🧶 Beautiful ✨ Detailed 💝 Adorable

Zebra Hand Puppet Amigurumi Pattern

Zebra Hand Puppet Amigurumi Pattern
4.4★ Rating
4-5 Hours Time Needed
2.7K Made This
✂️

Intermediate Level

Ideal for those with basic knitting experience, featuring slightly more advanced stitches and techniques to expand your skills.

⏱️

Weekend Treat

Takes 5-7 hours, making it an enjoyable project to finish over a couple of days.

🧸

Cute Companion

An adorable friend to cherish, handcrafted with love to bring comfort and joy for years to come.

About This Zebra Hand Puppet Amigurumi Pattern

This zebra hand puppet pattern is designed to spark imagination and create magical moments during playtime. Crafted with super bulky plush yarn, the puppet feels incredibly soft and huggable while being durable enough for active play. The pattern includes detailed instructions for creating distinctive zebra stripes, expressive indented eyes, and a charming fluffy mane that adds wonderful texture and personality to your finished piece.

Zebra Hand Puppet Amigurumi Pattern crochet pattern - detailed view of completed project

The hand puppet design allows for easy manipulation during storytelling sessions, making it perfect for parents, teachers, or anyone who loves bringing stories to life. With arms attached to the body, this zebra can wave, gesture, and interact in countless imaginative ways.

Why You'll Love This Zebra Hand Puppet Amigurumi Pattern

I absolutely love this zebra hand puppet pattern because it combines functionality with adorable design! The puppet structure makes it perfect for interactive play, and watching children's faces light up during puppet shows brings me so much joy. I'm particularly fond of how the plush yarn creates such a soft, touchable texture that kids can't resist cuddling. The indented eye technique gives the zebra such an expressive, lifelike appearance, and the loop stitch mane adds delightful dimension. What really makes this pattern special is its versatility—it's engaging enough for storytelling yet cuddly enough to be a bedtime companion. Plus, the satisfaction of seeing those black and white stripes come together is incredibly rewarding!

Zebra Hand Puppet Amigurumi Pattern step 1 - construction progress Zebra Hand Puppet Amigurumi Pattern step 2 - assembly progress Zebra Hand Puppet Amigurumi Pattern step 3 - details and accessories Zebra Hand Puppet Amigurumi Pattern step 4 - final assembly and finishing

Switch Things Up

I love experimenting with color variations on this zebra puppet! Instead of classic black and white, try creating a rainbow zebra using bright pink, purple, and blue stripes for a magical twist that kids absolutely adore. You could also make a brown and cream version for a more realistic safari look.

For a festive holiday puppet, I've added a tiny red scarf or bow tie around the neck, and even crocheted a small Santa hat that fits perfectly between the ears. The mane is another great place to get creative—try using variegated yarn for a multi-colored effect, or make it extra fluffy by adding more rounds of loop stitches.

If you're making this for a baby, consider using safety eyes that are securely attached or embroider the eyes instead for extra safety. I also sometimes add a rattle insert inside the head (sealed in a small fabric pouch) to make it an interactive toy for infants.

For theatrical performances or classroom use, I've created an entire set of safari animal puppets following this same basic pattern structure but adapting the features—lions with golden manes, giraffes with longer necks, and elephants with trunk attachments. The possibilities are truly endless, and each variation brings new joy to puppet show time!

Common Mistakes & How to Fix Them

✗ Forgetting to insert safety eyes before closing the head completely—always place eyes between rounds 10-11 before stuffing and finishing ✗ Not indenting the eyes properly which results in a flat appearance instead of the characteristic sunken zebra eye look ✗ Skipping stitch markers when changing colors for stripes, leading to uneven or misaligned black and white sections throughout the body ✗ Overstuffing the head and body which makes the puppet difficult to manipulate—keep filling light for better hand movement flexibility ✗ Sewing ears too far apart or at incorrect angles, creating an unbalanced appearance instead of the proper zebra ear placement

Zebra Hand Puppet Amigurumi Pattern

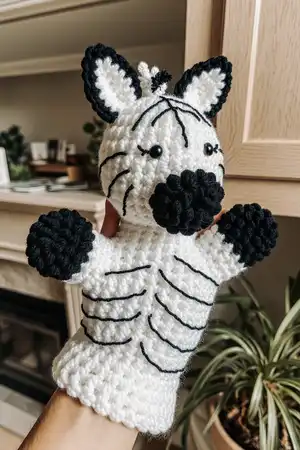
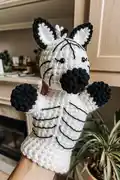
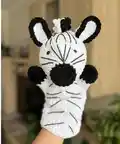
Create an enchanting zebra hand puppet that brings storytelling to life! This delightful 28cm (11") plush companion combines soft Himalaya Dolphin Baby yarn with charming black and white stripes. Perfect for puppet shows, imaginative play, or as a cuddly friend, this pattern features an easy-to-follow design with detailed instructions for creating expressive eyes, adorable ears, and a fluffy mane. Whether you're crafting for children or collectors, this zebra puppet will steal hearts with its sweet personality and huggable charm.

Intermediate 4-5 Hours

Materials Needed for Zebra Hand Puppet Amigurumi Pattern

— Main Fabric

  • 01
    Super bulky plush yarn - Himalaya Dolphin Baby (120m - 100g) in white color for head and body
  • 02
    Super bulky plush yarn - Himalaya Dolphin Baby in black color for nose, head and body
  • 03
    Sport cotton yarn - Yarn Art Jeans (160m - 50g) in black for embroidery

— Tools Required

  • 01
    4.5mm crochet hook
  • 02
    Plastic safety eyes (2 pieces, 7mm diameter)
  • 03
    Fiber filler for stuffing
  • 04
    Large needle for sewing
  • 05
    Knitting markers
  • 06
    Scissors

Progress Tracker

0% Complete

— HEAD :

Info :

Use the black yarn

Round 1 :

6 sc in MR (6)

Round 2 :

inc * 6 (12)

Round 3 :

(1 sc, inc) * 6 (18)

Round 4 :

18 sc

Info :

Change the yarn to white

Round 5 :

(2 sc, inc) * 6 (24)

Round 6 :

6 sc, inc, 4 sc, inc, 4 sc, inc, 7 sc (27)

Round 7 :

7 sc, inc, 5 sc, inc, 5 sc, inc, 7 sc (30)

Round 8 :

8 sc, inc, 6 sc, inc, 6 sc, inc, 7 sc (33)

Round 9 :

9 sc, inc, 7 sc, inc, 7 sc, inc, 7 sc (36)

Round 10 :

10 sc, inc, 8 sc, inc, 8 sc, inc, 7 sc (39)

Round 11 :

11 sc, inc, (4 sc, inc) * 4 times, 7 sc (44)

Round 12-17 :

44 sc (6 rounds)

Round 18 :

dec, (4 sc, dec) * 7 times (36)

Round 19 :

(4 sc, dec) * 6 (30)

Round 20 :

(3 sc, dec) * 6 (24)

Infos :

Insert safe plastic eyes. Fix eyes between rounds 10 and 11 from MR on the nose. The distance between the eyes is 13 sc. Stuff the piece with fiber filler

Round 21 :

(2 sc, dec) * 6 (18)

Round 22 :

(1 sc, dec) * 6 (12)

Round 23 :

dec * 6 (6)

Info :

Draw the yarn through 6 front loops and tighten. Cut and secure the yarn

— EYE INDENTING :

Info :

Use the black cotton yarn. Take the thread and pull it through the back of the head and pull it out above the right eye, leaving the tail on back head's part

Step 1 :

Pass the needle from below under the left eye and pull out under the right eye, making sure that the yarn falls from the inside of the left eye

Step 2 :

Pass the needle from above the right eye, making sure that the thread lies on the inside of the eye, and pull out the needle in the same place behind the head

Step 3 :

Tighten both threads so that the eyes are sunken. Tie a knot and hide the tail inside the head

— EARS :

Info :

Use the white yarn. Make 2 ears

Round 1 :

6 sc in MR

Round 2 :

(2 inc, 1 sc) * 2 times (10)

Round 3 :

3 inc, 2 sc, 3 inc, 2 sc (16)

Round 4 :

1 sc, 4 inc, 4 sc, 4 inc, 3 sc (24)

Round 5 :

2 sc, sl st

Info :

Cut the white yarn. Skip 4 st, attach the black yarn, make 19 sc around ear, sl st. Cut the yarn

Attachment :

Sew ears between rounds 4-5 from the eyes. Distance 11 st. Sew the back of both ears closer to each other. Cut and secure all yarn tails

— FACE EMBROIDERY :

Info :

Use the black cotton yarn and a large needle. Embroider lines on the face as shown on pictures. Cut and secure the yarn

— MANE :

Info :

Use the white plush yarn

Setup :

Make 20 ch. Starting in the second loop from the hook, continue crocheting with loop stitches

Round 1 :

19 loop st

Info :

Leave the tail for sewing. Cut it. Attach the black yarn to the first st in round 1

Round 2 :

19 loop st

Info :

Cut the yarn. The mane is ready. Sew the mane to the head

— ARMS :

Info :

Use the black plush yarn. Crochet hook 4.5mm. Make 2 pieces. Don't stuff

Round 1 :

6 sc in MR (6)

Round 2 :

inc * 6 (12)

Round 3 :

(2 sc, inc) * 4 (16)

Round 4-5 :

16 sc (2 rounds)

Info :

Change the yarn to white

Round 6 :

(2 sc, dec) * 4 (12)

Round 7-9 :

12 sc (3 rounds)

Info :

Make sl st, cut the yarn

— BODY :

Info :

Use the white plush yarn. Crochet hook 4.5mm. Leave the tail for sewing, begin crochet without sl st

Setup :

Make 24 ch, sl st in the first loop. Make a circle

Round 1 :

24 sc

Round 2 :

(3 sc, inc) * 6 (30)

Round 3 :

(4 sc, inc) * 6 (36)

Round 4 :

(5 sc, inc) * 6 (42)

Round 5 :

Crochet together with arm - 7 sc, 13 sc only on the body, 7 sc together with another arm, 15 sc only on the body (42)

Info :

Crochet sc2tog on both sleeves sides to avoid holes

Round 6 :

sc2tog, crochet only on the arm - 4 sc, sc2tog, 12 sc only on the body, sc2tog, 4 sc only on the another arm, sc2tog, 14 sc only on the body (38)

Round 7 :

dec, 2 sc, dec, 12 sc, dec, 2 sc, dec, 14 sc (34)

Round 8 :

34 sc, ch

Round 9-14 :

34 dc (6 rounds)

Info :

Make 1 sc, 1 sl st, cut and secure the yarn

— BODY EMBROIDERY :

Info :

Use the black yarn and a large needle. Embroider lines on the body or don't embroider if you want

Assembly Instructions

  • Sew the completed mane securely to the top of the head, positioning it from between the ears down the back of the head
  • Attach the ears between rounds 4-5 from the eyes with 11 stitches distance between them, sewing the back of both ears closer to each other for proper positioning
  • Sew the body to the head using the tail left for sewing, ensuring the head is securely attached and properly aligned with the body opening
  • Embroider zebra stripes on the face using black cotton yarn following the pattern pictures as a guide for stripe placement
  • Add optional zebra stripe embroidery lines on the body using black yarn and a large needle if desired for extra detail

Important Notes

  • 💡Insert safety eyes between rounds 10 and 11 before stuffing the head completely—the distance between eyes should be 13 single crochet stitches
  • 💡Use the eye indenting technique with black cotton yarn to create the characteristic sunken zebra eyes for a more realistic and expressive appearance
  • 💡Keep the body and arms lightly stuffed or unstuffed to maintain flexibility for hand puppet manipulation during play
  • 💡Use stitch markers when changing between black and white yarn colors to maintain even stripe patterns throughout the project
  • 💡Pin ears and mane in place before final sewing to ensure proper positioning and symmetrical appearance on both sides

This charming zebra hand puppet pattern brings the magic of safari animals to your fingertips! Designed with plush yarn for maximum cuddliness and featuring classic black and white stripes, this puppet is perfect for storytelling adventures, educational play, or simply as a huggable companion. The pattern includes helpful video links for tricky techniques like eye indenting and loop stitches, making it accessible even for intermediate crocheters. Watch as this adorable zebra comes to life stitch by stitch! 🦓✨

You ask,

we answer.

FAQs

Can I use regular yarn instead of plush yarn for this zebra hand puppet?

Yes, you can substitute with sport weight cotton yarn like Yarn Art Jeans throughout the entire pattern. The puppet will be smaller and less plush, but it will still work well as a hand puppet. Adjust your hook size accordingly and expect a more compact final size.

How do I create the loop stitch for the mane if I've never done it before?

The pattern includes a helpful video link for loop stitch technique. Essentially, you insert your hook, wrap yarn around your finger to create a loop, then pull through and complete as a single crochet. Practice on a small swatch first before working on the actual mane.

Is the eye indenting technique necessary or can I skip it?

While not absolutely necessary, the eye indenting technique gives your zebra a much more professional and expressive appearance with properly sunken eyes. The pattern includes detailed instructions and video links to guide you through this technique step-by-step.

Can I make this puppet larger or smaller than the 28cm size?

Yes! Simply use thicker or thinner yarn with an appropriately sized hook. For a larger puppet, try using super bulky yarn with a 6mm hook. For smaller, use DK weight yarn with a 3.5mm hook. Just remember that eye size should also be adjusted proportionally.

Should I stuff the arms and body of the hand puppet?

The pattern specifically states not to stuff the arms, and the body should be kept relatively light on stuffing to maintain flexibility for hand manipulation. Only the head should be firmly stuffed to maintain its shape and support the features.