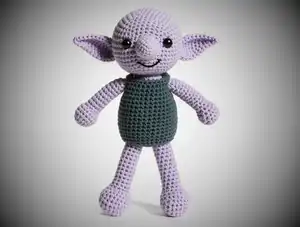
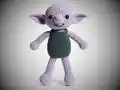
Bring the beloved house elf from the magical world to life with this detailed crochet pattern! Create your very own Dobby complete with his iconic large ears, expressive safety eyes, and removable sack clothing. This intermediate-level pattern guides you through crafting each body part separately before assembly, resulting in a poseable and huggable friend that captures Dobby's endearing character. Perfect for fans of the wizarding world and amigurumi enthusiasts alike, this pattern includes instructions for both the original sack outfit and suggestions for alternative clothing options. Whether you're making this as a cherished gift or adding to your own collection, this detailed pattern ensures your Dobby will be ready for magical adventures.
Progress Tracker
0% Complete
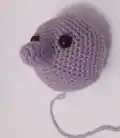
— Head :
Info :
Work in continuous spiral round using tan merino wool with 3.5mm hook. Use stitch marker to mark first stitch of each row
Row 1 :
Make a magic circle of 6 stitches (6)
Row 2 :
Make 2sc in each stitch (12)
Row 3 to 6 :
Make 1sc in each stitch (12)
Row 7 :
Make 1sc in the first stitch, and 2sc in the next. Repeat for the round (1sc, 2sc) (18)
Row 8 :
Make 1sc in the first two stitches, then 2sc in the next. Repeat for the round (1sc x 2, 2sc) (24)
Row 9 :
(1sc x 3, 2sc) repeat for the round (30)
Row 10 :
(1sc x 4, 2sc) repeat for the round (36)
Row 11 :
(1sc x 5, 2sc) repeat for the round (42)
Row 12 :
(1sc x 6, 2sc) repeat for the round (48)
Row 13 :
(1sc x 7, 2sc) repeat for the round (54)
Row 14 :
(1sc x 8, 2sc) repeat for the round (60)
Row 15 :
(1sc x 9, 2sc) repeat for the round (66)
Row 16 to 18 :
1sc in each stitch (66)
Row 19 :
Make 1sc in the first nine stitches, then sc2tog. Repeat for the round (1sc x 9, sc2tog) (60)
Row 20 :
(1sc x 8, sc2tog) repeat for the round (54)
Row 21 :
(1sc x 7, sc2tog) repeat for the round (48)
Row 22 :
(1sc x 6, sc2tog) repeat for the round (42)
Info :
Pull the last stitch out to form a large loop to help keep your place. Attach safety eyes now by pushing through crochet head in a screw fashion. Test placement with yarn first if unsure
Row 23 :
(1sc x 5, sc2tog) repeat for the round (36)
Row 24 :
(1sc x 4, sc2tog) repeat for the round (30)
Row 25 :
(1sc x 3, sc2tog) repeat for the round (24)
Row 26 :
(1sc x 2, sc2tog) repeat for the round (18)
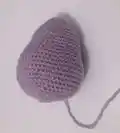
Info :
Pull the last stitch out to form a large loop to help keep your place. Stuff the head now, starting with the long nose using the butt of your crochet hook to push stuffing down. Pad it well, leaving just a little space for last couple of rows
Row 27 :
(1sc x 1, sc2tog) repeat for the round (12)
Info :
Add final stuffing if required to give the toy the right shaped head
Row 28 :
sc2tog until closed (6)
Info :
Slip stitch to join and leave a long tail for sewing the sections together later. Set head aside
— Body :
Info :
Work in continuous spiral round using tan merino wool with 3.5mm hook. Use stitch markers to keep count
Row 1 :
Make a magic circle of 6 stitches (6)
Row 2 :
Make 2sc in each stitch (12)
Row 3 :
Make 1sc in the first stitch, and 2sc in the next. Repeat for the round (1sc, 2sc) (18)
Row 4 to 5 :
Make 1sc in each stitch (18)
Row 6 :
Make 1sc in the first two stitches, then 2sc in the next. Repeat for the round (1sc x 2, 2sc) (24)
Row 7 :
(1sc x 3, 2sc) repeat for the round (30)
Row 8 :
(1sc x 4, 2sc) repeat for the round (36)
Row 9 to 14 :
Make 1sc in each stitch (36)
Row 15 :
(1sc x 5, 2sc) repeat for the round (42)
Row 16 :
(1sc x 6, 2sc) repeat for the round (48)
Row 17 :
(1sc x 7, 2sc) repeat for the round (54)
Row 18 to 23 :
Make 1sc in each stitch (54)
Row 24 :
Make 1sc in the first seven stitches, then sc2tog. Repeat for the round (1sc x 7, sc2tog) (48)
Row 25 :
(1sc x 6, sc2tog) repeat for the round (42)
Row 26 :
(1sc x 5, sc2tog) repeat for the round (36)
Row 27 :
(1sc x 4, sc2tog) repeat for the round (30)
Row 28 :
(1sc x 3, sc2tog) repeat for the round (24)
Row 29 :
(1sc x 2, sc2tog) repeat for the round (18)
Info :
Stuff the body now. Fill with toy stuffing but don't overfill. It should have a certain amount of squidge when you hold it rather than being completely rigid
Row 30 :
(1sc x 1, sc2tog) repeat for the round (12)
Row 31 :
sc2tog until closed (6)
Info :
Slip stitch to join and leave a long tail for sewing the sections together later. Set body aside
— Arms (Make 2) :
Info :
Use tan merino wool and 3.5mm hook. Work in increasing spiral
Row 1 :
Make a magic circle of 6 single crochet stitches (6)
Row 2 :
Put 2sc in each stitch until the end of the row (12)
Row 3 :
Make 1sc in the first stitch, and 2sc in the next. Repeat for the round (1sc, 2sc) (18)
Row 4 to 5 :
Put 1sc in each stitch (18)
Row 6 :
(1sc x 1, sc2tog) repeat for the round (12)
Row 7 to 29 :
Put 1sc in each stitch. Remember to mark the first stitch of row 7 to keep count of the rows
Info :
Slip stitch to join and leave a long tail for sewing it on later. Fill the arm with toy stuffing using the end of your hook to push it down to the hand pad. Leave top of the arm empty for later attaching to the body, approximately the width of your thumb
— Legs (Make 2) :
Info :
Make two legs with bigger feet sections than arms and slightly longer. Use tan merino wool and 3.5mm hook
Row 1 :
Make a magic circle of 6 single crochet stitches (6)
Row 2 :
Put 2sc in each stitch until the end of the row (12)
Row 3 :
Make 1sc in the first stitch, and 2sc in the next. Repeat for the round (1sc, 2sc) (18)
Row 4 :
Make 1sc in the first two stitches, then 2sc in the next. Repeat for the round (1sc x 2, 2sc) (24)
Row 5 to 7 :
Put 1sc in each stitch (24)
Row 8 :
(1sc x 2, sc2tog) repeat for the round (18)
Row 9 :
(1sc x 1, sc2tog) repeat for the round (12)
Row 10 to 31 :
Put 1sc in each stitch. Remember to mark the first stitch of row 7 to keep count of the rows
Info :
Slip stitch to join and leave a long tail of yarn. Fill legs with stuffing leaving just a small space at the top for later sewing in
— Ears (Make 2) :
Info :
Make two cones which will be pushed flat to form elven ears. Use tan merino wool and 3.5mm hook
Row 1 :
Make a magic circle of 4 stitches (4)
Row 2 :
Make 2sc in each stitch (8)
Row 3 :
Make 1sc in each stitch (8)
Row 4 :
(1sc, 2sc) repeat for the round (12)
Row 5 :
Make 1sc in each stitch (12)
Row 6 :
(1sc x 2, 2sc) repeat for the round (16)
Row 7 to 9 :
Make 1sc in each stitch (16)
Row 10 :
(1sc x 3, 2sc) repeat for the round (20)
Row 11 to 19 :
Make 1sc in each stitch (20)
Info :
Fold the ear in half along the length of the cone, and without stuffing sew the open bottom edge together using your yarn needle. Leave a long tail for attaching it to the head later
— Clothes - Main Body :
Info :
Use slate grey DK yarn. This will look like a rectangle with two small rectangles cut out for arm holes
Row 1 :
Make a chain of 14 stitches, plus 2 to form the first sc. Put 1sc in each chain from the 3rd loop
Row 2 :
Chain 2 to form the first sc. Put 1sc into each remaining stitch of the row
Row 6 :
Chain 2 to form the first sc. Sc once in the next 10 stitches. Chain 2
Row 7 to 9 :
Ch2 to form the first sc. Then sc once into each of the next 10 stitches
Row 10 :
Ch2 to form the first sc. Sc once into each subsequent stitch. Chain 6 at the end of the row
Row 11 :
Sc into the 3rd stitch from the hook, then sc once into each stitch to the end of the row. Ch2 at row's end
Row 12 to 17 :
Repeat row 11
Row 18 :
From the 3rd stitch from the hook, sc once in the first 10 stitches. Chain 2
Row 19 to 21 :
From 3rd stitch from the hook, sc once into each of the 10 stitches. Ch 2 at the row's end
Row 22 :
From 3rd stitch from the hook, sc once into each stitch. Chain 6 at the end of the row
Row 23 :
Sc into the 3rd stitch from the hook, then sc once into each stitch to the end of the row. Ch2 at row's end
Row 24 to 27 :
Repeat row 23
Info :
Decide which face of the garment you want displayed. Thread yarn needle with a long tail and single crochet the opposite sides of the rectangle together. Pull the sleeve over Dobby's body
— Clothes - Shoulder Straps :
Info :
Make straps on the toy to ensure correct size regardless of stitch size variations
Strap :
Make a chain of 8 stitches, put a single crochet into the 3rd stitch from the hook. Single crochet in each remaining stitch to the row's end. Leave a long tail at each end
Info :
Sew the straps on to each shoulder corner of the main body clothing piece, fixing them at a point which is snuggly fitted but allows the clothes to be removed if you want
This enchanting Dobby the House Elf pattern captures the heart and soul of one of the most beloved characters in literary history. Every stitch honors his journey from enslaved house elf to free and loyal friend, creating a huggable reminder of bravery, loyalty, and the power of freedom. The pattern's attention to detail—from his oversized ears to his removable sack clothing—ensures your finished Dobby will be recognizable and cherished by fans of all ages. Whether displayed on a shelf or hugged close, this little elf carries magic in every carefully crafted stitch. 🧦✨ Dobby is free, and so is your creativity! Happy crocheting! 🧶💚