🧶 Beautiful ✨ Detailed 💝 Adorable

Squirtle Amigurumi Pattern

Squirtle Amigurumi Pattern
4.0★ Rating
3-4 Hours Time Needed
2.4K Made This
✂️

Beginner Friendly Level

Perfect for those just starting their sewing journey, with clear instructions and simple techniques

⏱️

Bite-Sized Project

Complete in under 2 hours—quick, fun, and perfect for a little creative escape.

🧸

Cute Companion

An adorable friend to cherish, handcrafted with love to bring comfort and joy for years to come.

About This Squirtle Amigurumi Pattern

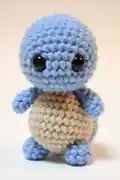
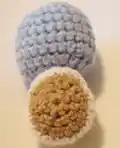
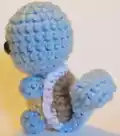
This delightful Squirtle pattern captures everything we love about the classic Water-type starter Pokémon. The pattern breaks down each component into manageable sections, starting with the distinctive blue head featuring those iconic safety eyes, then moving through the beige belly body, the brown and white shell, and finishing with the adorable curled tail. Each piece is crafted separately and assembled to create a sturdy, huggable friend that stands proudly on its own.

Squirtle Amigurumi Pattern crochet pattern - detailed view of completed project

The finished Squirtle measures approximately 4-5 inches tall, making it the perfect size for display, play, or gifting to Pokémon fans of all ages. The combination of blue and beige yarn creates that classic Squirtle look that's instantly recognizable.

Why You'll Love This Squirtle Amigurumi Pattern

I absolutely love this pattern because it transforms simple crochet techniques into something truly magical for Pokémon fans. There's something incredibly satisfying about watching Squirtle come to life stitch by stitch, especially when you attach those safety eyes and suddenly see his personality shine through. The tail curl is such a clever detail that adds authenticity, and the shell attachment gives the project a professional, dimensional finish. What I appreciate most is how achievable this pattern is for beginners while still creating an impressive result that looks store-bought. It's the perfect gateway project for anyone wanting to explore amigurumi or expand their Pokémon collection, and the joy on someone's face when they receive this handmade treasure makes every stitch worthwhile.

Squirtle Amigurumi Pattern step 1 - construction progress Squirtle Amigurumi Pattern step 2 - assembly progress Squirtle Amigurumi Pattern step 3 - details and accessories Squirtle Amigurumi Pattern step 4 - final assembly and finishing

Switch Things Up

I love experimenting with this Squirtle pattern to create unique variations that showcase different personalities and styles! One of my favorite modifications is making a shiny Squirtle by swapping the blue yarn for a soft teal or turquoise shade, which gives it that special variant look that collectors adore. You could also try making the shell removable by adding small snaps or velcro, turning it into an interactive toy that kids would love.

For a more personalized touch, I sometimes embroider tiny details on the belly using darker beige thread to create subtle shading, or add small felt shapes to create accessories like sunglasses or a tiny bandana. If you're feeling adventurous, try making the whole Squirtle Squad by creating multiple versions in slightly different sizes—a whole family of Squirtles looks absolutely adorable displayed together!

Another fun variation is adding wire to the arms and legs to make them poseable, though be sure to cover the wire ends carefully with extra stuffing for safety. You could even experiment with different eye sizes or add embroidered closed eyes for a sleepy version. The possibilities are endless, and each modification makes your Squirtle truly one-of-a-kind while still maintaining that classic, lovable charm!

Common Mistakes & How to Fix Them

✗ Forgetting to stuff the head firmly before closing can result in a floppy, misshapen appearance that won't hold its structure properly ✗ Placing safety eyes too far apart or at the wrong height ruins the characteristic Squirtle expression and overall facial proportions ✗ Not switching yarns correctly between the head and body sections can leave visible gaps or create color bleeding between sections ✗ Failing to create a proper tail curl by folding and sewing row one correctly results in a straight tail instead of the signature curved look ✗ Overstuffing the body before closing makes it difficult to complete the decreases and creates an overly round, unbalanced figure

Squirtle Amigurumi Pattern

Bring the beloved Water-type Pokémon to life with this charming Squirtle crochet pattern! Perfect for Pokémon fans and amigurumi enthusiasts alike, this pattern guides you through creating an adorable blue turtle complete with its signature shell, tail curl, and sweet expression. Whether you're making it for yourself, gifting it to a fellow trainer, or building your Pokémon collection, this pattern includes detailed instructions for every component. With its compact size and delightful design, your finished Squirtle will become a treasured companion that captures the playful spirit of this iconic starter Pokémon.

Beginner Friendly 3-4 Hours

Materials Needed for Squirtle Amigurumi Pattern

— Main Fabric

  • 01
    Worsted weight yarn in blue color
  • 02
    Worsted weight yarn in beige color
  • 03
    Worsted weight yarn in white color
  • 04
    Worsted weight yarn in light brown color

— Tools Required

  • 01
    3.5mm crochet hook
  • 02
    Scissors
  • 03
    Tapestry needle
  • 04
    1 pair 10mm safety eyes
  • 05
    Polyfil stuffing or another soft stuffing material

Progress Tracker

0% Complete

— Head :

Using blue yarn

Row 1 :

CH 2, SC 8 in first stitch (8 stitches) - Alternatively, SC 8 into a magic circle

Row 2 :

INC x 8 (16 stitches)

Row 3 :

*SC, INC* x 8 (24 stitches)

Row 4-6 :

SC x 24 (24 stitches)

Row 7 :

*SC x 7*, INC, *SC x 8*, INC, *SC x 7* (26 stitches)

Info :

Place eyes 5 stitches apart, and 6 stitches down from the top of the head, between the two increases

Row 8 :

SC x 26 (26 stitches)

Row 9 :

*SC x 2*, *DEC x 11*, *SC x 2* (15 stitches)

Info :

Stuff the head as much as possible

Row 10 :

SC, *DEC x 6*, *SC x 2* (9 stitches)

Info :

Finish stuffing the head

— Body :

Info :

Cut the blue yarn, leaving a tail, but don't fasten off, and switch to the beige yarn. Stuff any extra yarn into the head

Row 1 :

INC x 9 (18 stitches)

Row 2-6 :

SC x 18 (18 stitches)

Row 7 to close :

DEC to close, FO

Info :

Stuff the body before you complete the DEC

— Shell :

Using light brown yarn

Row 1 :

CH 2, SC 7 in first stitch (7 stitches) - Alternatively, SC 7 into a magic circle

Row 2 :

INC x 7 (14 stitches)

Row 3 :

*SC x 3, INC x 4* x 2 (22 stitches)

Switch to white yarn

Row 4 :

SC x 22 (22 stitches)

Finishing :

FO with SlSt. Sew shell onto body as pictured

— Arms :

Using blue yarn

Row 1 :

CH 2, SC 6 into first stitch (6 stitches) - Alternatively, make a magic circle and SC 6 into it

Row 2 :

SC x 6 (6 stitches)

Finishing :

FO with SlSt. Sew on arms using the tapestry needle (use picture for guidance)

— Legs :

Using blue yarn

Row 1 :

CH 2, SC 7 into first stitch (7 stitches) - Alternatively, make a magic circle and SC 7 into it

Row 2 :

SC x 7 (7 stitches)

Finishing :

FO with SlSt. Sew on legs using the tapestry needle (use picture for guidance)

— Tail :

Using blue yarn

Row 1 :

CH 2, SC 10 in first stitch (10 stitches) - Alternatively, SC 10 into a magic circle

Row 2 :

*SC x 2*, INC, *SC x 4*, INC, *SC x 2* (12 stitches)

Row 3-7 :

SC x 12 (12 stitches)

Row 8 :

*SC x 2*, DEC, *SC x 4*, DEC, *SC x 2* (10 stitches)

Row 9 :

SC x 10 (10 stitches)

Row 10 :

*SC x 4*, DEC, *SC x 4* (9 stitches)

Row 11 :

SC x 9, FO with a SlSt

Finishing :

Using the same shade of blue yarn, fold over the top (row 1) and sew to fasten, creating the curl. Sew the tail to the base of the shell. Weave in any remaining loose ends, and trim off

Assembly Instructions

  • The head and body are worked as one continuous piece, with the body starting immediately after completing the head by switching to beige yarn
  • Attach the shell to the back of the body, positioning it centered on the beige belly section as shown in the pattern photos
  • Sew the arms onto the sides of the body using the tapestry needle, referring to the pattern images for proper placement and spacing
  • Attach the legs to the bottom of the body, ensuring they are positioned evenly so Squirtle can stand upright on its own
  • Create the tail curl by folding over row 1 of the tail and sewing it in place, then attach the curled tail to the base of the shell
  • Weave in all remaining loose yarn ends throughout the piece and trim off any excess for a clean, professional finish

Important Notes

  • 💡Make sure to place the safety eyes at the correct position (5 stitches apart, 6 stitches down from top) before closing the head completely
  • 💡Stuff the head firmly before completing the final decrease rounds to maintain the proper rounded shape and prevent sagging
  • 💡Keep a small amount of stuffing ready for the body section, but don't overstuff as the beige belly should be slightly less full than the head
  • 💡When switching from blue to beige yarn between head and body, leave a tail for weaving in later to ensure a clean color transition
  • 💡The shell should be sewn flat against the body rather than stuffed, creating the characteristic flat-backed appearance of Squirtle's shell
  • 💡Use the pattern photos as a guide for assembly and positioning of all pieces to achieve the authentic Squirtle look

This charming Squirtle pattern brings the iconic Water-type Pokémon starter to life in adorable miniature form! With its signature blue coloring, beige belly, brown shell with white trim, and that perfectly curled tail, this pattern captures all the personality that makes Squirtle such a beloved character. The step-by-step instructions guide you through creating each component separately before assembling them into one cohesive, huggable friend. Whether you're a Pokémon enthusiast, an amigurumi collector, or simply love creating cute handmade treasures, this Squirtle will bring joy to your crafting experience and beyond. 🧶💙✨

You ask,

we answer.

FAQs

What size will my finished Squirtle be?

Using worsted weight yarn and a 3.5mm hook, your finished Squirtle will measure approximately 4-5 inches tall, making it the perfect size for display or as a handheld plush toy.

Can I use different yarn weights for this pattern?

Yes, you can use different yarn weights, but remember to adjust your hook size accordingly. Using thicker yarn will create a larger Squirtle, while thinner yarn will make a smaller version. Just ensure your hook size matches your yarn weight for proper tension.

Do I need to know how to do a magic circle?

The pattern offers alternatives! Each piece that starts with a magic circle also includes the option to chain 2 and work into the first stitch instead, so you can use whichever method you're more comfortable with.

What if I can't find the exact colors mentioned?

Feel free to substitute with similar colors! The key is having a medium blue, a light beige or cream, white, and a light brown. As long as you maintain good contrast between the colors, your Squirtle will look great.

How do I create the tail curl properly?

After completing all the tail rows, fold over the top edge (row 1) and use your tapestry needle to sew it in place, creating the curved shape. The pattern includes detailed instructions for this step to ensure you get that signature Squirtle tail curl.

When should I insert the safety eyes?

Insert the safety eyes between rows 7 and 8 of the head, placing them 5 stitches apart and 6 stitches down from the top, positioned between the two increases. Make sure to secure them before you stuff and close the head.