🧢 Beautiful ✨ Detailed πŸ’ Adorable

Ribbed Slip Stitch Socks Knitting Pattern

Ribbed Slip Stitch Socks Knitting Pattern
4.0β˜… Rating
8-10 Hours Time Needed
3.6K Made This
βœ‚οΈ

Intermediate Level

Ideal for those with basic knitting experience, featuring slightly more advanced stitches and techniques to expand your skills.

⏱️

All-Day Adventure

Requires 8-10 hours, ideal for a full day of immersive knitting.

🧣

Snug Essential

Everyday comfort with practical charm, designed for both functionality and style through changing seasons.

About This Ribbed Slip Stitch Socks Knitting Pattern

Ribbed Slip Stitch Socks Knitting Pattern crochet pattern - detailed view of completed project

With five comprehensive sizes and detailed instructions for every step, you'll create perfectly fitted socks that showcase beautiful texture and color. The slip stitch pattern creates a fabric that's both dense and stretchy, perfect for everyday wear.

Why You'll Love This Ribbed Slip Stitch Socks Knitting Pattern

I'm absolutely in love with how this slip stitch technique creates such dramatic visual impact with so little effort! The best part is that you're only working with one color per round, so there's no tangling or complicated color management to worry about. I find the rhythm of the slip stitches incredibly meditative - it's like knitting regular ribbing but with these gorgeous color pops appearing magically. The 3x2 rib is one of my favorite stitch patterns because it's so forgiving and stretchy, making these socks comfortable for all-day wear. I also appreciate how the pattern includes a bonus colorful variation if you want to get even more creative with your color combinations. The heel flap construction is my go-to for sock durability, and I love that this pattern walks you through every step with clear instructions. These socks work up relatively quickly for how impressive they look, and they make absolutely incredible gifts because they appear far more complicated than they actually are!

Ribbed Slip Stitch Socks Knitting Pattern step 1 - construction progress Ribbed Slip Stitch Socks Knitting Pattern step 2 - assembly progress Ribbed Slip Stitch Socks Knitting Pattern step 3 - details and accessories Ribbed Slip Stitch Socks Knitting Pattern step 4 - final assembly and finishing

Switch Things Up

I love experimenting with different color combinations to give these socks completely different personalities! Instead of using three colors, I've tried working them with just two - using the main color for both MC and CC2 creates a simpler stripe pattern that's still gorgeous. For a bolder look, I've used high-contrast colors like black and neon brights, which really makes the slip stitch texture pop dramatically.

The bonus colorful stripe variation on page 6 is one of my favorite ways to switch things up - you can create rainbow striped socks by changing all three colors as you go! I keep track of my color changes with a simple chart so I can make matching socks. Another fun variation is working the cuff and toe in a neutral color but going wild with bright stripes on the leg and foot.

For a more subtle look, I sometimes choose three shades of the same color family - like light, medium, and dark grey - which creates an ombrΓ© effect that's sophisticated and wearable with everything. I've also tried self-striping yarn for the CC1 while keeping MC and CC2 solid, which adds an element of surprise to the pattern. The slip stitch technique works beautifully with variegated yarns too, though I recommend keeping at least one color solid so the pattern doesn't get too busy.

If you want to make these socks more durable, consider working the heel and toe in a reinforced yarn or adding a thin strand of mohair held together with your fingering weight yarn in high-wear areas. I've also experimented with different cuff lengths - a longer 3-inch cuff creates a nice fold-over effect, while a shorter 1-inch cuff is perfect for wearing with sneakers!

Common Mistakes & How to Fix Them

βœ— Forgetting to carry yarn strands along the inside instead of cutting them, creating unnecessary ends to weave in later βœ— Not maintaining consistent tension during slip stitches, which can cause the fabric to pucker or become too loose and baggy βœ— Ending the leg section on a slip stitch round before starting the heel, making color transitions awkward and visible βœ— Miscounting stitches when adjusting for the heel flap setup, especially in kid and large sizes with M1 increases

Ribbed Slip Stitch Socks Knitting Pattern

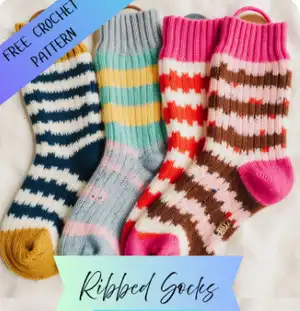
Knit these stunning ribbed socks featuring a beautiful slip stitch stripe pattern that creates incredible texture without complicated colorwork! This pattern includes five sizes from kids to extra-large adults, making it perfect for the whole family. The 3x2 rib provides excellent stretch and comfort, while the slip stitch technique creates eye-catching stripes with minimal effort. You'll love how the colors blend together to create a sophisticated, modern look that's perfect for gift-giving or treating yourself to cozy handknit socks.

Intermediate 8-10 Hours

Materials Needed for Ribbed Slip Stitch Socks Knitting Pattern

β€” Main Fabric

  • 01
    Fingering weight yarn in three colors
  • 02
    Main Color (MC): 84-159 yards (76-145 meters) depending on size
  • 03
    Contrast Color 1 (CC1): 67-143 yards (61-131 meters) depending on size
  • 04
    Contrast Color 2 (CC2): 38-90 yards (35-82 meters) depending on size

β€” Tools Required

  • 01
    US Size 1 (2.25mm) knitting needles (DPNs, circular, or preferred method for small circumference)
  • 02
    Stitch markers
  • 03
    Measuring tape
  • 04
    Scissors or snips
  • 05
    Tapestry needle for grafting and weaving in ends

Progress Tracker

0% Complete

β€” Slip Stitch Stripe Pattern :

Info :

Do not cut CC1 and MC strands as you work stripes. Carry yarn along inside of sock.

Round 1 :

With MC, [Sl 1, k1, sl 1, p2] to end. Switch to CC1

Rounds 2-3 :

[Sl 1, k1, sl 1, p2] to end

Rounds 4-8 :

[K3, p2] to end

Round 9 :

[K1, sl 1, k1, p2] to end. Switch to MC

Rounds 10-11 :

[K1, sl 1, k1, p2] to end

Rounds 12-18 :

[K3, p2] to end

Info :

Repeat rounds 1-18 throughout pattern

β€” Cuff :

Setup :

With CC2, CO 50 (60, 65, 70, 80) sts and join for working in the round, being careful not to twist sts

Establish Pattern :

[K3, p2] to end

Continue :

Work 3x2 rib pattern until cuff measures 2 inches or desired length. Break CC2

β€” Leg :

Setup :

Join in MC and work 9 rounds of 3x2 rib, then begin Slip Stitch Stripe Pattern

Continue :

Work Slip Stitch Stripe Pattern until leg (including cuff) measures 6 inches or desired length

Info :

Do NOT end after working a slip stitch round. Best to end after working a k3, p2 round

β€” Heel Flap Setup :

Kid Size :

Work in pattern across first 25 sts. Break MC and CC1. Join CC2. K1, m1, [sl 1, k1] to end (51 sts)

Small Size :

Work in pattern across first 30 sts. Break MC and CC1. Join CC2. K2, [sl 1, k1] to end

Medium Size :

Work in pattern across first 33 sts. Break MC and CC1. Join CC2. K2, [sl 1, k1] to end

Large Size :

Work in pattern across first 35 sts. Break MC and CC1. Join CC2. K1, m1, [sl 1, k1] to end (71 sts)

XL Size :

Work in pattern across first 40 sts. Break MC and CC1. Join CC2. K2, [sl 1, k1] to end

Info :

You will now work heel flap back and forth across last 26 (30, 32, 36, 40) sts just worked

β€” Heel Flap :

Row 1 :

Turn work. Sl 1, p to end. Turn work

Row 2 :

[Sl 1, k1] to end. Turn work

Continue :

Repeat rows 1 and 2 until heel flap measures 1.5 (2, 2, 2.25, 2.5) inches. End after working row 2

β€” Heel Turn :

Row 1 :

Sl 1, p 13 (15, 16, 18, 20), p2tog, p1, turn

Row 2 :

Sl 1, k 3, ssk, k1, turn

Row 3 :

Sl 1, p 4, p2tog, p1, turn

Row 4 :

Sl 1, k 5, ssk, k1, turn

Continue Pattern :

Sl 1, k or p to one stitch before gap created by turning on previous row, ssk or p2tog, k1 or p1, turn. Continue until all heel stitches worked

Info :

For Kid and Small sizes: On second to last row work only p2tog before turning. On last row work only SSK at end. Break CC2

β€” Gusset :

Setup :

Join MC or CC1 (whichever color left off with prior to heel flap). With right side facing, pick up and k 12 (14, 16, 18, 20) sts along left side of heel flap

Continue :

Work 25 (30, 32, 35, 40) sts across front of sock in established Slip Stitch Stripe Pattern. Pm, pick up 12 (14, 16, 18, 20) sts on right side of heel flap

Complete Round :

K across heel sts, then k down first set of new sts picked up on left side to reach end of round

β€” Gusset Decreases :

Round 1 :

Work in established Slip Stitch Stripe Pattern across 25 (30, 32, 35, 40) sts, sl marker, k1, ssk, k around to 3 sts before end of round, k2tog, k1

Round 2 :

Work even with no decreases

Continue :

Repeat rounds 1 and 2 until 52 (60, 64, 72, 80) sts remain on needles

Info for Medium :

Slip Stitch Stripe Pattern worked across only first 32 sts. Pattern interrupted at end - you will end by purling 2, then knitting 2 (instead of 3). On slip stitch rounds end with sl 1, k1 or k1, sl1 instead of full repeat

β€” Foot :

Continue :

Work Slip Stitch Stripe Pattern across first 25 (30, 32, 35, 40) sts, and stockinette stitch across remaining 27 (30, 32, 37, 40) sts

Length :

Continue until foot reaches desired length before beginning toe decreases. Do NOT stop on a slip stitch round

Info :

Begin toe shaping when work reaches tip of pinky toe, or approximately 1.5 inches before end of desired foot length

β€” Toes :

Info :

Rearrange sts on needles so they are evenly divided for toe decreases. Break MC and CC1. Join CC2

Setup :

Work 1 round even in stockinette stitch

Round 1 :

K1, ssk, k 20 (24, 26, 30, 34) sts, k2tog, k1, pm, k1, ssk, k 20 (24, 26, 30, 34) sts, k2tog, k1

Round 2 :

K all stitches

Round 3 :

K1, ssk, k to 3 sts before next marker, k2tog, k1, sl m, k1, ssk, k around to 3 sts before end of round, k2tog, k1

Continue :

Repeat rounds 2 and 3 until 24 (28, 32, 36, 40) sts remain

Finish :

Graft toes closed using kitchener stitch. Weave in all ends and block socks

Assembly Instructions

  • After completing the toe decreases, use kitchener stitch to graft the remaining stitches together for an invisible seam at the toe.
  • Weave in all yarn ends securely using a tapestry needle, working them into stitches of the same color for best camouflage.
  • If you carried yarns up the inside during stripe work, make sure those floats are secure and not too tight.
  • Block your finished socks by soaking them in cool water with wool wash, then gently squeezing out excess water.
  • Lay socks flat or use sock blockers to shape them while drying, which will even out stitches and enhance the slip stitch pattern.
  • Check that all ends are secure after blocking, as wet yarn can sometimes loosen woven-in tails.

Important Notes

  • πŸ’‘Use stitch markers consistently to track beginning of round and gusset decrease points for accurate shaping
  • πŸ’‘The 3x2 rib pattern requires specific stitch counts, so cast on numbers may differ from standard sock patterns
  • πŸ’‘Always end leg section on a non-slip-stitch round before starting heel to ensure proper color transitions
  • πŸ’‘Carry yarn strands loosely along inside of sock during stripe work to maintain fabric elasticity and avoid puckering
  • πŸ’‘Gauge is crucial for proper fit - the pattern requires 38 sts over 4 inches in rib pattern when blocked
  • πŸ’‘Kid and Small sizes have special heel turn instructions due to odd stitch counts, so read carefully

These Ribbed Slip Stitch Socks are the perfect blend of comfort and style! The slip stitch technique creates stunning colorwork without the complexity of stranded knitting, making them accessible for intermediate knitters ready to level up their skills. With five sizes included and detailed instructions for every step from cuff to toe, you'll have everything you need to create beautiful, perfectly-fitted socks. Whether you're making them as gifts or treating yourself, these socks showcase your knitting prowess while remaining wonderfully wearable. Happy knitting! 🧢✨

You ask,

we answer.

FAQs

What does it mean to carry the yarn along the inside?

Instead of cutting your MC and CC1 yarns when switching colors, you simply carry the unused strand up the inside of your sock as you work. This eliminates countless ends to weave in later and makes the color changes quick and easy.

Can I use a different needle size or yarn weight?

While you can experiment, the pattern is designed for fingering weight yarn and US Size 1 needles to achieve the specified gauge. Different yarn weights will require different stitch counts and may not fit the sizing chart provided.

Why are the cast-on numbers different from typical sock patterns?

The 3x2 rib pattern (3 knit stitches, 2 purl stitches) requires stitch counts divisible by 5, which differs from standard sock patterns. Don't worry - the ribbing is very stretchy and forgiving, ensuring a great fit!

What if I've never done a slip stitch pattern before?

Slip stitch patterns are easier than they look! You simply slip designated stitches from left to right needle without working them. The pattern provides clear instructions for when to slip and when to knit, creating the beautiful textured stripes.

How do I know what size to make?

Measure the circumference of the ball of your foot (not your finished sock size). Match this measurement to the size chart: Kid (5-6"), S (7"), M (8"), L (9"), XL (10"). The ribbing will stretch to fit comfortably.

Can I make these socks in solid colors instead of stripes?

Absolutely! You can work the entire sock in one color if you prefer, though you'll miss out on the beautiful slip stitch texture that the color changes create. The pattern also includes a bonus colorful stripe variation on page 6.