🧢 Beautiful ✨ Detailed πŸ’ Adorable

Christmas Tree Cat Amigurumi Pattern

Christmas Tree Cat Amigurumi Pattern
4.7β˜… Rating
4-5 Hours Time Needed
1.7K Made This
βœ‚οΈ

Intermediate Level

Ideal for those with basic knitting experience, featuring slightly more advanced stitches and techniques to expand your skills.

⏱️

Weekend Treat

Takes 5-7 hours, making it an enjoyable project to finish over a couple of days.

πŸŽ„

Holiday Cheer

Festive fun for the season, bringing handmade magic to celebrations and creating new family traditions.

About This Christmas Tree Cat Amigurumi Pattern

This Christmas Tree Cat pattern is a wonderful blend of cuteness and holiday spirit. The design features a white cat with pink inner ears, dressed up in an elaborate green Christmas tree costume that wraps around its body. The tree costume includes multiple decorative layers with white trim details that create a realistic tiered effect. The finishing touch is a matching tree-shaped hat topped with a cheerful pompom, making this piece truly special for the festive season.

Christmas Tree Cat Amigurumi Pattern crochet pattern - detailed view of completed project

The pattern uses front loop only and back loop only techniques to create dimensional decorative layers on both the body and hat. These techniques give the Christmas tree its characteristic tiered appearance while allowing you to practice more advanced crochet skills.

Why You'll Love This Christmas Tree Cat Amigurumi Pattern

I absolutely love how this pattern transforms a simple cat amigurumi into a festive masterpiece! The layered tree effect is so satisfying to create, and watching each decorative tier come together feels magical. I'm particularly fond of how the white trim contrasts against the green yarn, creating that classic Christmas tree look. The cute cat face peeking out from under the tree hat never fails to make me smile, and I love that you can add your own personality through the embroidered features. This pattern is perfect for building confidence with FLO and BLO techniques while creating something truly special for the holidays.

Christmas Tree Cat Amigurumi Pattern step 1 - construction progress Christmas Tree Cat Amigurumi Pattern step 2 - assembly progress Christmas Tree Cat Amigurumi Pattern step 3 - details and accessories Christmas Tree Cat Amigurumi Pattern step 4 - final assembly and finishing

Switch Things Up

I love experimenting with this pattern to create unique variations! One of my favorite modifications is changing the tree color to a snowy white with silver tinsel yarn worked into the decorative layers for a winter wonderland effect. You could also make the cat in orange tabby colors and add tiny felt ornaments to the tree layers using fabric glue.

For a more modern look, I've tried using gradient yarn for the tree portion, which creates a beautiful ombre effect from dark green at the bottom to light mint at the top. Another fun idea is embroidering tiny star shapes or snowflakes onto the green body sections using metallic thread before adding the white trim.

If you want to make it more playful, consider adding small jingle bells to the decorative layers or creating a tiny star for the top instead of a pompom. I've also experimented with making the inner ears sparkly by using a yarn with metallic threads. For gift-giving, you could personalize it by embroidering the recipient's name on the back of the body in small letters.

Common Mistakes & How to Fix Them

βœ— Forgetting to work in front loop only or back loop only when specified can eliminate the decorative layered effect entirely βœ— Not leaving long enough yarn tails for sewing makes assembly difficult and can result in weak connections between parts βœ— Skipping the wire in the tail means it won't hold its shape and position as designed in the pattern βœ— Stuffing the body before completing all the decorative outer layers makes it nearly impossible to crochet the trim properly

Christmas Tree Cat Amigurumi Pattern

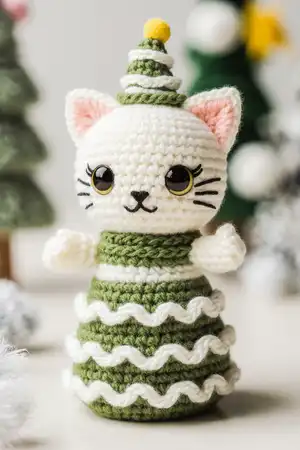
Create an adorable festive feline wearing a charming Christmas tree hat! This delightful pattern combines a sweet white cat with a beautifully detailed green tree costume, complete with layered decorations and a pompom topper. Perfect for holiday dΓ©cor or as a heartwarming handmade gift, this Christmas Tree Cat brings seasonal cheer to any space. The pattern features detailed instructions for crafting the cat's expressive face, cozy body, and decorative tree layers that capture the magic of the holidays.

Intermediate 4-5 Hours

Materials Needed for Christmas Tree Cat Amigurumi Pattern

β€” Main Fabric

  • 01
    Sport weight (fine) yarn in white, green, and pink colors
  • 02
    Fiberfill stuffing for head, body, and appendages

β€” Tools Required

  • 01
    2.5mm (C) crochet hook
  • 02
    Safety eyes 12-15mm
  • 03
    Pompom 10mm
  • 04
    Stitch markers
  • 05
    Yarn needle for sewing
  • 06
    Scissors
  • 07
    Hot glue gun
  • 08
    Wire for tail support
  • 09
    Black yarn for embroidering facial features
  • 10
    Yellow yarn for embroidering eye bags

Progress Tracker

0% Complete

β€” EARS (MAKE 2):

Info:

Begin with White Yarn, change to pink yarn when indicated

Row 1:

6 SC in an MR (6)

Row 2:

(SC, INC) 3 times (9)

Row 3:

2 SC, INC, 2 SC, INC, 2 SC, INC (12)

Row 4:

3 SC, INC, 3 SC, INC, 3 SC, INC (15)

Row 5:

4 SC, INC, 4 SC, INC, 4 SC, INC (18)

Info:

Cut the yarn, leaving a long tail for sewing

β€” HEAD:

Info:

Begin with White Yarn

Row 1:

8 SC in an MR (8)

Row 2:

8 INC (16)

Row 3:

(SC, INC) 8 times (24)

Row 4:

(2 SC, INC) 8 times (32)

Row 5:

32 SC (32)

Row 6:

(7 SC, INC) 4 times (36)

Row 7:

(5 SC, INC) 6 times (42)

Row 8:

(6 SC, INC) 6 times (48)

Row 9-17:

48 SC (48)

Row 18:

(4 SC, DEC) 8 times (40)

Row 19:

(3 SC, DEC) 8 times (32)

Row 20:

(2 SC, DEC) 8 times (24)

Info:

Cut the yarn, leaving a long tail for sewing. Stuffing required.

β€” HAT:

Info:

Begin with Green yarn

Row 1:

6 SC in an MR (6)

Row 2:

(SC, INC) 3 times (9)

Row 3:

(2 SC, INC) 3 times (12)

Row 4:

(3 SC, INC) 3 times (15)

Row 5:

BLO, (4 SC, INC) 3 times (18)

Row 6:

(5 SC, INC) 3 times (21)

Row 7:

BLO, (6 SC, INC) 3 times (24)

Row 8:

(7 SC, INC) 3 times (27)

Info:

Cut the yarn, leaving a long tail for sewing

β€” Hat Decorative Layers:

Back to row 4, crochet FLO:

Begin with White yarn: (3 CH, Sk, Slst) 7 times, 3 Ch, Slst

Crochet FLO in row 6:

(3 CH, Sk, Slst) 10 times, 3 Ch, Slst

Crochet FLO in row 8:

(3 CH, Sk, Slst) 13 times, 3 Ch, Slst

β€” BODY:

Info:

Begin with Green yarn

Row 1:

8 SC in an MR (8)

Row 2:

8 INC (16)

Row 3:

(SC, INC) 8 times (24)

Row 4:

(2 SC, INC) 8 times (32)

Row 5:

(3 SC, INC) 8 times (40)

Row 6:

(4 SC, INC) 8 times (48)

Row 7:

BLO, 48 SC (48)

Row 8:

(10 SC, DEC) 4 times (44)

Row 9:

44 SC (44)

Row 10:

BLO, (9 SC, DEC) 4 times (40)

Row 11:

40 SC (40)

Row 12:

(8 SC, DEC) 4 times (36)

Row 13:

BLO, 36 SC (36)

Row 14:

(7 SC, DEC) 4 times (32)

Row 15:

32 SC (32)

Row 16:

BLO, (6 SC, DEC) 4 times (28)

Row 17:

28 SC (28)

Row 18:

(5 SC, DEC) 4 times (24)

Row 19:

BLO, 24 SC (24)

Info:

Cut the yarn, leaving a long tail for sewing

β€” Body Outer Decorative Layers:

Row 6 crochet FLO:

Row 1: 2 CH, 48 DC, Slst (green). Row 2: (3 Ch, Sk, Slst) 24 times (white)

Row 9 crochet FLO:

Row 1: 2 CH, 44 DC, Slst (green). Row 2: (3 Ch, Sk, Slst) 22 times (white)

Row 12 crochet FLO:

Row 1: 2 CH, 36 DC, Slst (green). Row 2: (3 Ch, Sk, Slst) 18 times (white)

Row 15 crochet FLO:

Row 1: 2 Ch, 32 DC, Slst (green). Row 2: (3 Ch, Sk, Slst) 16 times (white)

Row 18 crochet FLO:

Row 1: 2 Ch, 24 DC, Slst (green). Row 2: (3 Ch, Sk, Slst) 12 times (white)

Info:

Stuffing required

β€” HANDS (MAKE 2):

Info:

Begin with White yarn

Row 1:

6 SC in an MR (6)

Row 2:

(SC, INC) 3 times (9)

Row 3-8:

9 SC (15)

Info:

Cut the yarn, leaving a long tail for sewing

β€” LEGS (MAKE 2):

Info:

Begin with White yarn

Row 1:

6 SC in an MR (6)

Row 2:

6 INC (12)

Row 3:

(3 SC, INC) 3 times (15)

Row 4-5:

15 SC (15)

Info:

Cut the yarn, leaving a long tail for sewing

β€” TAIL:

Info:

Begin with White yarn

Row 1:

6 SC in an MR (6)

Row 2-15:

6 SC (6)

Info:

Cut the yarn, leaving a long tail for sewing. Use a long piece of wire, equal to the tail length, and thread it through.

Assembly Instructions

  • Sew BLO of hat between R3 and R4 of the head. Stuff the hat before sewing it closed.
  • Sew the ears onto the head from R4 to R10 of the head.
  • Attach the safety eyes between R9 and R10, with a distance of 9 stitches between them.
  • Use black yarn to embroider the nose, eyelid, and whiskers on the face.
  • Use yellow yarn to sew the eyebags under the eyes.
  • Sew the body to the head securely.
  • Sew the arms to the body between R19 and R20.
  • Sew the legs and tail to the bottom of the body.
  • Attach a yarn pompom to the top of the hat to complete the festive look.

Important Notes

  • πŸ’‘Pay close attention to BLO and FLO instructions as they create the decorative tree layers
  • πŸ’‘Complete all decorative outer layers on the body before stuffing to avoid difficulty
  • πŸ’‘Leave long yarn tails when cutting for easier assembly and stronger connections
  • πŸ’‘Insert wire into the tail before closing to maintain its shape and position
  • πŸ’‘Stuff the body and head firmly but not overly tight for best appearance
  • πŸ’‘Pin all pieces in place before final sewing to ensure proper positioning and symmetry

This charming Christmas Tree Cat pattern is designed to bring festive joy to your holiday season! The adorable white cat dressed in its elaborate green tree costume makes for a delightful decoration or heartfelt gift. With layered decorative details and a sweet pompom-topped hat, this project combines intermediate techniques with holiday magic. Perfect for spreading Christmas cheer through handmade crafting! πŸŽ„πŸ±

You ask,

we answer.

FAQs

What does FLO and BLO mean in this pattern?

FLO stands for Front Loop Only and BLO stands for Back Loop Only. These techniques create the decorative layered effect on the Christmas tree body and hat. When you crochet in only one loop instead of both, it leaves the other loop free, creating a ridge that adds dimension.

Can I make this cat in different colors?

Absolutely! While the pattern uses white for the cat and green for the tree, you can customize the colors to your preference. Consider using gray, orange, or brown yarn for the cat, and any festive color for the tree costume.

Why does the tail need wire inside?

The wire helps the tail maintain its shape and position. Without it, the crocheted tail may droop or not hold the curved position typical of cat tails. You can use floral wire or craft wire of the specified thickness.

Do I need to complete the decorative layers immediately?

Yes, it's important to crochet the decorative white trim layers before stuffing the body. The pattern specifically instructs you to go back to certain rows and work in the front loops only. Complete these before final assembly.

What size will the finished cat be?

Using sport weight yarn and a 2.5mm hook, the finished Christmas Tree Cat will be approximately 4-5 inches tall, making it a perfect size for tabletop display or ornament use.