🧢 Beautiful ✨ Detailed πŸ’ Adorable

Christmas Pudding Amigurumi Pattern

Christmas Pudding Amigurumi Pattern
4.2β˜… Rating
2-3 Hours Time Needed
3.8K Made This
βœ‚οΈ

Intermediate Level

Ideal for those with basic knitting experience, featuring slightly more advanced stitches and techniques to expand your skills.

⏱️

Bite-Sized Project

Complete in under 2 hoursβ€”quick, fun, and perfect for a little creative escape.

πŸŽ„

Holiday Cheer

Festive fun for the season, bringing handmade magic to celebrations and creating new family traditions.

About This Christmas Pudding Amigurumi Pattern

This Christmas Pudding amigurumi captures the essence of a traditional holiday dessert in the most adorable way possible. With its rounded, slightly squished shape and decorative white icing that drips down the sides, it looks good enough to eat! The pattern uses simple color changes and basic amigurumi techniques to create a pudding body, then adds charming details like holly leaves and berries on top. The sweet face with embroidered smile and safety eyes gives this festive treat tons of personality.

Christmas Pudding Amigurumi Pattern crochet pattern - detailed view of completed project

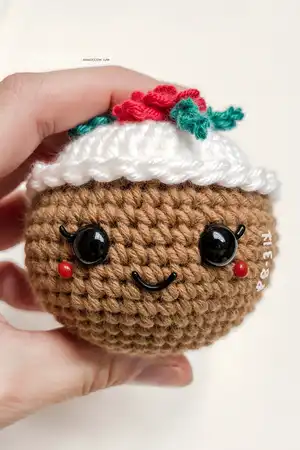
Perfect for holiday decorating or as a thoughtful handmade gift, this pudding works up quickly using worsted weight yarn. The pattern includes clear instructions for creating the textured icing effect and assembling all the festive details.

Why You'll Love This Christmas Pudding Amigurumi Pattern

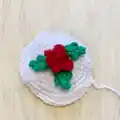
I absolutely love how this pattern combines holiday tradition with kawaii cuteness! The squished pudding shape is so satisfying to create, and watching the icing drizzle come together with those half double crochet variations feels like actual decorating. What really makes my heart happy is adding that little embroidered smile and seeing the personality shine through. It's quick enough to make several for gifts without feeling overwhelmed, yet detailed enough to feel special and handmade. Plus, arranging the holly leaves and berries on top is like the cherry on top of a perfect holiday project!

Christmas Pudding Amigurumi Pattern step 1 - construction progress Christmas Pudding Amigurumi Pattern step 2 - assembly progress Christmas Pudding Amigurumi Pattern step 3 - details and accessories Christmas Pudding Amigurumi Pattern step 4 - final assembly and finishing

Switch Things Up

I love experimenting with this pattern to create different looks! Sometimes I'll swap the brown body for a darker chocolate brown yarn to make it look like a rich dark chocolate pudding. You could even try making the icing in a pale yellow or cream color instead of white for a vanilla custard effect.

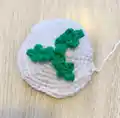
For a more rustic look, I've added tiny embroidered details on the icing to simulate sugar crystals or sprinkles. Another fun variation is making the berries in different shades of red, from deep burgundy to bright cherry, or even adding a few white berries for a snowy twist.

If you want to make it extra festive, consider adding a dusting of silver or gold metallic thread worked into the icing rounds for a sparkly finish. I've also experimented with making miniature versions using thinner yarn and a smaller hook for ornament-sized puddings that look adorable hanging on the tree. Some crafters have even added a small loop at the top to turn them into Christmas tree decorations or gift bag charms!

Common Mistakes & How to Fix Them

βœ— Forgetting to squish the body into a pancake shape after stuffing, which is essential for achieving the authentic pudding look βœ— Placing the icing too low on the body instead of around rounds twenty-one through twenty-nine where it naturally drapes βœ— Pulling the icing stitches too tight during the textured rounds, which flattens the drizzle effect instead of creating dimension βœ— Not securing the eyes and red brads with glue before final assembly, causing them to loosen or fall out over time

Christmas Pudding Amigurumi Pattern

Create this adorable Christmas Pudding amigurumi that measures about 12cm across! This festive holiday treat features a charming squished pudding shape with sweet icing drizzle, holly leaves, and bright red berries on top. Complete with an embroidered smile and cute eyes, this quick project is perfect for spreading Christmas cheer. Whether you're making gifts for loved ones or decorating your own space, this delightful pudding brings handmade warmth to your holiday season.

Intermediate 2-3 Hours

Materials Needed for Christmas Pudding Amigurumi Pattern

β€” Main Fabric

  • 01
    Paintbox Yarns One Ball in Paper White color
  • 02
    Paintbox Yarns One Ball in Grass Green color
  • 03
    Paintbox Yarns One Ball in Pillar Red color
  • 04
    Paintbox Yarns One Ball in Soft Fudge (brown) color

β€” Tools Required

  • 01
    Crochet hook size 3.25mm
  • 02
    Amigurumi safety eyes 9mm (2 count)
  • 03
    Red brads 5mm (2 count)
  • 04
    Tapestry needle
  • 05
    Glue
  • 06
    Polyester stuffing

Progress Tracker

0% Complete

β€” Body [Make one] :

Using Brown Yarn

R1 :

MR 6

R2 :

inc around [12]

R3 :

(sc, inc) x6 [18]

R4 :

(sc 2, inc) x6 [24]

R5 :

(sc 3, inc) x6 [30]

R6 :

(sc 4, inc) x6 [36]

R7 :

(sc 5, inc) x6 [42]

R8 :

(sc 6, inc) x6 [48]

R9 :

(sc 7, inc) x6 [52]

R10 :

(sc 8, inc) x6 [60]

R11-20 :

sc around [10 rounds]

Infos :

Embroider a smile on R13, add eyes between R14-15, 3-4 stitches above smile. Add red brads between R13-14 next to eyes. Secure with glue.

R21 :

(sc 8, dec) x6

R22 :

(sc 7, dec) x6 [52]

R23 :

(sc 6, dec) x6 [48]

R24 :

(sc 5, dec) x6 [42]

R25 :

(sc 4, dec) x6 [36]

Info :

Stuff semi firmly as you go

R26 :

(sc 3, dec) x6

R27 :

(sc 2, dec) x6

R28 :

(sc, dec) x6

R29 :

dec around

Info :

FO. Weave in all ends. Squish the body by pressing the top and bottom so it is more of a tall pancake shape.

β€” Leaves [Make three or more] :

Using Green Yarn :

ch 7, sl st in 2nd ch from hook through bb, (sl st through bb, ch 2, sl st in same bb), sl st in next 2 back bumps, ch 3, sl st in same bb, sl st in next bb, 3 sl st in next bb. working on other side of the ch: sl st in next 2 st, ch 3, sl st in current st, sl st in next, ch 2, sl st in same, sl st in last. FO leaving long tail for sewing.

β€” Berries [Make three or more] :

Using Red Yarn :

R1: MR 4. Clean FO and leave a long tail for sewing.

β€” Icing [Make one] :

Using White Yarn :

R1 :

MR 6 [6]

R2 :

inc around [12]

R3 :

(sc, inc) x6 [18]

R4 :

(sc 2, inc) x6 [24]

R5 :

(sc 3, inc) x6 [30]

R6 :

(sc 4, inc) x6 [36]

R7 :

(sc 5, inc) x6 [42]

R8-9 :

sc, hdc in next 2 st, sc in next 3st, hdc, sc, hdc, sc, hdc in next 2 st, sc in next 2 st, hdc in next 3 st, sc in next 4 st, hdc in next 5 st, sc in next 6 st, hdc in 8 st, sc in last 2 st. [2 rounds]

Info :

FO leaving long tail for sewing.

Assembly Instructions

  • Sew the leaves onto the top of the white icing piece, arranging three or more leaves to resemble holly.
  • Attach the berries on top of the leaves where they meet, using the long tails left from fastening off.
  • Place the completed icing piece with leaves and berries onto the top of the pudding body around rounds twenty-one through twenty-nine.
  • Use the long tail from the icing to sew it securely to the body, making sure it drapes naturally like melted icing.
  • Weave in all remaining yarn ends and trim excess yarn for a clean finish.

Important Notes

  • πŸ’‘Make sure to squish the body into a pancake shape after stuffing to achieve the authentic pudding silhouette
  • πŸ’‘Embroider the smile and attach eyes and brads before stuffing to ensure proper placement and easier access
  • πŸ’‘Use fabric glue to secure the safety eyes and red brads so they stay firmly in place during use
  • πŸ’‘Stuff the body semi-firmly, not too tight, so it maintains its squished shape without becoming too rigid
  • πŸ’‘The icing texture is created by alternating single crochet and half double crochet stitches in rounds eight and nine
  • πŸ’‘Feel free to make more than three leaves and berries for a fuller, more festive look on top

This charming Christmas Pudding pattern by Anniegurumi brings festive joy in the sweetest way possible! With its adorable squished shape, drizzled icing, and holly berry details, it's a delightful holiday project that works up quickly and makes wonderful gifts. The simple construction combined with creative decorative touches means you'll have a basket full of puddings ready for the season in no time. Perfect for decorating your home or gifting to friends and family who appreciate handmade treasures! πŸŽ„βœ¨

You ask,

we answer.

FAQs

What size will my finished Christmas Pudding be?

The finished Christmas Pudding measures approximately 12cm (about 4.7 inches) across when made with the recommended Paintbox Yarns and 3.25mm hook.

Can I use different yarn brands for this pattern?

Yes, you can use any worsted weight yarn in brown, white, green, and red colors. Just make sure all your yarns are the same weight for consistent results.

How do I create the drizzled icing effect?

The icing drizzle effect is created in rounds eight and nine by alternating between single crochet and half double crochet stitches in a specific pattern, which creates natural-looking bumps and dips.

What does it mean to squish the body into a pancake shape?

After stuffing and completing the body, gently press down on the top and bottom to flatten it slightly, creating a wider, shorter pudding shape that looks more realistic and less spherical.

How many leaves and berries should I make?

The pattern recommends making at least three leaves and three berries, but you can make more for a fuller, more decorative look on top of your pudding.

Can I make this pudding larger or smaller?

Yes, you can adjust the size by using a larger or smaller hook and thicker or thinner yarn. Just remember that your final measurements will change accordingly.