🧢 Beautiful ✨ Detailed πŸ’ Adorable

Christmas Bells Crochet Pattern

Christmas Bells Crochet Pattern
4.1β˜… Rating
4-5 Hours Time Needed
2.7K Made This
βœ‚οΈ

Intermediate Level

Ideal for those with basic knitting experience, featuring slightly more advanced stitches and techniques to expand your skills.

⏱️

Weekend Treat

Takes 5-7 hours, making it an enjoyable project to finish over a couple of days.

πŸŽ„

Holiday Cheer

Festive fun for the season, bringing handmade magic to celebrations and creating new family traditions.

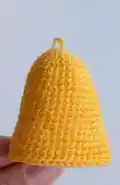
About This Christmas Bells Crochet Pattern

This delightful Christmas bells pattern creates a classic holiday decoration that features two golden bells tied together with decorative blue clappers inside, surrounded by four rich green leaves and three cheerful red berries. The pattern uses a special V and X stitch technique to create beautiful texture, and includes a crab stitch edging on the bells for an elegant finished look. Each component is worked separately and then assembled together with a sturdy hanging loop, making it perfect for displaying on your Christmas tree, doorway, or as part of your festive home decor.

Christmas Bells Crochet Pattern crochet pattern - detailed view of completed project

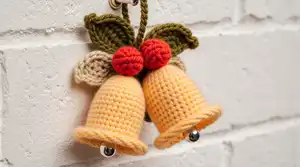
The finished decoration measures approximately 4.7 x 5.1 inches and uses DK weight yarn in festive yellow, dark green, and red colors. The pattern includes helpful tips like steaming the leaves for a professional finish and securely hiding all thread ends for a polished appearance.

Why You'll Love This Christmas Bells Crochet Pattern

I absolutely adore this Christmas bells pattern because it captures the essence of traditional holiday decorating while being surprisingly achievable for intermediate crocheters. There's something magical about watching those golden bells take shape and then adding the little clappers inside that actually create a subtle jingling sound! The crab stitch edging adds such a professional touch that makes the bells look store-bought, and I love how the leaves can be steamed to lay perfectly flat. What really makes this pattern special is the thoughtful assembly process that hides all your thread ends beautifully, so your finished piece looks flawless from every angle. The combination of those rich holiday colorsβ€”golden yellow, forest green, and berry redβ€”creates an ornament that feels both nostalgic and timeless. Every time I make these bells, I feel like I'm creating a little piece of Christmas magic that will bring joy for years to come, whether hanging on my own tree or gifted to someone special.

Christmas Bells Crochet Pattern step 1 - construction progress Christmas Bells Crochet Pattern step 2 - assembly progress Christmas Bells Crochet Pattern step 3 - details and accessories Christmas Bells Crochet Pattern step 4 - final assembly and finishing

Switch Things Up

I love experimenting with this Christmas bells pattern to create unique variations that match different holiday decorating styles! Instead of traditional yellow bells, try using metallic gold or silver yarn for an elegant, sophisticated look that catches the light beautifully. You could also make the bells in white or ivory for a winter wonderland theme, or even go bold with red bells and green leaves for a color-reversed version.

For a rustic farmhouse aesthetic, I sometimes use natural beige or cream yarn for the bells paired with sage green leaves and burgundy berries. Another fun variation is adding small ribbon bows where the bells tie together, or embroidering tiny snowflakes onto the bells using white thread for extra detail. You could even make a whole garland by creating multiple bell sets and connecting them with a long chain or braided cord.

If you want to personalize them as gifts, try adding tiny embroidered initials or the year on one of the leaves. For a magical touch, I've experimented with adding a light dusting of clear glitter or fabric stiffener mixed with fine glitter to make the bells sparkle. The possibilities are endless, and each variation creates a unique ornament that reflects your personal style while maintaining that classic Christmas charm!

Common Mistakes & How to Fix Them

βœ— Not crocheting tight enough allows stuffing to show through the bells, creating an unprofessional appearance with visible gaps between stitches
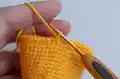
 βœ— Skipping the crab stitch edging on round twenty of the bells eliminates the decorative border that gives a polished finish βœ— Forgetting to insert tambourines inside the bells before completing them means missing the authentic jingling sound feature of the ornament βœ— Failing to steam the leaves with a damp cloth results in uneven, curled pieces that don't lay flat against the bells βœ— Not leaving long enough tails when finishing pieces makes assembly difficult and can result in parts coming loose over time

Christmas Bells Crochet Pattern

Ring in the holiday season with this enchanting Christmas bells crochet pattern that brings festive cheer to any space! Create a beautiful ornamental decoration featuring two golden bells adorned with lush green leaves and vibrant red berries, complete with interior clappers and a hanging loop. Perfect for trimming your tree, decorating your mantel, or giving as a heartfelt handmade gift, this pattern combines traditional holiday colors with charming details. Using DK weight yarn and simple techniques, you'll craft a stunning seasonal piece measuring approximately 4.7 x 5.1 inches that captures the spirit of Christmas and can be treasured year after year as part of your holiday decorating traditions.

Intermediate 4-5 Hours

Materials Needed for Christmas Bells Crochet Pattern

β€” Main Fabric

  • 01
    DK weight yarn - Yarn Art Jeans (55% cotton/45% acrylic; 50g/160m)
  • 02
    Yarn Art Jeans No. 35 (yellow) for bells
  • 03
    Yarn Art Jeans No. 82 (dark green) for leaves and loop
  • 04
    Yarn Art Jeans No. 90 (red) for berries
  • 05
    Blue yarn for bell clappers

β€” Tools Required

  • 01
    2.25mm crochet hook
  • 02
    Smaller crochet hook for threading bell clappers
  • 03
    Stuffing material (fiberfill/polyester)
  • 04
    Tapestry needle
  • 05
    Scissors
  • 06
    Stitch marker (or scrap of contrasting yarn)
  • 07
    2 tambourines (small bells)
  • 08
    Damp cloth for steaming leaves
  • 09
    Iron for steaming

Progress Tracker

0% Complete

β€” Bells (make 2) :

Yarn :

YarnArt Jeans No. 03 (yellow)

Rnd 1 :

6 into MR (6)

Rnd 2 :

6 inc (12)

Rnd 3 :

(1 sc, inc)*6 (18)

Rnd 4 :

(2 sc, inc)*6 (24)

Rnd 5 :

(3 sc, inc)*6 (30)

Rnds 6-7 :

30 sc (2 rounds)

Rnd 8 :

(4 sc, inc)*6 (36)

Rnds 9-14 :

36 sc (6 rounds)

Rnd 15 :

(5 sc, inc)*6 (42)

Rnds 16-19 :

42 sc (4 rounds)

Info :

Crochet the next row with Crab (Reverse) stitch

Rnd 20 :

42 sc (Crab stitch), 1 sl st

Finishing :

Break yarn. Pull tightly. Hide the tail inside

β€” Bell Clapper :

Instructions :

Chain 16 with blue yarn. Using a smaller hook, pull the thread into the eye of the bell to grab and pull the thread

Working :

Start working in the second chain from hook 15 sc. Break yarn

Info :

Attach the finished clapper to the bell. Tie all the threads. Tie both bells together

β€” Leaf (make 4) :

Yarn :

YarnArt Jeans No. 82 (dark green)

Rnd 1 :

Chain 15, crochet to the chain foundation. Start working in the second chain from hook - 13 sc, 3 sc in 1 stitch

Continue :

Continue crocheting on the other side of the chain foundation - 12 sc, 3 sc in 1 stitch

Rnd 2 :

(3 sc, chain 3, 1 sc in the previous stitch)*4, 3 sc, chain 3, 1 sc in the previous stitch, (3 sc, chain 3, 1 sc in the previous stitch)*4, 2 sc, 2 sl st

Finishing :

Break yarn, leaving a long tail for sewing

Info :

Iron the part with steam if it is uneven. To do this, put a damp cloth on top of a crochet garment and steam it off for a few seconds

β€” Berries (make 3) :

Yarn :

YarnArt Jeans No. 90 (red)

Rnd 1 :

6 into MR (6)

Rnd 2 :

6 inc (12)

Rnd 3-6 :

12 sc (4 rounds)

Info :

Complete stuffing with fiberfill

Finishing :

Tighten the hole using a tapestry needle

β€” Loop :

Yarn :

YarnArt Jeans No. 82 (dark green)

Rnd 1 :

Chain 41, turn and continue crocheting on the other side of the chain

Rnd 2 :

40 sc, 1 sl st, turn

Rnd 3 :

40 sc

Finishing :

Cut off the long end of the thread. Use a needle to connect the ends

Assembly Instructions

  • Sew four green leaves together at their base points to create a symmetrical cluster arrangement
  • Insert tambourines (small bells) into each crocheted bell before final assembly to create authentic jingling sound
  • Thread the blue bell clappers through the opening at the top of each yellow bell and secure firmly
  • Tie the two completed bells together at their tops using remaining yarn tails
  • Using a tapestry needle, pull all thread ends from the bells through to the back of the leaf cluster
  • Attach the tied bells to the front center of the four-leaf arrangement, securing all threads together at the back
  • Sew the three red berries onto the leaf cluster in a visually pleasing arrangement around the bells
  • Attach the hanging loop to the back of the leaves, using it to hide and secure all remaining protruding threads

Important Notes

  • πŸ’‘Crochet with tight tension throughout the project to prevent stuffing from showing through the stitches
  • πŸ’‘The pattern uses a special V and X stitch technique (grab yarn over hook for first stitch, under hook for second stitch)
  • πŸ’‘Steam the leaves with a damp cloth and iron if they appear uneven or don't lay flat
  • πŸ’‘Leave long tails when finishing each piece to make assembly easier and more secure
  • πŸ’‘Insert tambourines into bells before completing the assembly for authentic jingling sound
  • πŸ’‘Use the crab stitch (reverse single crochet) for round 20 of the bells to create the decorative edging

This charming Christmas bells pattern brings traditional holiday elegance to your seasonal decorating with its golden bells, festive foliage, and cheerful berries! The thoughtful construction includes special touches like interior tambourines for authentic jingling, crab stitch edging for a professional finish, and a clever assembly method that hides all your thread ends beautifully. Whether you're creating ornaments for your own tree or crafting heartfelt handmade gifts, these bells capture the warmth and magic of Christmas in every stitch. The finished piece becomes a treasured decoration you'll proudly display year after year, bringing joy and holiday spirit to your home. πŸŽ„πŸ””βœ¨

You ask,

we answer.

FAQs

What is the V and X stitch technique mentioned in the pattern?

The V and X stitch technique is a special way of working single crochet stitches where you alternate grabbing the yarn: first grab the yarn over the hook, then for the next stitch grab it under the hook. This creates a beautiful textured appearance that gives the bells extra visual interest and dimension.

What are tambourines and where do I find them?

Tambourines in this pattern refer to small jingle bells or bell charms that create the authentic ringing sound. You can find these at craft stores in the jewelry-making or ornament supplies section, usually sold as 'jingle bells' or 'bell charms.' You need 2 pieces, one for each bell.

How do I do the crab stitch mentioned in round 20?

Crab stitch, also called reverse single crochet, is worked by crocheting single crochet stitches in the opposite direction than normal (left to right if you're right-handed). It creates a decorative twisted rope-like edge that gives the bells a professional, finished appearance.

Can I make these bells larger or smaller?

Yes! To make larger bells, use a thicker yarn weight (worsted or bulky) with an appropriately sized hook. For smaller bells, use fingering or sport weight yarn with a smaller hook. Just remember that changing the size will also affect the amount of yarn needed and the overall proportions.

Why do I need to steam the leaves?

Steaming the leaves with a damp cloth and iron helps flatten them and gives them a more polished, professional appearance. The leaves can sometimes curl or appear uneven after crocheting, and the steam helps set them into the proper shape so they lay nicely against the bells.

How do I attach the bell clappers inside the bells?

Using a smaller crochet hook, thread the blue chain through the opening at the top of each bell (where you started the magic ring). Pull the clapper chain through so it hangs inside the bell with the tambourine attached, then secure it firmly at the top before tying the bells together.