🧢 Beautiful ✨ Detailed πŸ’ Adorable

Zebra Edu Amigurumi Pattern

Zebra Edu Amigurumi Pattern
4.6β˜… Rating
8-10 Hours Time Needed
3.8K Made This
βœ‚οΈ

Intermediate Level

Ideal for those with basic knitting experience, featuring slightly more advanced stitches and techniques to expand your skills.

⏱️

All-Day Adventure

Requires 8-10 hours, ideal for a full day of immersive knitting.

🐰

Whimsical Buddy

Playful characters full of personality, designed to spark imagination and become cherished playtime favorites.

About This Zebra Edu Amigurumi Pattern

Zebra Edu is an enchanting amigurumi pattern that showcases the beautiful contrast of black and white stripes, creating a stunning visual effect. Standing approximately 20cm tall, this charming zebra features a unique pink snout with carefully positioned nostrils, a playful curled mane, and distinctive shell details on the hooves for added realism. The pattern provides options for both boy and girl versions, allowing you to customize Edu with either a classic tie or a gorgeous dress complete with a matching bow tiara.

Zebra Edu Amigurumi Pattern crochet pattern - detailed view of completed project

This intermediate-level pattern guides you through advanced color-changing techniques to create perfect zebra stripes throughout the body, legs, and arms. The detailed facial features including optional eyelashes for the girl version and eyebrow embroidery bring incredible expression and character to your finished piece.

Why You'll Love This Zebra Edu Amigurumi Pattern

I'm absolutely in love with this Zebra Edu pattern because the dramatic black and white stripes create such a striking visual impact! What really excites me is how the color changes throughout the pattern create that authentic zebra look - it's challenging enough to keep things interesting but so rewarding when you see those perfect stripes forming. I particularly adore the curled mane detail; those little spirals add such playful character and charm! The shell technique for the hooves is genius and gives Edu that extra touch of realism that makes people do a double-take. Plus, having the option to make either version means I can create unique zebras for different occasions - the girl version with her sweet bow tiara is perfect for baby showers, while the boy version with his dapper tie makes a wonderful gift for anyone who loves safari animals!

Zebra Edu Amigurumi Pattern step 1 - construction progress Zebra Edu Amigurumi Pattern step 2 - assembly progress Zebra Edu Amigurumi Pattern step 3 - details and accessories Zebra Edu Amigurumi Pattern step 4 - final assembly and finishing

Switch Things Up

I absolutely love experimenting with Zebra Edu's color scheme! While the classic black and white is stunning, you could create a magical rainbow zebra using bright colors for the stripes - imagine hot pink and turquoise or purple and yellow! For a softer look, try cream and light gray for a more subtle, vintage-inspired zebra.

The accessories offer endless customization possibilities. Instead of the standard tie, you could crochet a tiny vest, bowtie, or even a little scarf. For the girl version, try making the dress in different colors - a soft lavender or bright coral would be absolutely gorgeous! You could add matching legwarmers or a little purse as extra accessories.

Size variations are easy to achieve by changing your yarn weight and hook size. Use sport weight yarn with a 3mm hook for a slightly larger zebra, perfect for toddler toys. Or go tiny with thread weight yarn and a 1mm hook for an adorable keychain version - just remember that smaller versions require more patience and precision!

The mane is another area where you can get creative. Try making it longer with more curls for a dramatic look, or shorter and spikier for a punk rock zebra! You could even use a different color for the mane - a bright blue or purple mane would look amazing against the black and white stripes.

For the snout, instead of pink, you could use a peachy color for a warmer tone, or even keep it black for a more traditional zebra appearance. The shell details on the hooves could be enhanced with metallic thread for a touch of sparkle.

Consider seasonal variations too - add a tiny crocheted flower crown for spring, a mini witch hat for Halloween, or a Santa hat and scarf for Christmas. The possibilities are truly endless!

Common Mistakes & How to Fix Them

βœ— Failing to maintain consistent tension when working with black and white color changes can result in visible gaps or puckering at the stripe transitions - practice smooth color changes to achieve clean lines βœ— Incorrectly positioning the pink nostrils without folding them properly can make the snout look flat instead of dimensional - fold and sew as directed taking dots from both sides for realistic shape βœ— Working the BLO (Back Loop Only) stitches on the hooves incorrectly will prevent the shell detail from forming properly - ensure you're only catching the back loop to create the ridge effect βœ— Not curling the mane pieces with your fingers after completing them results in loose, droopy curls that lack the playful bounce - take time to shape each curl for maximum cuteness and dimension

Zebra Edu Amigurumi Pattern

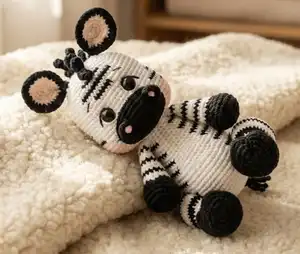
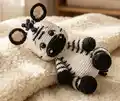
Craft your own adorable Zebra Edu with this charming black and white striped amigurumi pattern! This delightful design features bold zebra stripes created through careful color changes, expressive facial details with optional eyelashes for the girl version, and a distinctive pink snout with nostrils. Complete with a stylish mane of curls and the choice between a handsome tie or an elegant dress with matching bow tiara, Zebra Edu brings personality and charm to any handmade collection. The pattern includes detailed instructions for creating realistic zebra stripes, shell details for hooves, and professional finishing techniques that make this piece truly special.

Intermediate 8-10 Hours

Materials Needed for Zebra Edu Amigurumi Pattern

β€” Main Fabric

  • 01
    Traditional Amigurumi yarn in White (8001), Black (8990), Rose Satin (4094), and Craft (7148) colors
  • 02
    Soft Amigurumi yarn in Pink (3081) for snout details
  • 03
    ClΓ©a yarn in Black (8990) for detailed embroidery work
  • 04
    One skein of each color is sufficient for the complete project

β€” Tools Required

  • 01
    2.0mm crochet hook for making the animals
  • 02
    3.0mm crochet hook for making clothes
  • 03
    Black safety eyes 13mm or 15mm
  • 04
    Scissors
  • 05
    Stitch marker (optional)
  • 06
    Polyester fiberfill stuffing
  • 07
    Doll needle (12.5cm recommended)
  • 08
    Pins for positioning parts
  • 09
    Blush for adding rosy cheeks

Progress Tracker

0% Complete

β€” Head :

Round 1 :

Start with White: AM of 8 sc (8)

Round 2 :

Inc in each sc (16)

Round 3 :

[1 sc and 1 inc] 8x (24)

Round 4 :

[2 sc and 1 inc] 8x (32)

Round 5 :

[3 sc and 1 inc] 8x (40)

Round 6 :

sc over sc (40)

Round 7 :

[4 sc and 1 inc] 8x (48)

Round 8 :

21 sc, change to Black, 6 sc, change to White, 21 sc (48)

Round 9 :

[5 sc and 1 inc] 8x (56)

Round 10 :

[6 sc and 1 inc] 3x, 1 sc, change Black to White, 1 sc, 1 inc, [6 sc and 1 inc] 3x (64)

Round 11 :

sc over sc (64)

Round 12 :

28 sc, change to Black, 30 sc, 6 sc, change to White (64)

Round 13-17 :

sc over sc (64) - [5 rows]

Round 18 :

Change to Black, 19 sc, change to White, 5 sc, 1 inc, 5 sc, change to Black, 6 sc, change to White (64)

Round 19 :

Change to White: [3 sc and 1 inc] 16x (80)

Round 20 :

Change to Black, 27 sc, change to White, 25 sc, change to Black, 20 sc, 8 sc (80)

Round 21 :

Change to White: sc over sc (80)

Round 22 :

Change to Black, 23 sc, change to White, 25 sc, 24 sc, change to Black, 29 sc (80)

Round 23-27 :

Change to White: sc over sc - [5 rows] (80)

Round 28 :

[3 sc and 1 dec] 16x (64)

Round 29 :

[1 dec and 2 sc] 16x (48)

Round 30 :

[1 sc and 1 dec] 16x (32)

β€” Whites of the Eyes :

Step 1 :

Use double White Amigurumi yarn. Insert needle into open part of head, exit at corner of eye

Step 2 :

Insert needle at corner of lower eye part, exit into open part of head

Step 3 :

Exit with needle in corner of second eye

Step 4 :

Insert needle at corner of lower eye part, exit into open head part, pull threads and tie 2 knots

β€” Black Embroidery of Eyes :

Step 1 :

Use double Black ClΓ©a yarn. Insert needle into open head part, exit at eye corner

Step 2 :

Insert needle at corner of upper eye part, exit into open head part

Step 3 :

Exit with needle in corner of second eye

Step 4 :

Insert needle at corner of upper eye part, exit into open head, pull threads and tie 2 knots

β€” Eyelash (Girl Version Only) :

Step 1 :

Use Black ClΓ©a yarn (single strand). Insert needle into open head, exit in middle of eye details

Step 2 :

Insert needle with space of one stitch in row above middle of black embroidery

Step 3 :

Repeat process on other eye, join thread ends and tie two knots

β€” Eyebrows :

Step 1 :

Use Black ClΓ©a yarn. Insert needle into open head, leave on second row above eyes, skip 3 sc, insert needle in row above

Step 2 :

Repeat same process on other side of eyes. Join thread ends and tie knots

β€” Snout :

Round 1 :

Use Black: AM of 8 sc (8)

Round 2 :

Inc all around (16)

Round 3 :

4 sc, 4 inc, 4 sc, 4 inc (24)

Round 4 :

6 sc, 4 inc, 8 sc, 4 inc, 2 sc (32)

Round 5 :

8 sc, 4 inc, 12 sc, 4 inc, 4 sc (40)

Round 6 :

10 sc, 4 inc, 16 sc, 4 inc, 6 sc (48)

Info :

Close with sl st. Sew snout between rows 17-29 of head without stuffing, taking only front loops. Sink eyes after sewing

β€” Nostrils :

Round 1 :

Start with Pink: AM of 6 sc (6)

Round 2 :

Change to Black: Increase all around (12). Close with sl st

Info :

Sew nostrils between rows 4-5 of snout separated by 6 sc. Fold nostrils and take 1 dot on each side twice for folded, cute appearance

β€” Ears :

Info :

Make 2 equal parts with Pink and finish. Make 2 equal parts with Black but don't finish. Join parts together to form ear

Round 1 :

AM of 6 sc (6)

Round 2 :

Inc all around (12)

Round 3 :

[1 sc and 1 inc] 6x (18)

Round 4 :

[2 sc and 1 inc] 6x (24)

Round 5 :

Join Pink and Black parts wrong sides together: [3 sc and 1 inc] 6x (30)

Round 6 :

sc over sc (30). Close with sl st

Info :

Sew ears between rows 4-5 on head. Fold ears and take 1 dot on each side twice when sewing
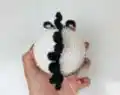
β€” Mane :

Step 1 :

Use Black thread. Attach to row 13 on back of head, centered

Step 2 :

Go up 10 ch, skip 1 ch and do [2 sc and 1 inc] 3x (12)

Step 3 :

Skip 2 rows in same direction, close with sl st in next. Repeat for 7 curls total

Info :

After finishing all curls, curl them with your fingers to maintain shape

β€” Body :

Round 1 :

Start with White: AM of 8 sc (8)

Round 2 :

Inc all around (16)

Round 3 :

[1 sc and 1 inc] 8x (24)

Round 4 :

[2 sc and 1 inc] 8x (32)

Round 5 :

[3 sc and 1 inc] 8x (40)

Round 6 :

[4 sc and 1 inc] 8x (48)

Round 7 :

[5 sc and 1 inc] 8x (56)

Round 8 :

[6 sc and 1 inc] 8x (64)

Round 9-10 :

sc over sc (64) - [2 rows]

Round 11 :

Change to Black, 16 sc, change to White, 24 sc, change to Black, 24 sc (64)

Round 12-13 :

Change to White: sc over sc (64) - [2 rows]

Round 14 :

Change to Black, 16 sc, change to White, 24 sc, change to Black, 24 sc (64)

Round 15-16 :

Change to White: sc over sc (64) - [2 rows]

Round 17 :

Change to Black, 16 sc, change to White, 24 sc, change to Black, 24 sc (64)

Round 18-19 :

sc over sc (64) - [2 rows]

Round 20 :

Change to Black to Black, 16 sc, change to White, 24 sc, change to Black, 24 sc (64)

Round 21 :

Change to White: 16 sc, 16 dec, 16 sc (48)

Round 22 :

sc over sc (48)

Round 23 :

Change to Black, 20 sc, change to White, 8 sc, change to Black, 20 sc (48)

Round 24-25 :

Change to White: sc over sc (48) - [2 rounds]

Round 26 :

Change to Black, [4 sc and 1 dec] 3x, 2 sc, change to White, 2 sc, 1 dec, 4 sc, change to Black, 1 dec, [4 sc and 1 dec] 3x (40)

Round 27-28 :

Change to White: sc over sc (40) - [2 rows]

Round 29 :

Change to Black, 17 sc, change to White, 7 sc, change to Black, 16 sc (40)

Round 30 :

Change to White: sc over sc (40)

Round 31 :

[3 sc and 1 dec] 8x (32)

Round 32-33 :

sc over sc (32) - [2 rows]. Close with sl st
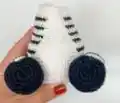
β€” Legs :

Round 1 :

Start with Black: AM of 6 sc (6)

Round 2 :

Inc all around (12)

Round 3 :

[1 sc and 1 inc] 6x (18)

Round 4 :

[2 sc and 1 inc] 6x (24)

Round 5 :

[3 sc and 1 inc] 6x (30)

Round 6 :

sc over sc in BLO (30)

Round 7-8 :

sc over sc (30) - [2 rows]

Round 9 :

6 sc, [1 dec and 1 sc] 6x, 6 sc (24)

Round 10 :

[2 sc and 1 dec] 6x (18)

Round 11 :

Change to White: sc over sc (18)

Round 12 :

6 sc, [1 inc] 6x, 6 sc (24)

Round 13 :

Change to Black: 6 sc, [1 sc and 1 inc] 6x, 6 sc (30)

Round 14 :

Change to White: [1 inc] 2x, 24 sc, [1 inc] 4x (36)

Round 15 :

sc over sc (36)

Round 16 :

Change to Black: sc over sc (36)

Round 17 :

Change to White: sc over sc (36)

Round 18 :

8 sc, [1 sc and 1 dec] 6x, 10 sc (30)

Round 19 :

Change to Black: sc over sc (30)

Round 20 :

Change to White: sc over sc (30)

Round 21 :

8 sc, [1 dec] 6x, 10 sc (24)

Round 22 :

Change to Black: [1 dec] 2x, 12 sc, [1 dec] 4x (18)

Info :

Add filling. Don't over-stuff thigh part to keep it flatter

Round 23 :

[1 sc and 1 dec] 6x (12)

Round 24 :

[1 dec] 6x (6). Close with inverted magic ring

Info :

Use Black thread to form zebra's hoof shell before attaching legs. Position legs slightly forward and attach to body

β€” Arms :

Round 1 :

Start with Black: AM of 6 sc (6)

Round 2 :

Inc all around (12)

Round 3 :

[1 sc and 1 inc] 6x (18)

Round 4 :

[2 sc and 1 inc] 6x (24)

Round 5 :

sc over sc in BLO (24)

Round 6-7 :

sc over sc (24) - [2 rows]

Round 8 :

3 sc, [1 dec and 1 sc] 6x, 3 sc (18)

Round 9-10 :

Change to White: sc over sc (18) - [2 rows]

Round 11 :

Change to Black: sc over sc (18)

Round 12-13 :

Change to White: sc over sc (18) - [2 rows]

Round 14 :

Change to Black: sc over sc (18)

Round 15-16 :

Change to White: sc over sc (18) - [2 rows]

Round 17 :

Change to Black: sc over sc (18)

Round 18 :

Change to White: sc over sc (18)

Info :

Only stuff lower part of arm

Round 19 :

[4 sc and 1 dec] 3x (15)

Round 20 :

[3 sc and 1 dec] 3x (12)

Round 21 :

Fold arm in half and close with 6 sc (6). Make 1 ch

Info :

Use Black thread to form arm shell. Sew arms on row 31 of body, leaving 7-8 sc space between them

β€” Tie (Boy Version) :

Row 1 :

Use Craft thread: Make 16 ch, skip first ch, from second make 1 sc for each ch (15)

Row 2-12 :

Turn work, make 1 ch, then sc over sc (15) - [11 rows]

Info :

Fold tie, wrap thread around middle 6 times, secure at back. Make cord with 51 ch, pass behind tie, place on animal

β€” Dress (Girl Version) :

Round 1 :

Use Satin with 3mm hook: Make 42 ch, close with sl st forming ring. Go up 3 ch, make 1 dc inc for each ch (84)

Round 2 :

Go up 3 ch and make 1 dc increase all around (168). Close with sl st

Round 3-4 :

Go up 3 ch and do dc over dc all around (168) - [2 rows]. Close with sl st in last row

Straps Round 1 :

Attach Satin thread to any strap. Go up 2 ch and make 11 more hdc (total 12 hdc)

Straps Round 2-3 :

Go up 2 ch, turn work, do hdc over hdc (12) - [2 rows]. Make 1 ch

Info :

Make cord with 25 ch, attach to strap, finish with 25 ch

β€” Bow (Girl Version) :

Row 1 :

Use Satin: Make 13 ch, from second ch make 1 sc for each ch (12)

Row 2-6 :

Go up 1 ch, turn work, do sc over sc (12) - [5 rows]

Row 7 :

Do 1 row of sc all around the loop including sides

Row 8 :

Make 1 sc and 1 picot (1 sc, 3 ch, 1 sc in sc), skip 1 sc, repeat sequence. Close with sl st

Info :

Fold bow in half, wrap thread 6 times in middle, tie knots at back. For tiara: use 3mm hook, make 60 ch, close forming ring. Go up 2 ch, make 1 hdc for each ch. Sew bow to tiara and place on zebra

Assembly Instructions

  • Sew the completed head to the body using the longer thread, ensuring proper centering and secure attachment
  • Create the shell details on hooves using black thread before attaching the legs to give them realistic zebra hoof appearance
  • Position and attach legs to the body slightly forward to prevent large gaps between them, following video tutorial for placement
  • Use black thread to form shell details on arms, then sew arms onto row 31 of body with 7-8 sc spacing between them
  • Attach ears between rows 4-5 on head, folding them and taking dots from both sides twice for dimensional effect
  • Sew pink and black nostrils between rows 4-5 of snout separated by 6 sc, folding for realistic appearance
  • For girl version: Place dress on zebra, attach bow to tiara, and position tiara on head between the ears

Important Notes

  • πŸ’‘Always use the exact yarn colors and weights specified to achieve the proper finished size of approximately 20cm
  • πŸ’‘Practice BLO (Back Loop Only) technique before starting as it's crucial for creating the shell effect on hooves
  • πŸ’‘Watch all auxiliary videos for shell creation, leg attachment, and arm sewing - these techniques are essential for professional results
  • πŸ’‘Curl the mane pieces with your fingers after completing them to maintain their shape and bounce
  • πŸ’‘For girl version, add eyelashes; for boy version, skip the eyelash step but still complete eyebrows
  • πŸ’‘Keep thigh portions of legs less stuffed to maintain proper sitting position and realistic proportions
  • πŸ’‘Pin all parts in place before sewing permanently to ensure correct positioning and symmetry

This stunning Zebra Edu pattern combines bold black and white stripes with charming details to create a truly special amigurumi friend! The pattern's careful color-changing technique creates authentic zebra stripes throughout, while the curled mane and pink snout add irresistible personality. With options for both boy and girl versions complete with adorable accessories, Edu is perfect for gifting or adding to your handmade collection. The shell technique for hooves adds that extra touch of realism that makes this pattern stand out! πŸ¦“πŸ§Άβœ¨

You ask,

we answer.

FAQs

What is the BLO technique and why is it important for this pattern?

BLO (Back Loop Only) means you only insert your hook through the back loop of the stitch instead of both loops. This technique is crucial for creating the shell detail on Zebra Edu's hooves. When you work BLO, it leaves the front loops free, creating a ridge effect that gives the hooves a realistic appearance. Practice this technique on a swatch before starting the actual legs and arms.

How do I keep the black and white stripes looking clean and professional?

The key to clean stripes is maintaining consistent tension and changing colors properly. Always change colors in the last yarn over of the previous stitch. Keep your unused color inside the work as you crochet, and avoid pulling too tightly at color changes as this can cause puckering. Practice your color transitions on a test swatch to perfect the technique before starting the main body.

What's the difference between making the boy and girl versions?

The main body, head, and limbs of Zebra Edu are identical for both versions. The differences are in the accessories and facial details: the girl version includes eyelashes, a fancy dress with straps, and a bow with tiara, while the boy version has a simple tie and no eyelashes. You can choose based on your preference or the recipient!

How do I create the curled mane properly?

After completing all 7 curls by working chains and single crochets, take each curl individually between your fingers and gently twist and shape it to encourage the spiral. This finger-curling step is essential - without it, the curls will hang limp and straight. The shaping helps them maintain their bouncy, playful appearance that gives Edu so much character.

Why do the nostrils need to be folded when attaching?

Folding the nostrils and taking dots from both sides (twice as instructed) creates a dimensional, realistic appearance instead of flat circles. This technique makes the nostrils look more natural and gives the snout depth and character. It's one of those small details that makes a big difference in the finished appearance!

What are the shell details on the hooves and how do I make them?

The shell details are decorative elements added to the bottom of the hooves using black thread after the legs and arms are completed. This technique involves working stitches into the front loops that were left free when you worked the BLO round. The pattern references a video tutorial that shows exactly how to create these shell details - watching this video is highly recommended as it's a visual technique that's easier to see than read.