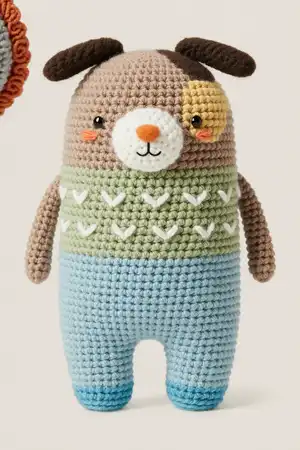
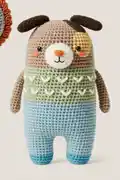
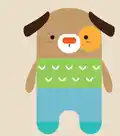
Create your own adorable mini dog companion with this detailed amigurumi crochet pattern! This charming pup features a rounded head, cute little ears, and stubby legs that make it perfect for cuddling or display. The pattern includes color-changing techniques to add personality and detail to your furry friend. Whether you're making it as a gift or adding to your own collection, this mini dog is sure to bring smiles. Complete with clothes pattern details and assembly instructions for a polished finish.
Progress Tracker
0% Complete
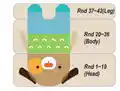
— Head / Body / Legs :
Round 1 :
6 sc in magic ring, tighten the loop (6 sts)
Round 2 :
(2-sc inc) x 6 (12)
Round 3 :
(sc x 1, 2-sc inc) x 6 (18)
Round 4 :
(sc x 2, 2-sc inc) x 6 (24)
Round 5 :
(sc x 3, 2-sc inc) x 6 (30)
Round 6 :
(sc x 4, 2-sc inc) x 6 (36)
Round 7 :
(sc x 5, 2-sc inc) x 6 (42)
Round 8 :
(sc x 6, 2-sc inc) x 6 (48)
Round 9-36 :
sc in all 48 st (48)
Info :
Change yarn colors according to symbol pattern: Rounds 1-19 use Soft Brown/Yellow yarn, Rounds 20-36 use Light Green/Sky Blue yarn, Rounds 37-42 use Sky Blue/Neon Blue yarn
— First Leg (Left Leg) :
Info :
To make legs, identify center space between legs by 6 stitches, and each leg identifies the other by 18 stitches. Use stitch markers to help. Sc at the 31st st of Round 36. This sc is the first st of the first leg.
Round 37-40 :
sc in all 18 st (18)
Round 41 :
(sc x 1, sc2tog) x 6 (12)
Round 42 :
(sc2tog) x 6 (6)
Info :
Fasten off, leaving a long tail. Stuff the leg. Using a yarn needle, weave the yarn tail through the front loop of each remaining st and pull tight to close.
— Second Leg (Right Leg) :
Info :
Rejoin the Sky blue yarn to 7th back unworked st of Round 36. This sc is the first st for the second leg. Continue working the second leg the same way as the first leg, from Round 37-42. Using a yarn needle, sew the 6 sts between the legs.
— Arms (Make 2) :
Round 1 :
5 sc in magic ring, tighten the loop (5 sts)
Round 2 :
(2-sc inc) x 5 (10)
Round 3-11 :
sc in all 10 st (10)
Info :
Fasten off, leaving a long tail for sewing. Flatten the arm, do not stuff.
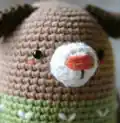
— Snout :
Info :
Use white yarn to make 4 chains
Round 1 :
sc x 1 in second ch from hook, sc x 1 in the next chain, sc x 3 in the bottom chain, working up the other side - sc x 1, sc x 2 in the next chain, slst (8 sts)
Round 2 :
ch 1, 2-sc inc, sc x 1, (2-sc inc) x 3, sc x 1, (2-sc inc) x 2, slst (14)
Round 3 :
ch 1, 2-sc inc, sc x 3, 2-sc inc, sc x 2, sc2tog, sc x 1, sc2tog, sc x 2, slst (14)
Round 4 :
ch 1, sc in all 14 st, slst (14)
Info :
Fasten off, leaving a long tail for sewing. Fill in some stuffing to the snout. Make a nose and mouth on the snout.
— Ears (Make 2) :
Round 1 :
5 sc in magic ring, tighten the loop (5 sts)
Round 2 :
(2-sc inc) x 5 (10)
Round 3 :
(sc x 1, 2-sc inc) x 5 (15)
Round 4 :
sc in all 15 st (15)
Round 5 :
sc x 6, sc2tog, sc x 5, sc2tog (13)
Round 6 :
sc x 6, sc2tog, sc x 5 (12)
Round 7 :
sc in all 12 st (12)
Round 8 :
(sc x 4, sc2tog) x 2 (10)
Round 9-10 :
sc in all 10 st (10)
Info :
Fasten off, leaving a long tail for sewing. Flatten the ear, do not stuff.
This delightful Mini Dog amigurumi pattern captures the sweet essence of a puppy companion in a perfectly portable size! With its charming color-blocked clothing details and adorable floppy ears, this little pup is designed to bring joy whether displayed on a shelf or tucked into a pocket. The pattern combines straightforward techniques with thoughtful details like the shaped snout and divided legs to create a character full of personality. Perfect for dog lovers of all ages! 🐶🧶 Happy crocheting! ✨