🧢 Beautiful ✨ Detailed πŸ’ Adorable

Amalfi Crochet Top Pattern

Amalfi Crochet Top Pattern
4.0β˜… Rating
25-35 Hours Time Needed
3.9K Made This
βœ‚οΈ

Advanced Level

Designed for experienced knitters, these patterns involve intricate designs and complex techniques to challenge and inspire.

⏱️

Slow & Steady

A 10-12 hour projectβ€”great for savoring the process over several sessions.

πŸ‘•

Casual Chic

Relaxed style with a modern twist, perfect for everyday wear while maintaining that handcrafted uniqueness.

About This Amalfi Crochet Top Pattern

The Amalfi Top is a stunning crochet garment that combines geometric beauty with practical wearability. Using a unique diagonal square construction method, this pattern creates a textured, eye-catching design that flatters all body types. The pattern includes detailed instructions for creating three types of squares that are assembled into a complete button-up top with sleeves and a collar.

Amalfi Crochet Top Pattern crochet pattern - detailed view of completed project

This pattern is sized for multiple body types and includes guidance on customizing length and fit. The modular square construction makes it easy to adjust sizing and create a perfectly fitted garment.

Why You'll Love This Amalfi Crochet Top Pattern

I absolutely love this pattern because it transforms simple crochet squares into a sophisticated, wearable piece of art! The diagonal square technique creates such beautiful texture and visual interest that you'll be proud to wear your finished top everywhere. I appreciate how the modular construction makes it easy to customize the fit and length to suit your personal style. The button-up design adds a classic touch while the geometric squares give it a modern edge. Working on this project is incredibly satisfying as you watch the squares come together into a complete garment, and the finished result is a unique top that nobody else will have!

Amalfi Crochet Top Pattern step 1 - construction progress Amalfi Crochet Top Pattern step 2 - assembly progress Amalfi Crochet Top Pattern step 3 - details and accessories Amalfi Crochet Top Pattern step 4 - final assembly and finishing

Switch Things Up

I love experimenting with this pattern to make each Amalfi Top uniquely mine! One of my favorite modifications is using multiple colors instead of the single-color version shown in the pattern. Try alternating two complementary colors for your squares to create a checkerboard effect, or use an ombre gradient by starting with darker squares at the bottom and gradually transitioning to lighter shades toward the collar.

For a more bohemian vibe, I sometimes add fringe along the bottom hem or the sleeve edges using leftover yarn. You can also play with the button choice - instead of standard buttons, I've used vintage wooden buttons or decorative toggles that completely transform the look of the finished top.

If you want to make this top more casual, consider shortening it by removing a row or two of squares from the base to create a cropped version that pairs perfectly with high-waisted jeans. Alternatively, add extra rows for a tunic-length top that looks great over leggings.

I've also experimented with the sleeve length by adding or removing loops of squares. A short-sleeve version is perfect for warmer weather, while extending the sleeves creates a cozy long-sleeve option for cooler days. You can even make it sleeveless by simply attaching the armhole edges with a row of single crochet for a summer tank top variation.

Another fun modification is adding pockets! Create two additional full squares and sew them onto the front panels at hip level for functional and stylish patch pockets. This small addition makes the top even more practical for everyday wear.

Common Mistakes & How to Fix Them

βœ— Not maintaining consistent tension when creating squares can result in uneven sizing and difficulty assembling the pieces together properly βœ— Skipping gauge measurement leads to squares that don't match the 8.5cm x 8.5cm dimension causing fit problems in final assembly βœ— Forgetting to turn work at the beginning of rounds for diagonal and half squares results in incorrect shape formation βœ— Not pinning sleeves to armholes before sewing causes uneven distribution and bunching around the shoulder area making wearing uncomfortable βœ— Rushing through square assembly without checking alignment creates gaps between pieces and weakens the overall structure of garment

Amalfi Crochet Top Pattern

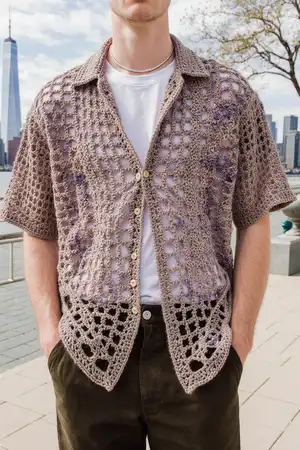
Create your own stylish Amalfi crochet top with this comprehensive pattern! This beautiful button-up design features elegant diagonal squares, a flattering fit, and custom sleeves. Perfect for crafters who want to make a wearable fashion statement, this pattern includes detailed instructions for six sizes and uses the diagonal square technique to create a unique texture. The finished top includes a collar, button closure, and comfortable sleeves that make it perfect for any occasion.

Advanced 25-35 Hours

Materials Needed for Amalfi Crochet Top Pattern

β€” Main Fabric

  • 01
    Alize Diva Stretch Yarn color 167, weight 2
  • 02
    Yarn amounts: 2750 yards (size S), 3250 yards (size M), 3750 yards (size L), 4250 yards (size XL), 4750 yards (size 2XL), 5250 yards (size 3XL)

β€” Tools Required

  • 01
    Crochet hook 3.75mm (F)
  • 02
    9mm buttons (7 pieces)
  • 03
    Stitch markers
  • 04
    Tapestry needle
  • 05
    Scissors
  • 06
    Pins for assembly
  • 07
    Optional measuring tape

Progress Tracker

0% Complete

β€” Diagonal Squares :

Info :

Make 5 for all sizes

Round 1 :

Ch 2. In the 2nd ch from hook, make: [dc 3, ch 2, dc 3]. (8)

Round 2 :

Ch 1 (does not count as st), turn, dc 3 times in the next st from hook. Ch 2, in the next ch-2 space from your hook, make: [dc 3, ch 2, dc 3]. Then, ch 2, and make 3 dc into the very last st. (18)

Round 3 :

Ch 1 (does not count as st), turn, dc 3 times in the next st from hook. Ch 2, in the next ch-2 space from your hook, dc 3 times. Then, ch 2. In the next ch-2 space from your hook, make: [dc 3, ch 2, dc 3]. Then, ch 2, and dc 3 times in the next ch-2 space from your hook. Ch 2, and dc 3 times into the very last st. (28)

Round 4 :

Ch 1 (does not count as st), turn, dc 3 times in the next st from hook. Ch 2, in the next ch-2 space from your hook, dc 3 times. Again, ch 2, and dc 3 times in the next ch-2 space from your hook. Then, ch 2, and in the next ch-2 space from your hook, make: [dc 3, ch 2, dc 3]. Then, ch 2, and make 3 dc into the next ch-2 space from hook. Again, ch 2 and make 3 dc into the next ch-2 space from hook. Finally, ch 2 and dc 3 times into the very last st. (38)

Round 5 :

Ch 1 (does not count as st), turn, dc 3 times in the next st from hook. Ch 2, in the next ch-2 space from your hook, dc 3 times. Again, ch 2, and dc 3 times in the next ch-2 space from your hook. Once more, ch 2 and dc 3 times in the next ch-2 space from your hook. Then, ch 2, and in the next ch-2 space from your hook, make: [dc 3, ch 2, dc 3]. Then, ch 2, and make 3 dc into the next ch-2 space from hook. Again, ch 2 and make 3 dc into the next ch-2 space from hook. Once more, ch 2 and make 3 dc into the next ch-2 space from hook. Lastly, ch 2 and dc 3 times into the very last st. (48)

Info :

Fasten off

β€” Full Squares :

Info :

Make 72 (size S), 77 (size M), 86 (size L), 91 (size XL), 102 (size 2XL), 107 (size 3XL)

Round 1 :

Ch 2. In the 2nd ch from hook, make: [dc 3, ch 2, dc 3, ch 2, dc 3, ch 2]. Then, sl st across your first 3 dc of the round, and sl st once more into the first ch-2 space of the round. You will begin each round going forward from a ch-2 space. (20)

Round 2 :

Ch 1 (does not count as st), in the same ch-2 space, make: [dc 3, ch 2, dc 3]. **Ch 2, in the next ch-2 space from hook, make: [dc 3, ch 2, dc 3]. Repeat from ** two more times. Then, sl st across the first 3 dc of the round, and sl st once more into the very first ch-2 space of the round. (40)

Round 3 :

Ch 1 (does not count as st), in the same ch-2 space, make: [dc 3, ch 2, dc 3]. **Ch 2, dc 3 times in the next ch-2 space from hook. Ch 2, in the next ch-2 space from hook make: [dc 3, ch 2, dc 3]. Repeat from ** once more. Then, ch 2, dc 3 times in the next ch-2 space from hook. Ch 2, and sl st across the first 3 dc of the round, and then sl st once more into the first ch-2 space of the round. (60)

Round 4 :

Ch 1 (does not count as st), in the same ch-2 space, make: [dc 3, ch 2, dc 3]. **Ch 2, dc 3 times in the next ch-2 space from hook. Ch 2, dc 3 times in the next ch-2 space from hook. Ch 2, in the next ch-2 space from hook make: [dc 3, ch 2, dc 3]. Repeat from ** once more. Then, ch 2, dc 3 times in the next ch-2 space from hook. Again, ch 2, dc 3 times in the next ch-2 space from hook. Lastly, ch 2, and sl st across the first 3 dc of the round, and then sl st once more into the first ch-2 space of the round. (80)

Round 5 :

Ch 1 (does not count as st), in the same ch-2 space, make: [dc 3, ch 2, dc 3]. **Ch 2, dc 3 times in the next ch-2 space from hook. Ch 2, dc 3 times in the next ch-2 space from hook. Ch 2, dc 3 times in the next ch-2 space from hook. Ch 2, in the next ch-2 space from hook make: [dc 3, ch 2, dc 3]. Repeat from ** once more. Then, ch 2, dc 3 times in the next ch-2 space from hook. Ch 2, dc 3 times in the next ch-2 space from hook. Again, ch 2, dc 3 times in the next ch-2 space from hook. Lastly, ch 2, and sl st across the first 3 dc of the round, and then sl st once more into the first ch-2 space of the round. (100)

Info :

Fasten off

β€” Half Squares :

Info :

Make 18 (sizes S, M, 2XL, 3XL) or 20 (sizes L, XL)

Round 1 :

Ch 2. In the 2nd ch from hook, make: [dc 3, ch 2, dc 3, ch 2, dc 3]. (13)

Round 2 :

Ch 1 (does not count as st), turn, dc in the next st from hook. Ch 2, in the next ch-2 space from hook, make: [dc 3, ch 2, dc 3]. Ch 2, in the next ch-2 space from hook, make: [dc 3, ch 2, dc 3]. Ch 2, dc in the very last st. (26)

Round 3 :

Ch 1 (does not count as st), dc 3 times in the next ch-2 space from hook. Ch 2, in the next ch-2 space from hook make: [dc 3, ch 2, dc 3]. Ch 2, dc 3 times in the next ch-2 space from hook. Ch 2, in the next ch-2 space from hook make: [dc 3, ch 2, dc 3]. Ch 2, dc 3 times in the next ch-2 space from hook. (33)

Round 4 :

Ch 1 (does not count as st), turn, dc in the next st from hook. Ch 2, dc 3 times in the next ch-2 space from hook. Ch 2, in the next ch-2 space from hook make: [dc 3, ch 2, dc 3]. Ch 2, dc 3 times in the next ch-2 space from hook. Again, Ch 2, dc 3 times in the next ch-2 space from hook. Ch 2, in the next ch-2 space from hook make: [dc 3, ch 2, dc 3]. Ch 2, dc 3 times in the next ch-2 space from hook. Ch 2, dc in the very last st. (44)

Round 5 :

Ch 1 (does not count as st), turn, dc 3 times in the next ch-2 space from hook. Ch 2, dc 3 times in the next ch-2 space from hook. Ch 2, in the next ch-2 space from hook make: [dc 3, ch 2, dc 3]. Ch 2, dc 3 times in the next ch-2 space from hook. Ch 2, dc 3 times in the next ch-2 space from hook. Again, Ch 2, dc 3 times in the next ch-2 space from hook. Then ch 2, in the next ch-2 space from hook make: [dc 3, ch 2, dc 3]. Ch 2, dc 3 times in the next ch-2 space from hook. Again, Ch 2, dc 3 times in the next ch-2 space from hook. (53)

Info :

Fasten off

β€” Top Base Assembly :

Info :

Assemble top base rectangle that is 8 (size S), 9 (size M), 10 (size L), 11 (size XL), 12 (size 2XL), or 13 (size 3XL) full squares wide, and 5 full squares tall

Info :

Optional: Add or remove rows of squares to adjust height for preferred length

β€” Front Panels :

Info :

Make 2 front panels, each consisting of a 2x2 square of full squares plus one full square and one diagonal square stacked on top

Info :

Sew each front panel to the first two and last two columns of the top base, making sure diagonal square faces outward

β€” Back Panel :

Info :

Create back panel rectangle that is 4 (sizes S, M), 4.5 (sizes L, XL), or 5 (sizes 2XL, 3XL) squares wide, and 3 full squares tall

Info :

Sew back panel between front panels on top base, spacing evenly so there is equal space between both front panels

Info :

Sew edge of front panels' top-most full square to top edge of back panel, starting at corner and working inward until completely attached

Info :

Sew line of half squares down edge of each front panel, starting directly underneath diagonal square and working to bottom of top

β€” Sleeves :

Info :

Make 2 sleeves

Info :

Create one large loop made of 4.5 (sizes S, M), 5 (sizes L, XL), or 5.5 (sizes 2XL, 3XL) squares connected together in loop

Info :

Loop should fit comfortably around widest part of arm. Add or remove half-square as needed for best fit

Info :

Stack another loop of same number of squares to first loop, making it 2 squares tall

Info :

Sew 0.5 (sizes S, M), 1 (sizes L, XL), or 1.5 (sizes 2XL, 3XL) square to top of loop, then sew diagonal square on either end of this square(s)

Info :

Sew sleeves to each sleeve hole, pinning sleeve to top and bottom of sleeve hole at midpoints for even spacing

β€” Shirt Collar :

Round 1 :

For all sizes, ch 19. Turn, dc in 2nd ch from hook and in each ch across. (18)

Round 2 :

Ch 1 (does not count as st), turn, dc in each st across. (18)

Rounds 3-42 :

For sizes S and M: Repeat Round 2. Fasten off.

Rounds 3-52 :

For sizes L and XL: Repeat Round 2. Fasten off.

Rounds 3-62 :

For sizes 2XL and 3XL: Repeat Round 2. Fasten off.

Info :

Sew edges of collar to shirt's neckline, starting approximately 1 inch in from front panel and working all the way around to other front panel. Space collar evenly and pin before sewing if possible

β€” Finishing :

Info :

Weave in all ends

Info :

Sew buttons to edge of front panel, leaving approximately 2 inches between each button

Assembly Instructions

  • Start by assembling the top base rectangle according to your size, making sure all full squares are sewn together securely with matching edges.
  • Attach both front panels to the first two and last two columns of the top base, ensuring diagonal squares face outward for proper design placement.
  • Sew the back panel centered between the front panels on the top base, spacing evenly to create equal gaps on both sides.
  • Connect the top edge of each front panel's uppermost full square to the top edge of the back panel, working from corner inward.
  • Sew a vertical line of half squares down each front panel edge, starting beneath the diagonal square and continuing to the bottom hem.
  • Construct both sleeves by creating loops and stacking squares, then pin sleeves to armholes at midpoints before sewing for even distribution.
  • Attach the collar by sewing its edges to the neckline, starting about 1 inch from each front panel edge and spacing evenly around.

Important Notes

  • πŸ’‘Gauge is critical for this pattern - one full square should measure exactly 8.5cm x 8.5cm to ensure proper fit and sizing
  • πŸ’‘Use stitch markers to keep track of your place, especially when working the corner sections of each square type
  • πŸ’‘Always turn your work at the beginning of rounds for diagonal and half squares to maintain correct shape formation
  • πŸ’‘Pin all pieces before sewing them together to ensure proper alignment and prevent gaps between squares in the final garment
  • πŸ’‘When assembling sleeves, test the fit around your arm before finalizing - add or remove a half square if needed for comfort
  • πŸ’‘Count your stitches regularly to avoid errors that compound as you build each square component of the top
  • πŸ’‘Consider blocking your finished squares before assembly to ensure they're all uniform in size and shape for easier construction

The Amalfi Top pattern brings together geometric elegance and wearable fashion in one stunning crochet project. This advanced pattern challenges you to master the diagonal square technique while creating a sophisticated button-up top that's truly one-of-a-kind. The modular construction allows for easy customization, making it perfect for creating a garment that fits your style and body perfectly. Whether you're crocheting for yourself or as a special gift, this top will become a wardrobe favorite that showcases your advanced crochet skills. 🧢 Happy crocheting! ✨

You ask,

we answer.

FAQs

Can I adjust the length of the Amalfi Top?

Yes! The pattern specifically mentions you can add or remove rows of squares from the top base to get your preferred height. Since the top is made of modular squares, it's easy to customize the length to suit your style.

How do I know which size to make?

The pattern includes six sizes from S to 3XL, with the model wearing size L at 5'11". Measure your bust and hip circumference, and count how many 8.5cm squares would fit across these measurements to determine your best size.

What if my squares aren't exactly 8.5cm x 8.5cm?

Check your gauge carefully! If your squares are smaller or larger, adjust your hook size accordingly. Going up a hook size will make larger squares, while going down will make smaller ones. Consistent gauge is essential for proper fit.

How much yarn do I actually need for my size?

The pattern lists exact yardage for each size: 2750 yards (S), 3250 (M), 3750 (L), 4250 (XL), 4750 (2XL), or 5250 (3XL) of Alize Diva Stretch weight 2 yarn. It's recommended to purchase slightly more to account for tension variations.

Can I use a different yarn than Alize Diva Stretch?

Yes, but choose a weight 2 (sport weight) yarn with similar stretch properties for best results. The stretch is important for comfortable fit. Make sure to check your gauge with any substitute yarn before starting.

What's the best way to join the squares together?

The pattern recommends sewing the squares together. Use a tapestry needle with matching yarn and whip stitch or mattress stitch along the edges, making sure to align corners and edges carefully for a professional finish.

How do I attach the sleeves evenly?

Pin the sleeve to the top and bottom of the sleeve hole at the midpoints before sewing. This ensures the sleeve is distributed evenly around the armhole. Don't worry about matching stitch counts exactly - focus on even spacing instead.

Is this pattern suitable for beginners?

This is an advanced pattern that requires experience with granny squares, garment construction, and assembly techniques. Beginners should master basic squares and smaller projects before attempting this full garment pattern.