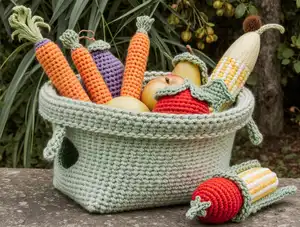
Create an adorable collection of crocheted vegetables perfect for pretend play, kitchen decoration, or as unique handmade gifts! This delightful pattern includes five realistic veggie designs: a plump tomato with decorative leaves, a tapered carrot with flowing greens, a textured corn cob with husks, a glossy eggplant with stem details, and a cute radish complete with leafy tops. Each vegetable is worked in the round using simple stitches and features charming details that bring them to life. These colorful creations are perfect for children's play kitchens, farmers market baskets, or as whimsical home décor that adds a touch of handmade charm to any space.
Progress Tracker
0% Complete
— TOMATO
Round 1:
With A, ch 2. 6 sc in 2nd ch from hook. Join with sl st to first sc (6 sc)
Round 2:
Ch 1. 2 sc in same sp as last sl st. 2 sc in each sc around. Join with sl st in first sc (12 sc)
Round 3:
Ch 1. 2 sc in same sp as last sl st. *1 sc in next sc. 2 sc in next sc. Rep from * to last sc. 1 sc in last sc. Join with sl st in first sc (18 sc)
Round 4:
Ch 1. 2 sc in same sp as last sl st. *1 sc in each of next 2 sc. 2 sc in next sc. Rep from * to last 2 sc. 1 sc in each of last 2 sc. Join with sl st in first sc (24 sc)
Round 5:
Ch 1. 1 sc in each sc around. Join with sl st to first sc
Round 6:
Ch 1. 2 sc in same sp as last sl st. *1 sc in each of next 3 sc. 2 sc in next sc. Rep from * to last 3 sc. 1 sc in each of last 3 sc. Join with sl st in first sc (30 sc)
Round 9:
Ch 1. *Sc2tog over next 2 sc. 1 sc in each of next 4 sc. Rep from * 4 times more. Join with sl st to first sc (25 sc)
Round 11:
Ch 1. *Sc2tog over next 2 sts. 1 sc in each of next 3 sc. Rep from * 4 times more. Join with sl st to first sc (20 sc)
Round 12:
Ch 1. 1 sc in each sc around. Join MC with sl st to first sc. Break A. Stuff tomato
Round 13:
With MC, ch 1. *Sc2tog over next 2 sts. 1 sc in each of next 2 sc. Rep from * 4 times more. Join with sl st to first sc (15 sc)
Round 14:
Ch 1. Working in back loop only of each st, *Sc2tog over next 2 sts. 1 sc in next sc. Rep from * 4 times more. Join with sl st to first sc (10 sc)
Round 15:
Ch 1. (Sc2tog over next 2 sts) 5 times. Join with sl st to first sc (5 sc). Fasten off leaving a long end. Thread end onto tapestry needle and draw through final 5 sc tightly. Using same end, ch 4. Sl st in 2nd ch from hook and each of next 2 ch. Sl st in same sp as where ch originated. Fasten off
Leaves:
With RS facing, join MC in any rem loop of 13th rnd. Ch 3. Sl st back into same sc as first sl st. *Sl st in each of next 2 loops. Ch 3. Sl st back into same sc as last sl st. Rep from * around. Join with sl st in first loop. Fasten off
— CARROT
Round 1:
With D, ch 2. 6 sc in 2nd ch from hook. Join with sl st to first sc (6 sc)
Round 2:
Ch 1. 2 sc in same sp as last sl st. 2 sc in each sc around. Join B with sl st in first sc (12 sc)
Round 3:
Working in back loop only of each sc, ch 1. 1 sc in same sp as last sl st. 1 sc in each of next 2 sc. (2 sc in next sc. 1 sc in each of next 3 sc) twice. 2 sc in last sc. Join with sl st to first sc (15 sc)
Round 4-7:
Ch 1. 1 sc in each sc around. Join with sl st to first sc
Round 8:
Ch 1. 1 sc in same sp as last sl st. 1 sc in each of next 2 sc. (Sc2tog over next 2 sc. 1 sc in each of next 3 sc) twice. Sc2tog over next 2 sts. Join with sl st to first sc (12 sc)
Round 9-14:
Ch 1. 1 sc in each sc around. Join with sl st to first sc
Info:
Stuff top end of Carrot. Continue stuffing as you work to end
Round 15:
Ch 1. 1 sc in same sp as last sl st. 1 sc in next sc. (Sc2tog. 1 sc in each of next 2 sc) twice. Sc2tog over next 2 sts. Join with sl st to first sc (9 sc)
Round 16-20:
Ch 1. 1 sc in each sc around. Join with sl st to first sc
Round 21:
Ch 1. 1 sc in same sp as last sl st. (Sc2tog over next 2 sts. 1 sc in next sc) twice. Sc2tog over next 2 sts. Join with sl st to first sc (6 sc)
Round 22-24:
Ch 1. 1 sc in each sc around. Join with sl st to first sc
Round 25:
Ch 1. (Sc3tog over next 3 sc) twice. Join with sl st in first st. Fasten off
Leaves (make 2):
With MC, ch 13. Sl st in 2nd ch from hook and each of next 6 ch, placing a marker on last ch. Ch 10. Sl st in 2nd ch from hook and each of next 8 ch. Sl st in marked ch. Ch 7. Sl st in 2nd ch from hook and each of next 5 ch. Sl st in marked ch. Sl st in each of last 5 ch. Fasten off. Sew leaves to top of carrot
— CORN COB
Row 1 (WS):
With C, ch 20. 1 sc in 2nd ch from hook. 1 sc in each ch to end (19 sc). Turn
Row 2:
Ch 1. Sl st in first sc. *1 tr in next sc. Sl st in next sc. Rep from * across. Turn
Row 3:
Ch 1. 1 sc in each st across. Turn
Rows 4-13:
Rep rows 2-3 five times more, then row 2 once. Fasten off leaving a long end
Assembly:
Sew foundation row to final row. Thread end onto tapestry needle and weave tightly through one end of Cob and fasten securely. Stuff Cob. Weave yarn tightly through opposite end and fasten securely
Leaves (make 3):
With MC, ch 25. 1 sc in 2nd ch from hook. 1 sc in each of next 2 ch. 1 hdc in next ch. 1 dc in each of next 2 ch. 1 tr in each of next 12 ch. 1 dc in each of next 2 ch. 1 hdc in next ch. 1 sc in each of last 3 ch. Fasten off. Sew leaves to corn cob
— EGGPLANT
Round 1:
With D, ch 2. 6 sc in 2nd ch from hook. Join with sl st to first sc (6 sc)
Round 2:
Ch 1. 2 sc in same sp as last sl st. 2 sc in each sc around. Join with sl st in first sc (12 sc)
Round 3:
Ch 1. 2 sc in same sp as last sl st. *1 sc in next sc. 2 sc in next sc. Rep from * to last sc. 1 sc in last sc. Join with sl st to first sc (18 sc)
Round 4:
Ch 1. 2 sc in same sp as last sl st. *1 sc in each of next 2 sc. 2 sc in next sc. Rep from * to last 2 sc. 1 sc in each of last 2 sc. Join with sl st to first sc (24 sc)
Round 5:
Ch 1. 1 sc in each sc around. Join with sl st to first sc
Round 6:
Ch 1. 2 sc in same sp as last sl st. *1 sc in each of next 5 sc. 2 sc in next sc. Rep from * to last 5 sc. 1 sc in each of last 5 sc. Join with sl st to first sc (28 sc)
Round 8:
Ch 1. 2 sc in same sp as last sl st. *1 sc in each of next 6 sc. 2 sc in next sc. Rep from * to last 6 sc. 1 sc in each of last 6 sc. Join with sl st to first sc (32 sc)
Round 10:
Ch 1. 2 sc in same sp as last sl st. *1 sc in each of next 7 sc. 2 sc in next sc. Rep from * to last 7 sc. 1 sc in each of last 7 sc. Join with sl st to first sc (36 sc)
Round 15:
Ch 1. 1 sc in same sp as last sl st. 1 sc in each of next 6 sc. (Sc2tog over next 2 sc. 1 sc in each of next 7 sc) 3 times. Sc2tog over next 2 sts. Join with sl st to first sc (32 sc)
Round 17:
Ch 1. 1 sc in same sp as last sl st. 1 sc in each of next 5 sc. (Sc2tog over next 2 sts. 1 sc in each of next 6 sc) 3 times. Sc2tog over next 2 sts. Join with sl st to first sc (28 sc)
Round 19:
Ch 1. 1 sc in same sp as last sl st. 1 sc in each of next 4 sc. (Sc2tog over next 2 sts. 1 sc in each of next 5 sc) 3 times. Sc2tog over next 2 sts. Join with sl st to first sc (24 sc)
Round 25:
Ch 1. 1 sc in same sp as last sl st. 1 sc in each of next 3 sc. (Sc2tog over next 2 sts. 1 sc in each of next 4 sc) twice. Sc2tog over next 2 sts. Join with sl st to first sc (20 sc)
Round 26:
As 5th rnd. Join MC with sl st in first sc. Break D
Round 27:
With MC, as 5th rnd. Stuff eggplant
Round 28:
Ch 1. Working in back loop only of each st, 1 sc in same sp as last sl st. 1 sc in each of next 2 sc. (Sc2tog over next 2 sts. 1 sc in each of next 3 sc) 3 times. Sc2tog over next 2 sts. Join with sl st to first sc (16 sc)
Round 30:
Ch 1. 1 sc in same sp as last sl st. 1 sc in next sc. (Sc2tog over next 2 sts. 1 sc in each of next 2 sc) twice. Sc2tog over next 2 sts. Join with sl st to first sc (12 sc)
Round 31:
Ch 1. (Sc2tog over next 2 sts) 6 times. Join with sl st to first sc (6 sc). Fasten off leaving a long end. Thread end onto tapestry needle and draw through final 6 sc tightly. Using same end, ch 5. Sl st in 2nd ch from hook and each of next 3 ch. Sl st in same sp as where ch originated. Fasten off
Stem Edging:
With RS facing, join MC in any rem loop of 28th rnd. Ch 3. 1 dc in same sp. *Miss next sc. Sl st in next sc. Ch 3. 1 dc in same sp. Rep from * around. Join with sl st in first st. Fasten off
— RADISH
Round 1:
With D, ch 2. 6 sc in 2nd ch from hook. Join A with sl st to first sc (6 sc)
Round 2:
With A, ch 1. 2 sc in each sc around. Join with sl st in first sc (12 sc)
Round 3-4:
Ch 1. 1 sc in each sc around. Join with sl st in first sc
Round 5:
Ch 1. 1 sc in same sp as last sl st. (Sc2tog over next 2 sc. 1 sc in next sc) 3 times. Sc2tog over next 2 sts. Join with sl st in first sc (8 sc). Stuff radish
Round 6:
Ch 1. (Sc2tog over next 2 sts) 4 times. Join with sl st to first sc (4 sc). Fasten off leaving a long end. Thread end onto tapestry needle and draw through final 4 sc tightly. Using same end, ch 3. Sl st in 2nd ch from hook and next ch. Sl st in same sp as where ch originated. Fasten off
Leaves (make 2):
With MC, ch 16. 1 sc in 2nd ch from hook. 1 hdc in next ch. 1 dc in each of next 3 ch. 1 tr in each of next 4 ch. Ch 4. Sl st back into last ch. Sl st in next ch. Ch 3. 1 dc in each of next 2 ch. 1 hdc in next ch. 1 sc in next ch. 3 sc in last ch (placing a marker on center sc). Working along opposite side of ch into rem loops, 1 sc in next ch. 1 hdc in next ch. 1 dc in each of next 2 ch. Ch 3. Sl st back into last ch. Sl st in next ch. Ch 4. 1 tr in same sp. 1 tr in each of next 3 ch. 1 dc in each of next 3 ch. 1 hdc in next ch. 1 sc in last ch. Join with sl st to first sc. Fasten off
Stem:
Join MC with sl st in marked sc. Ch 8. Sl st in top of Radish. Sl st in each ch back to Leaf. Fasten off
This delightful veggie basket pattern brings garden-fresh charm to your crochet projects with five adorable designs that work up quickly and easily. Whether you're creating a play food set for little ones, adding whimsical décor to your kitchen, or making unique gifts for gardening enthusiasts, these vegetables are sure to bring smiles wherever they go. The simple techniques and clear instructions make this pattern perfect for beginners, while the satisfying results will delight crocheters of all skill levels. Each veggie has its own personality with charming details that make them truly special. 🥕🍅🌽 Happy crocheting! 🧶✨