๐Ÿงถ Beautiful โœจ Detailed ๐Ÿ’ Adorable

Mini Milk Cow Amigurumi Pattern

Mini Milk Cow Amigurumi Pattern
4.7โ˜… Rating
4-5 Hours Time Needed
4.2K Made This
โœ‚๏ธ

Intermediate Level

Ideal for those with basic knitting experience, featuring slightly more advanced stitches and techniques to expand your skills.

โฑ๏ธ

Weekend Treat

Takes 5-7 hours, making it an enjoyable project to finish over a couple of days.

๐Ÿ„

Charming Critter

Delightful animal designs with sweet details that capture the essence of your favorite woodland and farmyard friends.

About This Mini Milk Cow Amigurumi Pattern

This Mini Milk Cow pattern brings farmyard charm to your amigurumi collection with its adorable details and classic coloring. The pattern features a cleverly constructed body that seamlessly transitions into two sturdy legs, complete with color changes that create the look of a tiny cow outfit. The sweet face is enhanced by a textured snout, small horns, and distinctive ears with dual-color edging. A finishing touch of a white collar with a jingling bell adds personality and charm to this delightful bovine buddy.

Mini Milk Cow Amigurumi Pattern crochet pattern - detailed view of completed project

Working in continuous rounds with strategic color changes, this pattern teaches valuable techniques like through-back-loop stitching for texture and proper leg division. The combination of different yarn colors creates a whimsical character that's perfect for display or gifting to animal lovers.

Why You'll Love This Mini Milk Cow Amigurumi Pattern

I absolutely love how this mini cow pattern combines simplicity with charming details! The way the color changes create a natural-looking outfit on the cow's body is so clever and satisfying to complete. I find the small size perfect for quick projects that still deliver a big impact - it's wonderful to see such personality packed into a palm-sized creation. The addition of the bell on the collar adds such a sweet touch that makes this cow feel authentic and special. What really makes me appreciate this pattern is how it teaches useful techniques like leg division and color transitions that you can apply to other amigurumi projects down the line!

Mini Milk Cow Amigurumi Pattern step 1 - construction progress Mini Milk Cow Amigurumi Pattern step 2 - assembly progress Mini Milk Cow Amigurumi Pattern step 3 - details and accessories Mini Milk Cow Amigurumi Pattern step 4 - final assembly and finishing

Switch Things Up

I love experimenting with different color combinations to create unique cow personalities! Instead of the classic black and white pattern, you could try brown and cream for a Jersey cow look, or even go whimsical with pink and purple for a fantasy version. The sky blue sections in the original pattern create a cute "outfit" effect, but you could swap this for red to make a little cow in a sweater, or use striped color changes for a more playful appearance.

Another fun modification I enjoy is adjusting the size by using different yarn weights - fingering weight creates an adorable miniature perfect for keychains, while bulky yarn makes a cuddly larger friend. You could also add embroidered details like flowers on the collar or create spotted patterns on the white sections using surface crochet or embroidery for more authentic cow markings.

For a more personalized touch, I sometimes make the ears larger for a floppy-eared effect, or add a small embroidered name tag to the collar. You could even create a whole farm family by making multiple cows in different sizes and colors! The pattern's construction method is versatile enough to adapt while maintaining that sweet, charming cow character we all love.

Common Mistakes & How to Fix Them

โœ— Forgetting to place stitch markers when dividing legs between rounds 36 and 37, which can lead to misaligned leg placement and uneven spacing โœ— Not changing yarn colors at the correct rounds as indicated in the symbol pattern, resulting in incorrect color blocking on the body โœ— Overstuffing the legs or body which can distort the shape and make the cow appear bulky instead of cute and proportional โœ— Skipping the through-back-loop-only round at round 20, which creates an important texture line that defines the head from the body โœ— Failing to sew the 6 stitches between the legs after completing both legs, leaving a gap in the body structure โœ— Attaching safety eyes before checking proper placement between rounds 13-14, making them difficult to reposition once secured โœ— Not leaving long enough tails when fastening off pieces like arms, ears, and horns, making assembly more challenging

Mini Milk Cow Amigurumi Pattern

Create an adorable miniature milk cow with this delightful amigurumi pattern! Standing at approximately 15cm (5.9 inches) tall, this charming cow features a sweet face with black safety eyes, a light peach snout, and tiny horns. Complete with a decorative collar and bell, this pattern uses worsted weight yarn in white, black, sky blue, light yellow, beige, and green colors. Perfect for beginners and intermediate crocheters who want to make a cute farmyard friend that's sure to bring smiles!

Intermediate 4-5 Hours

Materials Needed for Mini Milk Cow Amigurumi Pattern

โ€” Main Fabric

  • 01
    Worsted weight yarn in white color for head, body, legs, and collar
  • 02
    Worsted weight yarn in black color for head sections
  • 03
    Worsted weight yarn in sky blue color for body sections
  • 04
    Worsted weight yarn in light yellow color for leg sections
  • 05
    Worsted weight yarn in beige color for arms
  • 06
    Worsted weight yarn in light peach color for snout and inner ears
  • 07
    Worsted weight yarn in green color for collar ribbon
  • 08
    Worsted weight yarn in dark brown color for horns
  • 09
    Alternative: Fingering weight yarn can be used with 3mm crochet hook for smaller 5.9 inch version

โ€” Tools Required

  • 01
    5/0 (3mm) crochet hook
  • 02
    5mm black plastic safety eyes (2 pieces)
  • 03
    6mm metal bell (1 piece)
  • 04
    Yarn needle for weaving and sewing
  • 05
    Fiberfill stuffing
  • 06
    Stitch markers
  • 07
    Scissors
  • 08
    Fabric glue for attaching eyes
  • 09
    Wooden pins (optional, for straightening doll's feet)

Progress Tracker

0% Complete

โ€” Head / Body / Legs :

Round 1 :

sc x 6 in the yarn loop (magic ring), tighten the loop [6 sts]

Round 2 :

(2-sc inc) x 6 [12]

Round 3 :

(sc x 1, 2-sc inc) x 6 [18]

Round 4 :

(sc x 2, 2-sc inc) x 6 [24]

Round 5 :

(sc x 3, 2-sc inc) x 6 [30]

Round 6 :

(sc x 4, 2-sc inc) x 6 [36]

Round 7 :

(sc x 5, 2-sc inc) x 6 [42]

Round 8 :

(sc x 6, 2-sc inc) x 6 [48]

Round 9-19 :

sc in all 48 st [48]

Round 20 :

sctbl in all 48 st [48]

Round 21-36 :

sc in all 48 st [48]

Info :

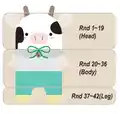
Change yarn colors according to symbol pattern: Rounds 1-19 use White/Black yarn (with Black yarn sections as indicated), Rounds 20-36 use White/Sky blue yarn, Rounds 37-42 use Sky blue/Light yellow yarn

Info :

Divide the legs: To make a leg, identify the center space between the legs by 6 stitches, and each leg identifies the other by 18 stitches (use stitch markers to help)

Info :

First leg (Left leg): sc at the 31st st of Round 36. This sc is the first st of the first leg. Continue working on the first leg

Round 37-40 :

sc in all 18 st [18]

Round 41 :

(sc x 1, sc2tog) x 6 [12]

Round 42 :

(sc2tog) x 6 [6]

Info :

Fasten off, leaving a long tail. Stuff the leg. Using a yarn needle, weave the yarn tail through the front loop of each remaining st and pull tight to close

Info :

Second leg (Right leg): Rejoin the Sky blue yarn to 7th back unworked st of Round 36. This sc is the first st for the second leg. Continue working the second leg the same way as the first leg from Round 37-42

Info :

Using a yarn needle, sew the 6 sts between the legs

โ€” Arms (Make 2) :

Round 1 :

sc x 5 in the yarn loop (magic ring), tighten the loop [5 sts]

Round 2 :

(2-sc inc) x 5 [10]

Round 3-4 :

sc in all 10 st [10]

Round 5 :

sctbl in all 10 st [10]

Round 6-11 :

sc in all 10 st [10]

Info :

Fasten off, leaving a long tail for sewing. Flatten the arm, do not stuff. Use Beige yarn

Info :

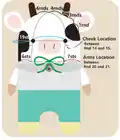
Arms location: Attach between Round 20 and 21

โ€” Snout :

Starting Chain :

Make 4 chains with Light peach yarn

Round 1 :

sc x 1 in second ch from hook, sc x 2 in the next chain, sc x 3 in the bottom chain, working up the other side - sc x 2, sc x 2 in the next chain, slst [10 sts]

Round 2 :

ch 1, sc x 4, 3-sc inc, sc x 4, 3-sc inc, slst [14]

Round 3-4 :

ch 1, sc in all 14 st, slst [14]

Info :

Fasten off, leaving a long tail for sewing. Fill in some stuffing to the snout. Make a nose and mouth on the snout. Section for snout stitching on face is indicated (8 sts wide, 19 sts position marker)

โ€” Horns (Make 2) :

Round 1 :

sc x 4 in the yarn loop (magic ring), tighten the loop [4 sts]

Round 2 :

sc in all 4 st [4]

Round 3 :

2-sc inc, sc x 3 [5]

Round 4 :

2-sc inc, sc x 4 [6]

Info :

Fasten off, leaving a long tail for sewing. Do not stuff. Use Dark brown yarn

โ€” Ears (Make 2) :

Round 1 (Light peach) :

sc x 6 in the yarn loop (magic ring), tighten the loop [6 sts]

Round 2 (Light peach) :

(2-sc inc) x 6 [12]

Info :

Fasten off and make another Light peach ear, then make two White ears by the same way

Round 3 (Edging) :

Locate Light peach colored ear part on the white ear, and then sc together with white yarn [12]

Info :

Fasten off, leaving a long tail for sewing

โ€” Collar :

Starting Chain :

Make 49 chains with White yarn

Round 1 :

sc x 1 in second ch from hook, sc x 47 [48 sts]

Round 2 :

ch 3, turn, dc2tog in second & third st, hdc, sc x 40, hdc, dc3tog [48]

Info :

Fasten off, leaving a long tail for sewing. Hang a metal bell on the green yarn and tie the ribbon

Info :

Sew Collar at Round 20. Place Collar in the center of cow's face, then sew 6 stitches to each side (positioned at 24th-25th stitch markers)

โ€” Face Details :

Eyes :

Place 5mm black safety eyes between Round 13 and 14. Glue the eyes on the face

Cheeks :

Position cheeks between Round 14 and 15

Assembly Instructions

  • Stuff the head firmly through rounds 1-19 before continuing to the body section, ensuring a well-shaped head structure
  • After completing both legs and sewing the 6 stitches between them, make sure the legs are evenly positioned with proper spacing
  • Attach the arms between rounds 20 and 21 on either side of the body, ensuring they're symmetrically placed
  • Position and glue the safety eyes between rounds 13-14, spacing them appropriately before securing permanently
  • Sew the stuffed snout onto the face at the marked position (8 stitches wide, around 19th stitch position), then embroider nose and mouth details
  • Attach the dual-colored ears (light peach and white edged) to the top sides of the head at appropriate angles
  • Sew the small dark brown horns to the top of the head between the ears for authentic cow appearance
  • Attach the white collar at round 20 with the center positioned at the front (24th-25th stitch), ensuring the bell hangs at the front

Important Notes

  • ๐Ÿ’กUse stitch markers to track the 31st stitch for the first leg and 7th back unworked stitch for the second leg division
  • ๐Ÿ’กPay careful attention to color changes as indicated in the symbol pattern - they occur at specific rounds to create the outfit effect
  • ๐Ÿ’กWhen working through back loops only (sctbl) at rounds 5, 20, these create texture lines that define different body sections
  • ๐Ÿ’กFlatten the arms completely without stuffing them for a more natural hanging appearance when attached
  • ๐Ÿ’กThe collar should be positioned carefully with 6 stitches sewn on each side of center for balanced placement
  • ๐Ÿ’กOptional wooden pins can be inserted into the bottom of the feet to help the cow stand straight and stable

This adorable Mini Milk Cow pattern combines classic farmyard charm with modern amigurumi techniques to create a sweet companion that's perfect for display or gifting. With its carefully crafted color transitions, textured details, and charming accessories like the bell collar, this pattern offers both a satisfying crochet experience and an utterly lovable finished result. The 15cm size makes it perfect for little hands or as a desktop companion. Whether you're building a farmyard collection or just love cute cows, this pattern delivers personality in every stitch! ๐Ÿ„๐Ÿ””โœจ

You ask,

we answer.

FAQs

Can I use fingering weight yarn instead of worsted weight?

Yes! The pattern mentions you can use fingering weight yarn with a 3mm crochet hook, which will create a smaller cow (approximately 5.9 inches). Just maintain consistent tension throughout your work.

How do I divide the legs correctly without making mistakes?

Use stitch markers to identify the 6-stitch center space and the 18 stitches for each leg at round 36. Start the first leg at the 31st stitch and the second leg at the 7th back unworked stitch. The pattern recommends using stitch markers to help track these positions.

Do I need to stuff the arms?

No, the pattern specifically instructs to flatten the arms without stuffing them. This creates a more natural appearance when they hang from the body.

When should I attach the safety eyes?

Attach the 5mm black safety eyes between rounds 13-14 of the head section. It's best to position them first with pins to ensure proper placement before securing them permanently.

What is the purpose of the through-back-loop-only rounds?

The sctbl (single crochet through back loop only) rounds at round 5 and round 20 create texture lines that help define different sections of the body, giving the cow more dimension and structure.

How do I attach the collar properly?

Sew the collar at round 20 with the center positioned at the front of the cow's face (around the 24th-25th stitch markers). Sew 6 stitches to each side of center for balanced placement, and attach the bell to the green ribbon before securing.