🧢 Beautiful ✨ Detailed πŸ’ Adorable

Lady Liberty Amigurumi Pattern

Lady Liberty Amigurumi Pattern
4.0β˜… Rating
4-6 Hours Time Needed
3.3K Made This
βœ‚οΈ

Intermediate Level

Ideal for those with basic knitting experience, featuring slightly more advanced stitches and techniques to expand your skills.

⏱️

Weekend Treat

Takes 5-7 hours, making it an enjoyable project to finish over a couple of days.

πŸŽ„

Holiday Cheer

Festive fun for the season, bringing handmade magic to celebrations and creating new family traditions.

About This Lady Liberty Amigurumi Pattern

Lady Liberty Amigurumi Pattern crochet pattern - detailed view of completed project

Standing at approximately 5 inches with her crown, this mini monument includes intricately detailed accessories that make her instantly recognizable - the flame-topped torch held high and the book representing law and justice. The crown features seven individual spikes worked in a beautiful fan pattern.

Why You'll Love This Lady Liberty Amigurumi Pattern

I'm absolutely captivated by how this pattern transforms simple stitches into such an iconic symbol of freedom and hope! What I love most is the genius construction technique - working in that third loop to create the dress foundation is such a clever method that produces a beautifully structured base. The back post stitches add incredible dimension to the body, and I'm always amazed at how they create that sculpted, realistic look. The crown is my favorite part to work - watching those seven individual spikes emerge as you crochet them is so satisfying, and the final result looks incredibly intricate even though the technique is quite straightforward once you get the rhythm. I appreciate how the pattern includes detailed photo guides for the trickier parts, making advanced techniques accessible. The dress detail that drapes over the shoulder is such a thoughtful touch - it adds so much authenticity and movement to the figure. The torch and flame combination is adorable, and I love that tiny book accessory that completes her iconic look. This isn't just a pattern; it's a celebration of American history that you can hold in your hand!

Lady Liberty Amigurumi Pattern step 1 - construction progress Lady Liberty Amigurumi Pattern step 2 - assembly progress Lady Liberty Amigurumi Pattern step 3 - details and accessories Lady Liberty Amigurumi Pattern step 4 - final assembly and finishing

Switch Things Up

I absolutely love customizing this Lady Liberty pattern for different patriotic occasions! For a more traditional American flag theme, I've worked her dress in red and white stripes with a blue bodice overlay dotted with tiny white star embroidery. It creates such a stunning patriotic statement while maintaining her iconic silhouette. You could also make her torch flame in red, white, and blue variegated yarn for extra festive flair during Independence Day celebrations.

For historical accuracy enthusiasts, I sometimes create her in copper and bronze tones to represent how she looked before oxidation turned her green. Using burnt orange, copper, and golden brown yarns gives her that freshly-built 1886 appearance that history buffs absolutely love. I've even added metallic thread held together with the yarn for a genuine metallic sheen that catches the light beautifully.

The crown offers wonderful opportunities for embellishment - I've sewn tiny seed beads or sequins onto each spike for sparkle, or worked the spikes in metallic gold or silver yarn while keeping the body green. For a more whimsical approach, I've made rainbow crown spikes to represent diversity and inclusion, which creates a powerful modern message while honoring liberty's universal meaning.

The dress detail can be positioned different ways - instead of over one shoulder, try draping it across both shoulders like a shawl, or even creating a second piece for a more elaborate layered gown effect. I've also experimented with adding tiny crocheted stars scattered across her dress or working the dress in a lighter mint green with the body in darker green for beautiful color variation and depth!

Common Mistakes & How to Fix Them

βœ— Not working in the correct third loop when starting the dress, resulting in a weak foundation that doesn't hold its circular shape properly βœ— Forgetting to crochet the body and dress together at round seventeen, leaving them as separate pieces instead of seamlessly connected βœ— Missing the back loop only instructions throughout the pattern, which eliminates the textured dimensional effect that makes the figure realistic βœ— Sewing the crown too low on the head instead of above the double crochet round, throwing off Lady Liberty's proportions completely

Lady Liberty Amigurumi Pattern

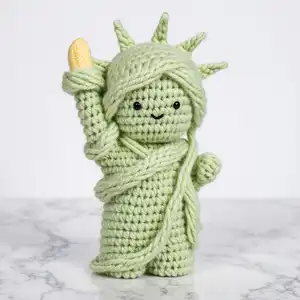
Create an iconic Lady Liberty amigurumi standing proudly at 5 inches tall, perfect for celebrating the 4th of July or showing your American pride year-round! This charming design features Lady Liberty's signature flowing dress with detailed bodice overlay, her famous spiked crown, and essential accessories including the torch with flickering flame and commemorative book. Worked entirely in beautiful pale green yarn with yellow accents, this pattern captures the essence of America's most beloved monument. With detailed photo guides and clear instructions for working in the third loop and back post stitches, you'll master special techniques while creating a patriotic treasure!

Intermediate 4-6 Hours

Materials Needed for Lady Liberty Amigurumi Pattern

β€” Main Fabric

  • 01
    100% cotton 3-ply sport weight yarn in pale green color (approximately 50g)
  • 02
    100% cotton 3-ply sport weight yarn in yellow color (small amount for flame)
  • 03
    Black thread for embroidering eyes

β€” Tools Required

  • 01
    2mm crochet hook
  • 02
    Sewing needle
  • 03
    Stuffing material (hypoallergenic polyester recommended)
  • 04
    Scissors
  • 05
    Pins for assembly positioning

Progress Tracker

0% Complete

β€” Dress :

Info :

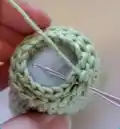
With pale green chain 26 and start crocheting in first chain, closing a circle. For first round, crochet in third loop of chain (watch minute 0:52 of video reference)

Round 1-6 :

26sc (26)

Round 7 :

5sc, 1dec, 12sc, 1dec, 5sc (24)

Round 8-12 :

24sc (24)

Round 13 :

(2sc, 1dec) repeat 6 times (18)

Info :

Join with slip stitch. Cut yarn and fasten off

β€” Dress Detail :

Info :

With pale green chain 35. Start crocheting in first chain, closing a circle

Round 1 :

10sl, 25sc (35)

Round 2-3 :

10blsl, 25blsc (35)

Info :

Join with sl. Cut yarn and fasten off. Leave small tail for sewing

β€” Body :

Info :

With pale green yarn start. Make 2 legs

Round 1 :

6sc in magic ring (6)

Round 2 :

6inc (12)

Round 3 :

12bpsc (12)

Round 4-5 :

12sc (12)

Info :

Cut yarn and fasten off first leg. Make second leg following same instructions. Don't fasten off second leg and connect two legs by inserting loop of needle inside one stitch of first leg

Round 6 :

24sc (12 from each leg) (24)

Round 7-10 :

24sc (24)

Round 11 :

(6sc, 1dec) repeat 3 times (21)

Round 12-14 :

21sc (21)

Round 15 :

(5sc, 1dec) repeat 3 times (18)

Round 16 :

18sc (18)

Info :

Stop here for adding stuffing material before continuing. For next round, crochet together with dress

Round 17 :

18sc (18)

Round 18 :

18blsl (18)

Info :

For next round, work only in remaining front loop of previous round

Round 19 :

FL (1sc, 1inc) repeat 9 times (27)

Round 20 :

(2sc, 1inc) repeat 9 times (36)

Round 21 :

(5sc, 1inc) repeat 6 times (42)

Round 22-29 :

42sc (42)

Round 30 :

(5sc, 1dec) repeat 6 times (36)

Round 31 :

(4sc, 1dec) repeat 6 times (30)

Round 32 :

(3sc, 1dec) repeat 6 times (24)

Round 33 :

(2sc, 1dec) repeat 6 times (18)

Info :

Stop here for finish stuffing the doll

Round 34 :

(1sc, 1dec) repeat 6 times (12)

Info :

Cut yarn, fasten off and hide remaining tail inside toy

β€” Arms (Make 2) :

Info :

Continue working with green

Round 1 :

6sc in magic ring (6)

Round 2 :

(2sc, 1inc) repeat 2 times (8)

Round 3-8 :

8sc (8)

Round 9 :

4sc (crocheting sides together, closing arms) (4)

Info :

Cut yarn and fasten off. Leave small tail for sewing

β€” Crown :

Info :

With pale green chain 28. Skip first chain and start

Row 1 :

27sc, chain 1, turn (27)

Row 2 :

1blsc, (chain 5, skip first chain, 1sl, 1sc, 1hdc, 1dc, skip one st from foundation, 3blsc) repeat 7 times, 1blsc

Info :

Cut yarn and fasten off. Leave tail for sewing

β€” Hair :

Info :

With pale green yarn start

Round 1 :

6sc in magic ring (6)

Round 2 :

6inc (12)

Round 3 :

(1sc, 1inc) repeat 6 times (18)

Round 4 :

(2sc, 1inc) repeat 6 times (24)

Round 5 :

(3sc, 1inc) repeat 6 times (30)

Round 6 :

(4sc, 1inc) repeat 6 times (36)

Round 7 :

(5sc, 1inc) repeat 6 times (42)

Round 8-11 :

42sc (42)

Round 12 :

chain 2, 12dc, chain 2, 1sl, chain 2, 12dc, chain 2, 1sc, (chain 7, skip first chain, 6sc, join with sc) repeat 16 times

Info :

Cut yarn and fasten off. Leave long tail for sewing

β€” Torch :

Info :

With pale green start

Round 1 :

4sc in magic ring (4)

Round 2 :

4sc (4)

Round 3 :

(1inc, 1sc) repeat 2 times (6)

Round 4 :

6sc (6)

Round 5 :

6FL inc (12)

Round 6 :

12bpsc (12)

Round 7 :

12sc (12)

Info :

Join with sl. Cut yarn, fasten off and leave small tail for sewing

β€” Flame :

Info :

With yellow start

Round 1 :

6sc in magic ring (6)

Round 2-3 :

6sc (6)

Round 4 :

(2sc, 1inc) repeat 2 times (8)

Round 5 :

8sc (8)

Info :

Cut yarn and fasten off. Sew flame inside torch

β€” Book :

Info :

Chain 5. Skip first chain and start

Row 1-4 :

4sc, chain 1 and turn (4)

Edging :

After row 4, crochet contour around detail following: 3sc in corner, 4sc going down, 3sc in next corner, 3sc, 3sc in next corner, 4sc. Join with sl

Info :

Cut yarn and fasten off

Assembly Instructions

  • Place hair on Lady Liberty's head, use pins to fasten and prevent moving while sewing all around the hair securely.
  • Sew crown above the round with double crochet stitches, ensuring it sits properly centered on top of the head.
  • Sew left arm between rounds 7 and 11 of body, positioning it to hold the book naturally at her side.
  • Dress the dress detail overlay, placing it over left shoulder and sewing it around the body for draped effect.
  • Place book on her left hand and sew it securely in position to represent the tablet of law.
  • Sew right arm at round 11, taking 4 stitches in length, then add small stitch to sew arm on face so it remains standing upright.
  • Sew torch in third round of right arm so it's held high, then embroider eyes in round 24 leaving 5 stitches between them.

Important Notes

  • πŸ’‘Work the dress foundation in the third loop of the chain for proper structure - reference video at minute 0:52 if unsure
  • πŸ’‘Use back post stitches where indicated to create dimensional texture that gives the figure realistic depth and shape
  • πŸ’‘Pin all pieces before sewing during assembly to ensure proper positioning and proportion of Lady Liberty's iconic pose
  • πŸ’‘Work the body and dress together at round 17 by crocheting through both pieces simultaneously for seamless connection
  • πŸ’‘The crown's seven spikes represent the seven continents and seas - work each spike carefully for authentic detail
  • πŸ’‘Stuff moderately throughout construction, especially before closing sections, to maintain elegant proportions and prevent overstuffing

This Lady Liberty amigurumi pattern is a beautiful tribute to one of America's most recognizable symbols of freedom and democracy! Created as part of a special 4th of July collection, this 5-inch patriotic figure captures the elegance and majesty of the Statue of Liberty with remarkable detail. From her flowing dress with shoulder drape to her iconic spiked crown and torch held high, every element tells the story of liberty enlightening the world. Perfect for Independence Day celebrations, patriotic displays, or as a meaningful gift for history lovers and American pride enthusiasts. Let your crochet hook celebrate freedom! πŸ—½βœ¨πŸ‡ΊπŸ‡Έ

You ask,

we answer.

FAQs

What is the third loop and how do I work in it?

The third loop is the back bump of the chain, located on the opposite side from where you normally crochet. Working in this loop creates a more stable foundation for the dress. The pattern references a video at minute 0:52 that shows exactly where this loop is located and how to work into it.

How do I crochet the body and dress together in round 17?

At round 17, you'll insert your hook through both a stitch from the body and a corresponding stitch from the dress simultaneously, then work your single crochet through both pieces. This joins them seamlessly without any visible seaming. The photo guides in the pattern show this technique clearly.

Can I use a different color besides pale green?

Absolutely! While Lady Liberty's iconic patina is the pale green color from copper oxidation, you could make her in copper/bronze colors to represent how she originally looked, or even in patriotic red, white, and blue for a different take on the design.

What are back post single crochet stitches?

Back post single crochet (bpsc) is worked by inserting your hook from back to front around the post (vertical part) of the stitch from the previous round, rather than into the top loops. This creates a raised, textured effect that adds dimension to your work.

How do I make the crown spikes stand up properly?

The crown spikes are created using a combination of slip stitch, single crochet, half double crochet, and double crochet worked into chain spaces. The increasing height of stitches naturally makes them stand upright. Light starching or stiffening can help them hold their shape even better.

Is the flame difficult to attach inside the torch?

Not at all! The flame is worked in yellow yarn and simply sewn inside the opening at the top of the torch. Because both pieces are small, a few strategic stitches through the base of the flame and into the torch opening will hold it securely in place.

Why does the right arm need to be sewn to the face?

Lady Liberty holds her torch high above her head. To keep the arm in this upright position without it flopping down, you add a small securing stitch between the arm and the face. This hidden stitch maintains her iconic pose without being visible.