🧢 Beautiful ✨ Detailed πŸ’ Adorable

Woody and Jessie Toy Story Amigurumi Pattern

Woody and Jessie Toy Story Amigurumi Pattern
4.8β˜… Rating
8-10 Hours Time Needed
2.2K Made This
βœ‚οΈ

Intermediate Level

Ideal for those with basic knitting experience, featuring slightly more advanced stitches and techniques to expand your skills.

⏱️

All-Day Adventure

Requires 8-10 hours, ideal for a full day of immersive knitting.

🧸

Cute Companion

An adorable friend to cherish, handcrafted with love to bring comfort and joy for years to come.

About This Woody and Jessie Toy Story Amigurumi Pattern

This delightful Toy Story pattern brings Woody and Jessie to life in adorable amigurumi form. Each character is carefully designed with authentic details including their signature cowboy hats, waistcoats, and boots. The pattern uses color changes to create the iconic outfits that make these characters instantly recognizable. With clear instructions for both dolls, you'll create a matching set that celebrates the beloved friendship from the Toy Story movies.

Woody and Jessie Toy Story Amigurumi Pattern crochet pattern - detailed view of completed project

The pattern includes detailed instructions for creating facial features, hair styling, and clothing assembly. Both characters share similar construction techniques, making it efficient to create the pair once you've mastered the first doll.

Why You'll Love This Woody and Jessie Toy Story Amigurumi Pattern

I absolutely love this pattern because it captures the essence of two iconic characters that have touched hearts for generations. The attention to detail in their outfits and expressions makes these dolls truly special. I find the color work engaging and rewarding, especially when creating Jessie's burgundy hat and Woody's yellow sheriff badge. These make perfect gifts for Toy Story fans or wonderful display pieces for your own collection. The joy of seeing these characters come to life stitch by stitch is incredibly satisfying!

Woody and Jessie Toy Story Amigurumi Pattern step 1 - construction progress Woody and Jessie Toy Story Amigurumi Pattern step 2 - assembly progress Woody and Jessie Toy Story Amigurumi Pattern step 3 - details and accessories Woody and Jessie Toy Story Amigurumi Pattern step 4 - final assembly and finishing

Switch Things Up

I love how versatile this pattern is for customization! You can easily adjust the color schemes to create different cowboy characters or even swap out the waistcoat patterns for unique designs. I've tried adding tiny embroidered stars on Jessie's hat or creating a slightly different shirt pattern for Woody, and it gives each doll a personal touch.

Consider experimenting with different yarn weights to make mini versions for keychains or larger display pieces. I've found that using sparkly yarn for Jessie's hair adds a magical touch that kids especially love. You could also add small props like lassos made from thin cord or tiny fabric bandanas.

For an extra special touch, I sometimes embroider names on the bottom of their boots or add personalized details to make them unique gifts. The facial expressions can also be customized - slightly changing the eye placement or smile can give each doll its own personality. Don't be afraid to get creative with the assembly and make these characters truly your own!

Common Mistakes & How to Fix Them

βœ— Forgetting to insert safety eyes between rounds 15-16 before closing the head completely, making it impossible to secure them properly later βœ— Not stuffing the head firmly enough before decreasing rounds, which results in a floppy or misshapen head structure that won't hold up well βœ— Skipping the BLO (back loops only) instructions when changing colors, which creates an uneven color transition instead of the clean lines needed for clothing details βœ— Miscounting stitches during the hair construction turning rows, leading to an asymmetrical or ill-fitting hairpiece that doesn't sit properly on the head

Woody and Jessie Toy Story Amigurumi Pattern

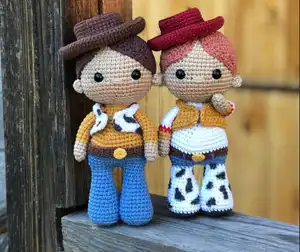
Bring the magic of Toy Story to life with this charming Woody and Jessie amigurumi pattern! These beloved cowboy characters are crafted with detailed clothing including their signature hats, waistcoats, and boots. Perfect for Toy Story fans and collectors, this pattern creates adorable dolls that capture the spirit of friendship and adventure. Each character features their iconic outfits with careful color work and authentic details that will delight both makers and recipients.

Intermediate 8-10 Hours

Materials Needed for Woody and Jessie Toy Story Amigurumi Pattern

β€” Main Fabric

  • 01
    Drops Safran yarn in bordeaux (20), red clay (59), brown (23), and strong yellow (11)
  • 02
    Drops I Love You 7 yarn in dark grey (04) and jeans blue (115)
  • 03
    Alize Cotton Gold yarn in white (55), brown (493), red (56), mustard (02), and beige (152)

β€” Tools Required

  • 01
    Crochet hook size No. 2
  • 02
    Crochet hook size No. 3
  • 03
    Plastic safety eyes 7-8mm diameter
  • 04
    Fiberfill stuffing
  • 05
    Tapestry needle for sewing
  • 06
    Scissors
  • 07
    Indelible marker for details
  • 08
    Stitch markers (recommended)

Progress Tracker

0% Complete

β€” Head :

Round 1 :

6 sc in mr (6)

Round 2 :

6 inc (12)

Round 3 :

(1 sc, inc) x 6 (18)

Round 4 :

(2 sc, inc) x 6 (24)

Round 5 :

(3 sc, inc) x 6 (30)

Round 6 :

(4 sc, inc) x 6 (36)

Round 7 :

(5 sc, inc) x 6 (42)

Round 8 :

(6 sc, inc) x 6 (48)

Round 9 :

(7 sc, inc) x 6 (54)

Round 10-19 :

54 sc

Info :

Between the 15-16 rows insert safety eyes, 7-8 mm in diameter

Round 20 :

(7 sc, dec) x 6 (48)

Round 21 :

(6 sc, dec) x 6 (42)

Round 22 :

(5 sc, dec) x 6 (36)

Round 23 :

(4 sc, dec) x 6 (30)

Round 24 :

(3 sc, dec) x 6 (24)

Round 25 :

(2 sc, dec) x 6 (18)

Info :

Stuff. Leave a long tail for sewing

β€” Hair (Jessy) :

Round 1 :

6 sc in mr (6)

Round 2 :

6 inc (12)

Round 3 :

(1 sc, inc) x 6 (18)

Round 4 :

(2 sc, inc) x 6 (24)

Round 5 :

(3 sc, inc) x 6 (30)

Info :

Expand crochet and continue work in turning rows

Round 6 :

(4 sc, inc) x 6, ch (36)

Round 7 :

(5 sc, inc) x 6, ch (42)

Round 8 :

(6 sc, inc) x 6, ch (48)

Round 9 :

(7 sc, inc) x 6, ch (54)

Round 10 :

(8 sc, inc) x 6, ch (60)

Round 11 :

Dec, 56 sc, dec, ch (58)

Round 12 :

2 dec, 50 sc, 2 dec, ch (54)

Round 13 :

2 dec, 46 sc, 2 dec, ch (50)

Round 14 :

2 dec, 42 sc, 2 dec, ch (46)

Round 15 :

2 dec, 38 sc, 2 dec, ch (42)

Round 16 :

2 dec, 34 sc, 2 dec, ch (38)

Round 17 :

38 sc

Round 18 :

Continue crochet round bangs hair: 24 sc

Round 19 :

38 sc

Info :

Leave a long tail for sewing

β€” Hair (Woody) :

Round 1 :

6 sc in mr (6)

Round 2 :

6 inc (12)

Round 3 :

(1 sc, inc) x 6 (18)

Round 4 :

(2 sc, inc) x 6 (24)

Round 5 :

(3 sc, inc) x 6 (30)

Info :

Expand crochet and continue work in turning rows

Round 6 :

(4 sc, inc) x 6, ch (36)

Round 7 :

(5 sc, inc) x 6, ch (42)

Round 8 :

(6 sc, inc) x 6, ch (48)

Round 9 :

(7 sc, inc) x 6, ch (54)

Round 10 :

(8 sc, inc) x 6, ch (60)

Round 11 :

Dec, 56 sc, dec, ch (58)

Round 12 :

2 dec, 50 sc, 2 dec, ch (54)

Round 13 :

2 dec, 46 sc, 2 dec, ch (50)

Round 14 :

2 dec, 42 sc, 2 dec, ch (46)

Round 15 :

2 dec, 38 sc, 2 dec, ch (42)

Round 16 :

2 dec, 34 sc, 2 dec, ch (38)

Round 17 :

38 sc

Round 18 :

Continue crochet round bangs hair: 24 sc

Round 19 :

38 sc

Info :

Leave a long tail for sewing

β€” Ears (x2) :

Round 1 :

6 sc in mr

Info :

Leave a long tail for sewing

β€” Forming Head Jessy :

Step 1 :

Between the 16-17 rows sew on ears. Distance from ears to eyes 5-6 sc

Step 2 :

Sew the hair to the head

Step 3 :

Embroider nose

Step 4 :

Start forming eyes: Embroider eyes - insert the white threaded needle on bottom of the eye and thread it to the bottom as shown in the picture. Bring the thread out near the second eye and repeat the same steps

Step 5 :

Toned cheeks

β€” Forming Head Woody :

Step 1 :

Between the 16-17 rows sew on ears. Distance from ears to eyes 5-6 sc

Step 2 :

Sew the hair to the head

Step 3 :

Embroider nose

Step 4 :

Start forming eyes: Embroider eyes - insert the white threaded needle on bottom of the eye and thread it to the bottom as shown in the picture. Bring the thread out near the second eye and repeat the same steps

Step 5 :

Toned cheeks

β€” Legs (Jessy) :

Round 1 :

6 sc in mr (6)

Round 2 :

6 inc (12)

Round 3 :

(1 sc, inc) x 6 (18)

Round 4 :

(2 sc, inc) x 6 (24)

Round 5 :

Change yarn color to the white color: BLO 24 sc

Round 6-7 :

24 sc

Round 8 :

(6 sc, dec) x 3 (21)

Round 9-10 :

21 sc

Round 11 :

(5 sc, dec) x 3 (18)

Round 12 :

18 sc

Round 13 :

(4 sc, dec) x 3 (15)

Round 14-15 :

15 sc

Round 16 :

(3 sc, dec) x 3 (12)

Round 17 :

12 sc

Info :

Stuff. Crochet second leg the same way and continue crocheting the body

β€” Legs (Woody) :

Round 1 :

6 sc in mr (6)

Round 2 :

6 inc (12)

Round 3 :

(1 sc, inc) x 6 (18)

Round 4 :

(2 sc, inc) x 6 (24)

Round 5 :

BLO 24 sc

Round 6-7 :

24 sc

Round 8 :

(6 sc, dec) x 3 (21)

Round 9-10 :

21 sc

Round 11 :

(5 sc, dec) x 3 (18)

Round 12 :

18 sc

Round 13 :

(4 sc, dec) x 3 (15)

Round 14-15 :

15 sc

Round 16 :

(3 sc, dec) x 3 (12)

Round 17 :

12 sc

Info :

Stuff. Crochet second leg the same way and continue crocheting the body

β€” Body (Jessy) :

Info :

On the second leg change yarn color to the blue color. The gap between the legs should be 3 ch

Round 1 :

12 sc on the leg, 3 sc on the chain, 12 sc on the leg, 3 sc on the chain (30)

Round 2 :

(4 sc, inc) x 6 (36)

Round 3 :

(5 sc, inc) x 6 (42)

Round 4-5 :

Change yarn color to the brown color: 42 sc

Round 6-7 :

Change yarn color to the white color: 42 sc

Round 8 :

(12 sc, dec) x 3 (39)

Round 9 :

(11 sc, dec) x 3 (36)

Round 10 :

(10 sc, dec) x 3 (33)

Round 11 :

(9 sc, dec) x 3 (30)

Round 12 :

(8 sc, dec) x 3 (27)

Round 13 :

(7 sc, dec) x 3 (24)

Info :

Stuff

Round 14 :

(6 sc, dec) x 3 (21)

Round 15-16 :

21 sc

Round 17 :

(5 sc, dec) x 3 (18)

Round 18 :

18 sc

Info :

Stuff

β€” Body (Woody) :

Info :

Do not cut off the thread on the second leg and continue crocheting the body. The gap between the legs should be 3 ch

Round 1 :

12 sc on the leg, 3 sc on the chain, 12 sc on the leg, 3 sc on the chain (30)

Round 2 :

(4 sc, inc) x 6 (36)

Round 3 :

(5 sc, inc) x 6 (42)

Round 4-6 :

42 sc

Round 7 :

Change yarn color to the mustard color: BLO 42 sc

Round 8 :

(12 sc, dec) x 3 (39)

Round 9 :

(11 sc, dec) x 3 (36)

Round 10 :

(10 sc, dec) x 3 (33)

Round 11 :

(9 sc, dec) x 3 (30)

Round 12 :

(8 sc, dec) x 3 (27)

Round 13 :

(7 sc, dec) x 3 (24)

Info :

Stuff

Round 14 :

(6 sc, dec) x 3 (21)

Round 15-16 :

21 sc

Round 17 :

(5 sc, dec) x 3 (18)

Round 18 :

18 sc

Info :

Stuff

β€” Belt Yellow Detail (Jessy) :

Round 1 :

6 sc in mr

Info :

Leave a long tail for sewing. Sew the yellow detail to the body (belt)

β€” Belt (Woody) :

Round 1 :

4 ch

Round 2-61 :

3 sc, ch (60 rounds)

Info :

Start working with brown color Alize cotton gold (hook size 1.3 mm). Split the white color yarn in half, and crochet. Work in turning rows. Sew the belt to the body

β€” Hands (Jessy) :

Round 1 :

6 sc in mr (6)

Round 2 :

(1 sc, inc) x 3 (9)

Round 3-5 :

9 sc

Round 6-7 :

Change yarn color to the yellow color: 9 sc

Round 8 :

Change yarn color to the red color: 9 sc

Round 9-16 :

Change yarn color to the white color: 9 sc

Info :

Stuff. Leave a long tail for sewing. Sew the hands to the body. Sew the head to the body

β€” Hands (Woody) :

Round 1 :

6 sc in mr (6)

Round 2 :

(1 sc, inc) x 3 (9)

Round 3-5 :

9 sc

Round 6 :

Change yarn color to the mustard color: 9 sc

Round 7-16 :

9 sc

Info :

Stuff. Leave a long tail for sewing. Sew the hands to the body. Sew the head to the body

β€” Waistcoat (Jessy) :

Round 1 :

43 ch

Round 2 :

5 sc, sleeves: 9 ch, skip 9 sc, 14 sc on the back, sleeves: 9 ch, skip 9 sc, 5 sc, ch (42)

Round 3-5 :

42 sc

Info :

Start working with mustard color and work in turning rows. Crochet round: 3 sc side view, 42 sc from above, 3 sc side view, 42 sc from below

β€” Waistcoat (Woody) :

Round 1 :

43 ch

Round 2 :

5 sc, sleeves: 9 ch, skip 9 sc, 14 sc on the back, sleeves: 9 ch, skip 9 sc, 5 sc, ch (42)

Round 3-5 :

42 sc

Info :

Start working with white color and work in turning rows. Crochet round: 3 sc side view, 42 sc from above, 3 sc side view, 42 sc from below. With indelible marker, mark the spots on Woody's waistcoat, if you do not want to draw, you can take a hook No. 0.9-1.3 and crochet them with a suitable yarn
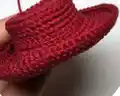
β€” Hat (Jessy) :

Round 1 :

6 sc in mr (6)

Round 2 :

6 inc (12)

Round 3 :

(1 sc, inc) x 6 (18)

Round 4 :

(2 sc, inc) x 6 (24)

Round 5 :

(3 sc, inc) x 6 (30)

Round 6 :

(4 sc, inc) x 6 (36)

Round 7 :

BLO 36 sc

Round 8-11 :

36 sc

Round 12 :

---BLO (5 sc, inc) x 6 (42)

Round 13 :

3 sc, inc, (6 sc, inc) x 5, 3 sc (48)

Round 14 :

(7 sc, inc) x 6 (54)

Round 15 :

4 sc, inc, (8 sc, inc) x 5, 4 sc (60)

Round 16 :

(9 sc, inc) x 6 (66)

Round 17 :

5 sc, inc, (10 sc, inc) x 5, 5 sc (72)

Round 18 :

(11 sc, inc) x 6 (78)

Round 19 :

78 sc

Info :

Start working with burgundy color. Sew the hat on to the head

β€” Hat (Woody) :

Round 1 :

6 sc in mr (6)

Round 2 :

6 inc (12)

Round 3 :

(1 sc, inc) x 6 (18)

Round 4 :

(2 sc, inc) x 6 (24)

Round 5 :

(3 sc, inc) x 6 (30)

Round 6 :

(4 sc, inc) x 6 (36)

Round 7 :

BLO 36 sc

Round 8-11 :

36 sc

Round 12 :

BLO (5 sc, inc) x 6 (42)

Round 13 :

3 sc, inc, (6 sc, inc) x 5, 3 sc (48)

Round 14 :

(7 sc, inc) x 6 (54)

Round 15 :

4 sc, inc, (8 sc, inc) x 5, 4 sc (60)

Round 16 :

(9 sc, inc) x 6 (66)

Round 17 :

5 sc, inc, (10 sc, inc) x 5, 5 sc (72)

Round 18 :

(11 sc, inc) x 6 (78)

Round 19 :

78 sc

Info :

Start working with brown color. Sew the hat on to the head. With indelible marker, mark the spots on Jessy's legs, if you do not want to draw, you can take a hook No. 0.9-1.3 and crochet them with a suitable yarn

Assembly Instructions

  • Sew the hair piece onto the completed head, positioning it carefully to match the character's signature hairstyle
  • Attach the ears between rounds 16-17 of the head, maintaining a distance of 5-6 sc from the eyes on each side
  • Embroider the facial features including the nose and eye details using white thread as described in the pattern
  • Connect the completed head to the body by sewing securely through the neck opening using your tapestry needle
  • Attach the hands to the sides of the body at the appropriate height for natural positioning
  • Sew or draw decorative details on the waistcoats and boots as indicated in the pattern using indelible marker or crochet
  • Place the completed hat on the head and sew it securely in position to complete your character

Important Notes

  • πŸ’‘Insert safety eyes between rounds 15-16 before closing the head completely to ensure proper placement and security
  • πŸ’‘Pay close attention to BLO (back loops only) instructions as they create clean color transitions essential for the clothing details
  • πŸ’‘Stuff each piece firmly but not overly tight to maintain the proper shape and proportions of the characters
  • πŸ’‘Use stitch markers to keep track of your rounds, especially during color changes throughout the body and clothing sections
  • πŸ’‘When working on the hair pieces in turning rows, count carefully to ensure symmetrical shaping for proper fit
  • πŸ’‘Keep yarn tension consistent throughout to create a smooth, professional-looking finish on both characters

This charming Woody and Jessie pattern brings the beloved Toy Story duo to life in adorable amigurumi form! Perfect for Disney fans and collectors alike, these detailed dolls feature authentic cowboy outfits, signature hats, and carefully crafted facial expressions that capture their adventurous spirit. The pattern uses strategic color changes and detailed assembly techniques to create characters you'll be proud to display or gift. Whether you're making them for a Toy Story enthusiast or adding to your own collection, these partners are ready to ride into your crafting adventure! 🀠🧢✨

You ask,

we answer.

FAQs

Can I make these dolls larger or smaller?

Yes! You can adjust the size by using a larger or smaller hook with thicker or thinner yarn. Keep in mind that you'll need to adjust your safety eye size accordingly, and the proportions may vary slightly.

What's the approximate finished size of each doll?

Using the recommended yarn and hook sizes, each doll measures approximately 9-11 inches tall. The exact size depends on your tension and how firmly you stuff them.

Do I need to make both characters or can I make just one?

You can absolutely make just one character! The pattern provides separate instructions for both Woody and Jessie, so feel free to choose your favorite or make both as a matching set.

How do I create the facial features if I don't want to use safety eyes?

You can embroider eyes using black yarn or felt instead of safety eyes. Simply embroider circles or use felt pieces sewn onto the face at the same placement indicated for safety eyes.

Are the hats removable or sewn on permanently?

The pattern instructs to sew the hats permanently onto the heads for security. However, you could leave them unsewn if you prefer removable hats, though they may not stay in place as securely.

What's the best way to add the details on Woody's vest and boots?

The pattern suggests using an indelible marker for drawing details, or you can use a small hook (0.9-1.3mm) with suitable yarn to crochet the design elements directly onto the waistcoat and boots.