🧢 Beautiful ✨ Detailed πŸ’ Adorable

Oversized Pajama Cardigan Knitting Pattern

Oversized Pajama Cardigan Knitting Pattern
4.5β˜… Rating
40-60 Hours Time Needed
3.2K Made This
βœ‚οΈ

Intermediate Level

Ideal for those with basic knitting experience, featuring slightly more advanced stitches and techniques to expand your skills.

⏱️

Slow & Steady

A 10-12 hour projectβ€”great for savoring the process over several sessions.

πŸ§₯

Layered Comfort

Perfect for cozy, stylish layering through changing seasons with versatile, mix-and-match potential.

About This Oversized Pajama Cardigan Knitting Pattern

This oversized pajama cardigan pattern offers the perfect blend of comfort and style for knitters ready to expand their wardrobe. The design features a flattering V-neck, roomy pockets, and a beautiful pattern stitch that creates visual interest without overwhelming complexity. Worked in panels that are seamed together, this cardigan allows you to create a professional-looking garment using straightforward construction methods. The pattern includes nine sizes ranging from XS to 5X, ensuring a comfortable fit with positive ease for everyone.

Oversized Pajama Cardigan Knitting Pattern crochet pattern - detailed view of completed project

What makes this cardigan special is the thoughtful combination of stockinette sections and decorative pattern stitch bands that add texture and visual appeal. The optional thumbholes in the sleeves provide extra functionality, making this piece perfect for chilly mornings when you need that little bit of extra warmth.

Why You'll Love This Oversized Pajama Cardigan Knitting Pattern

I absolutely love this pattern because it creates the kind of sweater you'll reach for every single day. There's something magical about knitting a garment that becomes part of your daily uniform, and this cardigan has that special quality. I love how the pattern stitch adds just enough interest to keep the knitting engaging without being tedious, and the oversized fit means it's incredibly forgiving and comfortable to wear. The fact that it uses a sustainable yarn blend of recycled wool and cotton makes me feel good about the project from start to finish, and those pockets are perfectly sized for keeping your hands warm or stashing your phone. This is the kind of project that reminds you why you fell in love with knitting in the first place.

Oversized Pajama Cardigan Knitting Pattern step 1 - construction progress Oversized Pajama Cardigan Knitting Pattern step 2 - assembly progress Oversized Pajama Cardigan Knitting Pattern step 3 - details and accessories Oversized Pajama Cardigan Knitting Pattern step 4 - final assembly and finishing

Switch Things Up

I love experimenting with this pattern to make each cardigan uniquely my own. One of my favorite modifications is playing with color blocking - instead of using a single solid color, I'll work the ribbing in one shade, the pattern stitch sections in a contrasting color, and the stockinette sections in yet another complementary tone. This creates a stunning visual impact that highlights the beautiful construction of the design.

Another variation I enjoy is adjusting the pocket placement and size. Sometimes I make them larger for a more dramatic statement, or I'll position them slightly higher or lower depending on my preference. I've even created versions with no pockets at all for a sleeker silhouette, or added a third pocket on the inside for hidden storage.

The pattern stitch is wonderful, but I've also substituted it with other textured stitches like seed stitch, moss stitch, or even simple garter stitch bands for a different look. Each variation changes the character of the cardigan while maintaining that cozy, oversized aesthetic that makes this design so special. Don't be afraid to make this pattern your own!

Common Mistakes & How to Fix Them

βœ— Not maintaining consistent tension when switching between stockinette and pattern stitch sections can create puckering or uneven fabric that affects drape and appearance βœ— Forgetting to keep selvedge stitches in stockinette when working ribbing or pattern sections results in messy seams that are difficult to finish cleanly βœ— Miscounting increases on sleeves leads to sleeves that are too tight or too loose at the upper arm, compromising fit and comfort throughout βœ— Not blocking gauge swatch before starting means your finished measurements will be significantly off and the cardigan may not fit as intended βœ— Skipping the step of pinning pieces together before seaming can result in misaligned pattern sections and uneven shoulder lines that look unprofessional

Oversized Pajama Cardigan Knitting Pattern

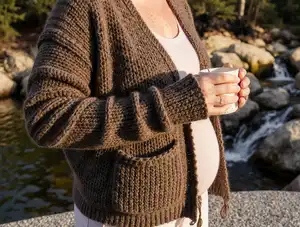
Transform your cozy wardrobe with this dreamy oversized pajama cardigan that's destined to become your go-to comfort piece. Designed after a memorable Colorado trip, this luxurious cardigan combines the comfort of your favorite robe with the versatility of a casual layering sweater. Knit in a beautiful worsted weight blend of recycled wool and cotton, it features a relaxed silhouette with elegant pattern stitch details, practical pockets, and optional thumbholes for extra coziness. Whether you're lounging at home in your pajamas or running errands around town, this cardigan wraps you in handmade warmth and effortless style.

Intermediate 40-60 Hours

Materials Needed for Oversized Pajama Cardigan Knitting Pattern

β€” Main Fabric

  • 01
    6-10 skeins Mungo by Rosa Pomar of Retrosaria in color Fossil (002), 100g/220m per skein, 50% recycled wool and 50% recycled cotton
  • 02
    Alternative: 1,440-2,400 yards of any worsted weight wool/cotton blend yarn depending on size

β€” Tools Required

  • 01
    US size 3 (3.25mm) circular needles, 32-40 inch length
  • 02
    US size 6 (4mm) circular needles, 32-40 inch length
  • 03
    Double pointed needles (dpns) in US size 6 (4mm) for sleeves, or use magic loop method
  • 04
    Stitch marker
  • 05
    Yarn needle for seaming
  • 06
    Scissors
  • 07
    Tape measure
  • 08
    Pins for blocking and assembly

Progress Tracker

0% Complete

β€” Back Panel :

Cast On :

With smaller needles, CO 98 (110, 122, 134)[146, 158, 170, 182, 194] sts

Ribbing Section :

Keeping each edge stitch worked in stockinette st (selvedge sts), work in K1P1 ribbing for 2 inches

Stockinette Section 1 :

Change to larger needles. Work in stockinette st (K on RS, P on WS) for 6 (6, 6.5, 6.5)[6.25, 6.25, 6.25, 6.75, 6.75] inches. End after a WS row

Pattern Stitch Section :

Work in Pattern St for 8.5 (9.5, 9.5, 10)[10, 10.5, 10.5, 10.5, 10.5] inches

Stockinette Section 2 :

Work in stockinette st for 8.5 (8.5, 8.5, 8.5)[9, 9, 9, 9, 9] inches. End after a WS row

Shoulder Bind Off :

BO 12 (15, 17, 20)[14, 16, 17, 19, 20] sts at the beginning of the next 4 (4, 4, 4)[6, 6, 6, 6, 6] rows. BO remaining neck sts

β€” Left Front Panel :

Cast On :

With smaller needles, CO 44 (50, 56, 62)[68, 74, 80, 86, 92] sts

Ribbing :

Work in K1P1 ribbing for 2 inches

Stockinette :

Change to larger needles and work in stockinette st until entire length is 19.5 (20, 20, 20.5)[20.5, 21, 21, 21, 21.5] inches. End after a WS row

V-Neck Shaping RS :

K to last 4 sts, ssk, k2

V-Neck Shaping WS :

P across row

Info :

Work these last 2 rows a total of 19 (20, 20, 21)[22, 22, 23, 23, 24] times or until front panel matches length of back panel

Shoulder Bind Off Row 1 :

BO 12 (15, 18, 20)[15, 17, 19, 21, 23] sts at the beginning of the next row, k to end of row

WS Row :

P across

Shoulder Bind Off Row 2 :

BO 13 (15, 18, 21)[15, 17, 19, 21, 23] sts at the beginning of the next row. For Sizes XL, 2X, 3X, 4X, and 5X, k to end of row

Sizes XL-5X Only WS :

P across

Sizes XL-5X Final BO :

BO 16 (18, 19, 21, 22) sts

β€” Right Front Panel :

Cast On :

With smaller needles, CO 44 (50, 56, 62)[68, 74, 80, 86, 92] sts

Ribbing :

Work in K1P1 ribbing for 2 inches

Stockinette :

Change to larger needles and work in stockinette st until entire length is 19.5 (20, 20, 20.5)[20.5, 21, 21, 21, 21.5] inches. End after a WS row

V-Neck Shaping RS :

K2, k2tog, k to end of row

V-Neck Shaping WS :

P across row

Info :

Work these last 2 rows a total of 19 (20, 20, 21)[22, 22, 23, 23, 24] times

Shoulder RS :

K across

Shoulder Bind Off Row 1 WS :

BO 12 (15, 18, 20)[15, 17, 19, 21, 23] sts at the beginning of the next row, p to end of row

RS Row :

K across

Shoulder Bind Off Row 2 WS :

BO 13 (15, 18, 21)[15, 17, 19, 21, 23] sts at the beginning of the next row. For Sizes XL, 2X, 3X, 4X, and 5X, p to end of row

Sizes XL-5X RS :

K across

Sizes XL-5X Final BO WS :

BO 16 (18, 19, 21, 22) sts

β€” Pockets (Make 2) :

Cast On :

With larger needles, CO 36 sts

Ribbing :

Work 6 rows of K2P2 ribbing

Pattern Stitch :

Work in Pattern St Instructions (worked flat) for 7 inches or until pocket is desired length

Finish :

BO sts and set aside to be blocked and attached to garment later

β€” Sleeves (Make 2) :

Cast On :

With smaller needles, beginning at cuff, CO 42 (44, 44, 46)[46, 48, 48, 50, 50] sts. Do NOT join in the round

Cuff :

Work 28 rows or 4 inches in Stockinette st (k RS, p WS). End after a WS row

Join Round :

Join in the round (if using dpns, distribute sts evenly on 3 needles), place marker at BOR

Increase Round :

Kfb on each side of the marker (2 sts inc)

Stockinette Increases :

With larger needles, work inc rnd every 6 (6, 6, 6)[4, 4, 3, 3, 3]th/rd rnd 9 (9, 9, 9)[15, 15, 22, 22, 23] times

Pattern Stitch Section :

Work rnds 1 and 2 of Pattern Stitch (in the round) for 5.5 (5.5, 5.5, 6)[6, 6.5, 7] inches

Info :

At the same time, work the inc rnds every 6 (6, 6, 5)[4, 3, 3, 3, 3]th/rd rnd 6 (6, 8, 10)[9, 14, 11, 15, 14] times and then work EVEN until pattern section is approx 6.5 (6.5, 6.5, 7)[7, 7.5, 8] inches in length. You should have 72 (74, 78, 84)[94, 106, 114, 124, 124] sts

Stockinette Even :

Continue to work even by knitting ea rnd (without inc) until sleeve measures 18.5 (18.5, 18.5, 18.5)[17.5, 17.5, 17, 17, 16] inches from CO edge (or your desired length)

Bind Off :

BO all sts

β€” Buttonband and Collar :

Pick Up Stitches :

Using larger circular needle, and with RS facing, pick up and k 158 (162, 165, 168)[171, 174, 174, 176, 176] sts along right front, 58 (58, 60, 60)[66, 66, 70, 70, 74] sts along back neck, and 158 (162, 165, 168)[171, 174, 174, 176, 176] sts along left front

Pattern Stitch :

Work in Pattern Stitch Instructions (worked flat) on 374 (381, 390, 396)[408, 414, 418, 422, 426] sts until button band measures 1.5-2 inches

Bind Off :

BO loosely in purl

β€” Pattern Stitch Instructions (Worked Flat) :

Info :

Continue to keep each selvedge st worked in stockinette st

Row 1 (RS) :

K2, *YO, k2, pass the YO over the 2 k sts* rep from * to * until 2 sts from end, k2

Row 2 (WS) :

P across row

Info :

Repeat rows 1 and 2 as directed

β€” Pattern Stitch Instructions (Worked in the Round) :

Round 1 :

*YO, k2, pass the YO over the 2 k sts*, rep from * to * to end of rnd

Round 2 :

K all sts

Assembly Instructions

  • Block all pieces to measurements before assembly to ensure proper fit and drape
  • Sew shoulder seams together using mattress stitch for invisible seaming
  • Set in sleeves by pinning armhole edge to body, matching center of sleeve cap to shoulder seam, then sewing in place
  • Sew up lower sleeve seams, leaving a 2 inch gap for thumbholes if desired, otherwise sew entire seam closed
  • Sew side seams of body from hem to underarm using mattress stitch
  • Pin pockets in desired position on front panels and sew securely in place around sides and bottom
  • Weave in all remaining ends and give finished cardigan a final light blocking if needed

Important Notes

  • πŸ’‘Gauge is critical for this project - always knit and block a gauge swatch before starting to ensure proper fit
  • πŸ’‘The pattern uses positive ease of 2 inches, meaning it should fit 2 inches larger than your actual chest measurement
  • πŸ’‘Keep selvedge stitches in stockinette throughout all sections to create clean edges for seaming
  • πŸ’‘When working the pattern stitch, maintain consistent tension to ensure even fabric texture
  • πŸ’‘Mark your place carefully when working increases on sleeves to avoid counting errors
  • πŸ’‘Buttons are optional - the pattern stitch band creates natural buttonholes if you choose to add them
  • πŸ’‘Consider your desired length when knitting sleeves and adjust measurements to suit your preference

This cozy Pajama Cardigan pattern was born from a winter trip to Colorado and designed to be the ultimate comfort piece in your handmade wardrobe. With its relaxed oversized fit, beautiful textured pattern stitch details, and practical pockets, this cardigan bridges the gap between loungewear and everyday style. The construction uses straightforward techniques with professional results, making it perfect for knitters ready to create a garment they'll treasure for years. Whether you're curling up at home or heading out for coffee, this cardigan wraps you in handmade luxury. Happy knitting and enjoy every cozy stitch!

You ask,

we answer.

FAQs

Can I substitute a different yarn for the recommended Mungo by Rosa Pomar?

Yes, you can substitute any worsted weight wool/cotton blend yarn. Just make sure to knit a gauge swatch and match the gauge of 24 sts and 28 rows per 4 inches when blocked. The wool/cotton blend is recommended for the perfect drape and structure of this cardigan design.

How do I know which size to make?

Measure your chest circumference and choose the size that gives you 2 inches of positive ease. For example, if your chest measures 36 inches, choose the size that gives a finished chest measurement of 38-40 inches. The pattern is designed to be worn oversized and comfortable.

What's the best way to pick up stitches for the buttonband?

Pick up stitches evenly along the front edges with the right side facing you. A good rule is to pick up approximately 3 stitches for every 4 rows. Use pins to mark even sections before you begin picking up stitches to ensure they're distributed evenly.

Do I need to add buttons or closures to this cardigan?

Buttons are completely optional for this design. The pattern stitch edging creates natural openings that can serve as buttonholes if you want to add buttons for closure. Many knitters prefer to wear it open as a relaxed layering piece without any closures.

Can I make the sleeves longer or shorter?

Absolutely! The sleeve length is adjustable. Just continue or stop the stockinette section at your desired length before binding off. Make sure to try on the sleeve as you go to check the length, and adjust accordingly for your arm length.

How should I care for my finished cardigan?

Hand wash your cardigan in cool water with a gentle wool wash, then lay flat to dry. The recycled wool and cotton blend should be treated gently to maintain its shape and softness. Never hang wet as it can stretch the fabric.