🧢 Beautiful ✨ Detailed πŸ’ Adorable

Adorable Goose Mittens Crochet Pattern

Adorable Goose Mittens Crochet Pattern
4.8β˜… Rating
3-4 Hours Time Needed
2.9K Made This
βœ‚οΈ

Beginner Friendly Level

Perfect for those just starting their sewing journey, with clear instructions and simple techniques

⏱️

Bite-Sized Project

Complete in under 2 hoursβ€”quick, fun, and perfect for a little creative escape.

πŸ₯

Charming Critter

Delightful animal designs with sweet details that capture the essence of your favorite woodland and farmyard friends.

About This Adorable Goose Mittens Crochet Pattern

Adorable Goose Mittens Crochet Pattern crochet pattern - detailed view of completed project

The construction method is beginner-friendly, using simple single crochet stitches worked continuously in the round. The thumb is attached separately after completing the main mitten body, and the pattern provides helpful guidance on creating the perfect thumb hole placement for maximum comfort.

Why You'll Love This Adorable Goose Mittens Crochet Pattern

I absolutely love this pattern because it's so adaptable and fun to make! The custom sizing feature means I can create mittens for everyone in my family without worrying about following rigid size charts. Working with double strands of yarn makes the project go quickly while creating a wonderfully thick and warm fabric that really keeps hands cozy. The goose eyes add such a delightful whimsical touch that always makes people smile. Plus, the top-down construction method is brilliant because you can try on the mitten as you go and adjust the length perfectly to your hand. It's one of those patterns where you learn valuable techniques while creating something truly practical and adorable at the same time!

Adorable Goose Mittens Crochet Pattern step 1 - construction progress Adorable Goose Mittens Crochet Pattern step 2 - assembly progress Adorable Goose Mittens Crochet Pattern step 3 - details and accessories Adorable Goose Mittens Crochet Pattern step 4 - final assembly and finishing

Switch Things Up

I love how versatile this pattern is! While the original design features adorable goose eyes in orange and white, you can completely transform these mittens by switching up your color choices. Try making them in gray with black eyes for penguin mittens, or use brown yarn with button eyes for teddy bear mittens. You could even create festive holiday versions in red and white for candy cane mittens or green with red accents for elf mittens!

The pattern also allows for personal customization in fit and style. If you prefer a looser, more relaxed fit around the wrist, simply skip the decrease rounds and continue with straight single crochet. For those who love extra warmth, consider adding ribbed cuffs at the bottom by working in back loop only for the final rounds. You could also embellish your finished mittens with embroidered details, pompoms, or crocheted flowers to make them uniquely yours.

Don't be afraid to experiment with different yarn weights either! While the pattern calls for worsted weight yarn held double, you could try bulky yarn held single for a quicker project, or sport weight yarn held triple for a different texture. The possibilities are endless, and each variation will give you a completely different look while maintaining the charming character that makes these mittens so special!

Common Mistakes & How to Fix Them

βœ— Working the magic ring too loosely at the start can create a hole at the fingertip; pull the tail tight and weave it in securely βœ— Forgetting to mark the beginning of rounds can cause confusion with stitch placement; use a stitch marker or safety pin to track your starting point βœ— Making the thumb hole chain too tight or too loose affects comfort; try on the mitten and adjust chain length before continuing with the pattern βœ— Not using double strands of yarn consistently throughout creates uneven tension and sizing issues; always check you're working with two strands together

Adorable Goose Mittens Crochet Pattern

Bring a playful touch to your winter wardrobe with these charming Goose Mittens! This delightful pattern features adorable goose eyes and creates warm, cozy mittens that both kids and adults will love. Perfect for showcasing your crochet skills while making practical cold-weather accessories, these mittens work up from the top down in a continuous spiral technique. The pattern includes custom sizing guidance so you can create the perfect fit for any hand size. Whether you're making them as thoughtful handmade gifts or treating yourself to some whimsical winter wear, these goose-inspired mittens will definitely make you smile every time you wear them!

Beginner Friendly 3-4 Hours

Materials Needed for Adorable Goose Mittens Crochet Pattern

β€” Main Fabric

  • 01
    1 skein (364 yards) of worsted weight yarn in orange (using two strands at once)
  • 02
    1 skein (364 yards) of worsted weight yarn in white (using two strands at once)

β€” Tools Required

  • 01
    J-6mm crochet hook
  • 02
    Yarn needle
  • 03
    12mm flat back safety eyes or black buttons
  • 04
    Stitch markers or safety pins

Progress Tracker

0% Complete

β€” Making the Top of the Mitten :

Info :

With 2 strands of orange yarn

Round 1 :

10 sc in a magic ring (10)

Round 2 :

Sc around (10)

Round 3 :

Sc around (10)

Info :

Weave in magic ring end

Round 4 :

Inc in each st around (20)

Info :

See how the glove is fitting so far, if you have medium to large size hands, you may want to do several more rounds of (sc in st, inc in next) repeat around

Round 5-14 :

Sc around (20)

Round 15 :

After reaching the proper width for your hand, continue to make rounds of sc until the glove reaches the crook of your hand (if you slip on the mitten, it should be just touching the space in between your thumb and index finger)
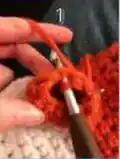
Thumb Hole Round :

Sc in the first stitch of the round, chain 6 (not too loose or tight), skip the next two stitches in the round and sc in the next st, sc around until you get back to that first stitch that had the chain 6, fasten off, weave ends

Info :

You can chain more stitches in an even number to create a larger thumb hole

β€” Making the Lower Hand and Wrist of the Mitten :

Info :

With 2 strands of white yarn

Round 16 :

Slip st and then sc into that same st 3 sts away from the thumb hole (you can choose anywhere in the round if you would like, this color change will be hardly visible), sc around (24)

Round 17 :

You may notice a gap at the beginning of this next round from where the color change happened, we are going to start this next round without any joining, just sc in the first stitch (skip the slip st) and sc around (24)

Round 18 :

Sc around (24)

Info :

From here on forward with the pattern, you can continue to sc around without any decreasing to have looser fitting mittens, or you can choose to shape them by decreasing as they go down your hand and your wrist for a snug fit (test mittens are made with a snug fit), so wherever you see fit to make the mitten tighter, repeat for each round (sc in 2 sts, decrease in next st)

Round 19 :

(Sc in 2 sts, decrease in next) (18)

Round 20-28 :

Sc around (18)

Info :

Fasten off, you can add some ribbing to the end of the mitten if you wish

β€” Making the Thumb :

Info :

With 2 strands of orange yarn, flip glove inside out, and you will be crocheting from the inside of the circle

Round 1 :

Slip st yarn into any chain around the thumb hole, sc in the same st, then in traditional and non-traditional spaces, work 12 sts around (12)

Round 2-3 :

Sc around

Info :

See how the thumb hole is fitting so far, if you have medium to large size hands and long fingers, you may want to do a few more rounds of sc, stop making sc rounds when you reach slightly past your thumb knuckle

Round 4 :

Decrease in all sts (6)

Info :

If you added more chains than 6 when you made the thumb hole, continue to decrease in each st until you reach 6 sts in the round

Round 5-7 :

Sc around (6)

Info :

Fasten off and weave top of thumb shut

β€” Placing the Eyes :

Info :

Flip the glove right side out and place your goose eyes (can be flat back eyes that are then melted at the sharp end, also buttons, or small crocheted circles) on the inner corner of the glove, with the test gloves, the eyes were placed between the 2nd and 3rd round of white

Final Step :

The mittens are complete, honk!

Assembly Instructions

  • After completing the main mitten body, flip it inside out to crochet the thumb from the inside of the thumb hole circle
  • Work stitches evenly around the thumb hole opening, including both traditional chain spaces and non-traditional spaces for proper thumb structure
  • Once the thumb is complete, fasten off and use the yarn tail to weave the top of the thumb shut securely
  • Flip the mitten right side out and position the safety eyes or buttons on the inner corner of the glove between rounds 2 and 3 of the white section
  • If using safety eyes, insert them through the fabric and secure the backs tightly; if using buttons, sew them on securely with matching thread
  • Weave in all remaining yarn ends throughout the mitten for a clean, professional finish

Important Notes

  • πŸ’‘Always work with two strands of yarn held together throughout the entire project to achieve the correct thickness and warmth
  • πŸ’‘The mittens are worked in a spiral without joining at the end of each round, just like amigurumi projects
  • πŸ’‘Use stitch markers to track the beginning of your rounds, especially when changing colors or placing the thumb hole
  • πŸ’‘Try on the mitten as you work to ensure proper fit and adjust rounds as needed for your hand size
  • πŸ’‘The thumb hole chain should be neither too tight nor too loose; test the fit before continuing to the wrist section
  • πŸ’‘For medium to large hands, add extra increase rounds in the beginning and extra length rounds before creating the thumb hole
  • πŸ’‘The color change between orange and white should be positioned away from the thumb hole for a cleaner appearance

These delightful Goose Mittens combine practicality with playfulness, creating a winter accessory that's as fun to make as it is to wear! The custom sizing feature makes this pattern incredibly versatile, allowing you to create perfectly fitted mittens for anyone from young teens to adults. The clever top-down construction and simple single crochet stitches make this an excellent project for practicing spiral crochet techniques while creating something truly useful. Those adorable goose eyes add just the right amount of whimsy to brighten up cold winter days. Honk your way through winter with these charming handmade mittens! 🧢 Happy crocheting! πŸ¦†βœ¨

You ask,

we answer.

FAQs

Can I make these mittens in different sizes?

Absolutely! This pattern features custom sizing instructions. You can adjust the width by adding more increase rounds in the beginning, and adjust the length by working more or fewer rounds before creating the thumb hole. The pattern is designed to fit any young teen to adult size.

Can I make these mittens for small children?

Yes! The pattern suggests experimenting with a smaller hook size and lighter weight yarn to create mittens for small children. You would also need to reduce the number of initial stitches in the magic ring and adjust the overall dimensions accordingly.

Why do I need to use two strands of yarn at once?

Using two strands of worsted weight yarn together creates a thicker, warmer fabric that's perfect for winter mittens. It also helps the mittens work up faster and provides better insulation against cold weather.

What if my thumb hole is too small or too large?

The pattern creates a thumb hole with a chain-6, but you can adjust this! Simply chain more or fewer stitches in an even number to create the perfect thumb hole size for your hand. Make sure to skip the corresponding number of stitches in the round.

Can I use buttons instead of safety eyes for the goose design?

Yes! The pattern specifically mentions that you can use flat back safety eyes, black buttons, or even small crocheted circles for the goose eyes. Choose whichever option you prefer or have available.

How do I know when to stop making the mitten body before the thumb hole?

The pattern instructs you to continue until the mitten reaches the crook of your hand. When you try it on, it should just touch the space between your thumb and index finger. This ensures proper thumb placement.

Should I make the wrist portion fitted or loose?

This is your choice! The pattern offers both options. You can continue with straight sc rounds for a looser fit, or incorporate decreases (sc in 2 sts, decrease in next) throughout rounds 19-28 for a snug, fitted wrist like the test mittens.