🧶 Beautiful ✨ Detailed 💝 Adorable

Meowth Amigurumi Pattern

Meowth Amigurumi Pattern
4.0★ Rating
8-10 Hours Time Needed
1.4K Made This
✂️

Intermediate Level

Ideal for those with basic knitting experience, featuring slightly more advanced stitches and techniques to expand your skills.

⏱️

All-Day Adventure

Requires 8-10 hours, ideal for a full day of immersive knitting.

🐱

Charming Critter

Delightful animal designs with sweet details that capture the essence of your favorite woodland and farmyard friends.

About This Meowth Amigurumi Pattern

Meowth Amigurumi Pattern crochet pattern - detailed view of completed project

The pattern includes optional needle felting guidance for creating authentic facial features and ear coloring, though alternative methods can be substituted. Wire reinforcement in the legs ensures your Meowth stands proudly on display.

Why You'll Love This Meowth Amigurumi Pattern

I absolutely love this Meowth pattern because it perfectly captures one of Pokémon's most recognizable and beloved characters in such a huggable form! The oval head construction technique is something I find fascinating and creates that signature Meowth profile beautifully. I especially appreciate how the pattern includes wire support for the legs, making this more than just a soft toy—it's a displayable piece that stands on its own. The tiny details like the individual fingers and whiskers made from embroidery floss add such authentic charm. What really excites me is the combination of crochet with optional needle felting, giving crafters flexibility to customize while still achieving that iconic look. Creating something that's both cuddly and recognizable from a beloved franchise brings such joy and satisfaction!

Meowth Amigurumi Pattern step 1 - construction progress Meowth Amigurumi Pattern step 2 - assembly progress Meowth Amigurumi Pattern step 3 - details and accessories Meowth Amigurumi Pattern step 4 - final assembly and finishing

Switch Things Up

I love experimenting with this Meowth pattern because there are so many creative possibilities! One of my favorite modifications is making different colored versions—imagine a shiny Meowth using cream and silver instead of stone and gold, or even creating regional variant colors inspired by other Pokémon games.

I've tried using different yarn weights to create various sizes. Using sport weight yarn with a smaller hook makes an adorable mini version perfect for keychains, while chunky yarn creates a large cuddly version that's perfect for younger children. Each size brings its own charm and challenges.

For the facial features, I sometimes skip needle felting entirely and use embroidered details or carefully placed felt pieces glued or sewn on. I've even experimented with safety eyes combined with embroidered mouths, which gives a softer, more traditional amigurumi look while still being recognizable as Meowth.

The whiskers are another fun area to customize—I've made them with fishing line for stiffer, more realistic whiskers that stick out, or omitted them entirely for a simpler, cleaner look. Some crafters prefer using black thread for more visible whiskers against the cream body.

I've also added extra details like a tiny crocheted coin purse attached to his paw, or created alternate expressions by changing the mouth shape during needle felting or embroidery. Making an angry Meowth or a sleeping Meowth with closed eyes adds personality and makes each creation unique. The possibilities are endless once you understand the basic construction!

Common Mistakes & How to Fix Them

✗ Not maintaining the oval shape properly during head construction can result in an oddly proportioned face that doesn't look like Meowth ✗ Forgetting to stuff the head firmly enough before closing causes a floppy appearance and poor structure for facial features ✗ Skipping the wire reinforcement in legs makes the figure unable to stand properly and defeats the poseable design ✗ Placing fingers incorrectly on the arms creates awkward-looking paws instead of the characteristic three-fingered Meowth hands ✗ Not using stitch markers when working the heel section of feet leads to confusion and misshapen foot construction

Meowth Amigurumi Pattern

Bring the iconic Pokémon character to life with this adorable Meowth amigurumi pattern! Standing approximately 12cm tall, this charming cream-colored cat features his signature gold coin charm, curled tail, and mischievous expression. This pattern combines traditional crochet techniques with optional needle felting details to create authentic features including Meowth's distinctive pointed ears, whiskers, and expressive face. Perfect for Pokémon fans and collectors, this detailed pattern guides you through creating a sturdy, poseable figure that can stand on its own. Whether you're crafting for yourself or as a gift for a fellow Pokémon trainer, this Meowth will capture hearts with his personality and charm.

Intermediate 8-10 Hours

Materials Needed for Meowth Amigurumi Pattern

— Main Fabric

  • 01
    Stylecraft Special DK in Stone color
  • 02
    Stylecraft Special DK in Gold color
  • 03
    Gold embroidery floss (Anchor colour no. 1037 recommended)
  • 04
    Stone colored embroidery floss (DMC colour no. 842 recommended)
  • 05
    Polyester toy filling/fiber fill

— Tools Required

  • 01
    2mm crochet hook
  • 02
    1.25mm crochet hook
  • 03
    Wire (approximately 25cm long for leg support)
  • 04
    Pins for placing pieces before sewing
  • 05
    Darning needle
  • 06
    Stitch markers (scrap yarn works well)
  • 07
    Needle felting tool (optional for facial features)
  • 08
    Black, white, and gold colored fibers for needle felting (optional)
  • 09
    Scissors

Progress Tracker

0% Complete

— HEAD

Info:

Using Stone yarn, ch 4 – we will be working around the chains to make an oval shape

Round 1:

inc in second ch from hook, inc in the next two chains. Continue to the other side of the chains: inc in the back of the three chains (12)

Round 2:

inc, dc 3, inc x 3, dc 3, inc x 2 (18)

Round 3:

inc x 2, dc 6, inc x 3, dc 6, inc (24)

Round 4:

(dc, inc) x 2, dc 6, (dc, inc) x 3, dc 6, dc, inc (30)

Round 5:

(dc 2, inc) x 2, dc 6, (dc 2, inc) x 3, dc 6, dc 2, inc (36)

Round 6:

(dc 3, inc) x 2, dc 6, (dc 3, inc) x 3, dc 6, dc 3, inc (42)

Round 7:

dc 42

Round 8:

(dc 4, inc) x 2, dc 6, (dc 4, inc) x 3, dc 6, dc 4, inc (48)

Round 9:

dc 48

Round 10:

(dc 5, inc) x 2, dc 6, (dc 5, inc) x 3, dc 6, dc 5, inc (54)

Round 11-13:

dc 54

Round 14:

(dc 5, dec) x 2, dc 6, (dc 5, dec) x 3, dc 6, dc 5, dec (48)

Round 15:

dc 48

Round 16:

(dc 4, dec) x 2, dc 6, (dc 4, dec) x 3, dc 6, dc 4, dec (42)

Info:

Start stuffing the head

Round 17:

(dc 3, dec) x 2, dc 6, (dc 3, dec) x 3, dc 6, dc 3, dec (36)

Round 18:

(dc 2, dec) x 2, dc 6, (dc 2, dec) x 3, dc 6, dc 2, dec (30)

Round 19:

(dc, dec) x 2, dc 6, (dc, dec) x 3, dc 6, dc, dec (24)

Round 20:

dec x 2, dc 6, dec x 3, dc 6, dec (18)

Info:

If you need to stuff the body some more, now's the time to add the bit of stuffing

Round 21:

dec x 2, dc 3, dec x 3, dc 3, dec (12)

Round 22:

dec x 6 (6)

Info:

Fasten off and sew in loose end

— BODY

Info:

Using Stone yarn

Round 1:

dc 4 in Magic Ring (4)

Round 2:

inc in all sts around (8)

Round 3:

(inc x 2, dc 2) x 2 (12)

Round 4:

(dc, inc x 3, dc 2) x 2 (18)

Round 5:

(dc 2, inc x 3, dc 4) x 2 (24)

Round 6-11:

dc 24

Round 12:

(dc 4, dec) x 4 (20)

Round 13-14:

dc 20

Info:

Fasten off and leave a long end to sew the piece onto head. Stuff with fiber fill

— EARS

Info:

Using Stone yarn, make 2

Round 1:

dc 6 in Magic Ring (6)

Round 2:

dc 6

Round 3:

inc in all sts around (12)

Round 4-5:

dc 12

Round 6:

(dc, inc) x 6 (18)

Round 7-8:

dc 18

Info:

Fasten off and leave a long end to sew the piece onto head. Stuff lightly with fiber fill

— ARMS

Info:

Using Stone yarn, make 2

Round 1:

dc 6 in Magic Ring (6)

Round 2:

inc in all sts around (12)

Round 3:

dec x 6 (6)

Round 4-14:

dc 6

Info:

Fasten off and leave a long end to sew the piece onto body

— FINGERS

Info:

Using Stone yarn, make 6 (3 for each hand)

Round 1:

dc 5 in Magic Ring (5)

Round 2:

dc 5

Continue:

sl st in first dc

Info:

Fasten off and leave a long end to sew the fingers onto hands. Sew one finger to the bottom of the arm, and one finger on either side of this

— LEGS & FEET

Info:

Using Gold and Stone yarn, make 2. Starting with Gold, ch 4 - we will be working around the chains to make an oval shape

Round 1:

inc in the second ch from hook, dc and inc in the next two chs. Repeat (inc, dc, inc) on the other side of the chains (10)

Round 2:

(inc, dc 4) x 2 (12)

Round 3:

dc 12

Round 4:

(dec, dc 4) x 2 (10)

Round 5:

dc 10

Round 6:

(dec, dc 3) x 2 (8)

Round 7:

dc 8

Info:

Change colour to Stone

Round 8-10:

dc 8

Info:

For the next section we will be working in rows to create the heel – no need to fasten off, just continue as follows

Row 11 (rs):

dc 1, turn

Row 12 (ws):

ch 1, dc 4, turn

Row 13 (rs):

ch 1, dc 4, – we are now working in rounds again so keep going without turning: – dec in side of row and next dc from previous round, dc 2, dec in next dc and side of next row

Round 14:

(dc 2, dec) x 2 (6)

Round 15-16:

dc 6

Info:

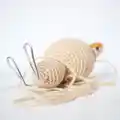
Fasten off and leave a long end to sew the pieces onto body. Use wire to make the legs sturdy and for Meowth to stand on its own
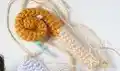
— TAIL

Info:

Using Gold and Stone yarn, starting with Gold

Round 1:

dc 6 in Magic Ring (6)

Round 2:

(inc, dc 2) x 2 (8)

Round 3-29:

dc 8

Info:

Change colour to Stone

Round 30-41:

dc 8

Info:

Fasten off and leave a long end to sew the piece onto body. Roll the Gold part of the tail together into a swirl, and leave the Stone part straight

— GOLD PLATE

Info:

Using Gold embroidery floss (Anchor colour no. 1037 recommended), ch 6, and working around these chains continue

Round 1:

(inc, dc 3, inc) x 2 (14)

Round 2:

(inc, dc 5, inc) x 2 (18)

Round 3:

(inc x 2, dc 5, inc x 2) x 2 (26)

Info:

Fasten off and leave a long end to sew the piece onto Meowth's face

— WHISKERS

Info:

Make 6 using stone colored embroidery floss and 1.25mm hook

Chain:

ch 12 (or your desired length)

Continue:

Sl st in second ch from hook and in the remaining ten sts

Info:

Fasten off and leave a long end to sew the piece onto face. You can also use the same yarn instead of embroidery floss, though whiskers will look thicker

Assembly Instructions

  • Assemble pieces in the order the pattern is written for best results
  • Use a reference photo of Meowth while assembling to ensure accurate character details and proportions
  • Pin all pieces in place before sewing to verify correct positioning and appearance
  • Insert wire into legs before attaching to body to provide stability and allow figure to stand independently
  • Sew body to head using the long tail left from body construction, ensuring secure attachment
  • Attach ears to top of head with proper spacing and positioning for authentic Meowth appearance
  • Sew three fingers to each arm with one at bottom and one on either side to create characteristic paw shape
  • Attach legs to bottom of body ensuring even spacing and proper wire positioning for balance
  • Roll gold section of tail into spiral swirl shape and attach to back of body with stone section extending straight out
  • Sew gold coin plate to forehead area of face using embroidery floss tail
  • Attach six whiskers evenly spaced on face, three on each side of the gold plate
  • Use needle felting or alternative methods to create eyes, mouth, teeth, and ear color details for finishing touches

Important Notes

  • 💡This pattern uses UK crochet terminology where double crochet (dc) equals US single crochet
  • 💡Wire reinforcement in legs is essential for creating a self-standing figure rather than just a soft toy
  • 💡Needle felting instructions are not included as it's optional; research alternative methods for facial features if preferred
  • 💡Use stitch markers or scrap yarn to track your place especially during oval head construction
  • 💡Reference photos of Meowth throughout assembly process ensures accurate character representation
  • 💡The gold plate on forehead is worked with embroidery floss for finer detail and authentic scale
  • 💡Two different hook sizes are required: 2mm for main body parts and 1.25mm for whisker details

This delightful Meowth amigurumi pattern brings the beloved Pokémon character to three-dimensional life in the most huggable way possible! With clever construction techniques like the oval-shaped head, individually crafted paws, and wire-reinforced legs that let your creation stand proudly, this pattern offers both challenge and reward. The combination of traditional crochet with optional needle felting details gives you flexibility to customize while staying true to Meowth's iconic look. Whether displayed on a shelf or cuddled by a Pokémon fan, this handmade Meowth is sure to bring smiles and become a treasured piece. 🧶 Happy crocheting and catch 'em all! 🐱✨

You ask,

we answer.

FAQs

What's the difference between UK and US crochet terminology in this pattern?

This pattern uses UK terminology where 'double crochet (dc)' is the same as 'single crochet (sc)' in US terms. If you're used to US terminology, simply replace every instance of 'dc' with 'sc' throughout the pattern.

Do I need to use needle felting for this pattern?

No, needle felting is optional! The designer uses it for eyes, mouth, teeth, and ear coloring, but you can substitute with embroidered details, felt pieces sewn on, safety eyes, or even paint designed for fabric. Choose whatever method you're comfortable with.

How important is the wire in the legs?

The wire is very important if you want Meowth to stand independently. Without wire, the figure will be floppy and unable to pose. The wire provides structural support and stability, making this more than just a soft toy—it becomes a displayable figure.

What size will my finished Meowth be?

Using the specified materials (2mm hook and Stylecraft Special DK yarn), your Meowth will be approximately 12cm tall, 7cm wide, and 9cm from front to back including the tail. Different yarn weights or hook sizes will alter these dimensions.

Why is the head worked in an oval shape instead of a circle?

The oval shape creates Meowth's distinctive elongated face profile, which is essential for capturing his character's appearance. Starting with chains and working around them creates this oval foundation that traditional magic ring circles cannot achieve.

How do I attach all three fingers to each arm correctly?

Position one finger at the bottom (palm area) of the arm, then attach the other two fingers on either side of this center finger. This creates the characteristic three-fingered paw shape that Meowth has in the Pokémon universe.