🧢 Beautiful ✨ Detailed πŸ’ Adorable

Farm Finger Puppet Set Amigurumi Pattern

Farm Finger Puppet Set Amigurumi Pattern
4.0β˜… Rating
6-8 Hours Time Needed
3.3K Made This
βœ‚οΈ

Beginner Friendly Level

Perfect for those just starting their sewing journey, with clear instructions and simple techniques

⏱️

All-Day Adventure

Requires 8-10 hours, ideal for a full day of immersive knitting.

🧸

Cute Companion

An adorable friend to cherish, handcrafted with love to bring comfort and joy for years to come.

About This Farm Finger Puppet Set Amigurumi Pattern

This Farm Finger Puppet set is designed to bring storytelling and imaginative play to life with 10 charming farm characters. Each puppet is carefully crafted using the back loop only technique, creating flat and comfortable puppets perfect for little fingers. The pattern includes detailed instructions for Old McDonald and nine beloved farm animals, each with unique features and personality. These puppets make wonderful gifts for children, educational tools for teachers, or delightful additions to any handmade toy collection.

Farm Finger Puppet Set Amigurumi Pattern crochet pattern - detailed view of completed project

The pattern uses simple stitches and techniques, making it accessible for beginners while offering satisfying variety through the different characters. Each puppet requires minimal yarn and can be completed relatively quickly, allowing you to build your farm collection one animal at a time.

Why You'll Love This Farm Finger Puppet Set Amigurumi Pattern

I absolutely love this pattern because it offers so much creative joy in one package - you get to make an entire farm family! The back loop only technique creates a wonderfully flat texture that's comfortable for finger play, and I find the variety of characters keeps the project exciting from start to finish. Each puppet has its own personality through small details like Old McDonald's mustache, the cow's patches, or the chicken's bright red comb. What I really appreciate is how quick each individual puppet works up, giving you that satisfying sense of completion multiple times throughout the project. These make incredible gifts that spark imagination and provide hours of storytelling fun for children.

Farm Finger Puppet Set Amigurumi Pattern step 1 - construction progress Farm Finger Puppet Set Amigurumi Pattern step 2 - assembly progress Farm Finger Puppet Set Amigurumi Pattern step 3 - details and accessories Farm Finger Puppet Set Amigurumi Pattern step 4 - final assembly and finishing

Switch Things Up

I love how versatile this finger puppet pattern truly is - you can customize it in so many creative ways! Try experimenting with different yarn textures like fuzzy yarn for the lamb to create an extra soft, fluffy effect, or use sparkly yarn for a magical unicorn variation of the horse. You could easily adapt the color schemes to match specific farm themes or even create fantasy versions with rainbow colors.

Consider adding embroidered details like spots on the dog, stripes on the cat, or decorative stitching on Old McDonald's overalls for extra personality. I've found that changing the facial expressions by repositioning the eyes or mouth can completely transform each character's mood - try making a sleepy duck or a surprised pig!

For special occasions, add tiny accessories like a flower crown for the lamb, a bow tie for the pig, or a small scarf for Old McDonald. You could even create seasonal versions with holiday colors - imagine a Santa hat on the farmer for Christmas or pastel colors for Easter themes. The basic body structure works perfectly for creating entirely new characters too - use it as a base for zoo animals, woodland creatures, or even storybook characters by adjusting the ears, noses, and color combinations.

Common Mistakes & How to Fix Them

βœ— Forgetting to use back loop only technique consistently, which creates the flat puppet shape essential for comfortable finger wear βœ— Pulling stitches too tight during assembly, causing the puppet body to pucker or lose its smooth cylindrical shape βœ— Sewing facial features too close together or misaligned, which affects the character's expression and overall appearance significantly βœ— Not securing small beads properly for eyes, creating a safety hazard especially when making puppets for young children βœ— Skipping stitch markers during color changes, leading to uneven rounds and misaligned pattern sections that are difficult to fix βœ— Using yarn that's too thick or thin for the recommended hook size, resulting in puppets that are either too stiff or too loose

Farm Finger Puppet Set Amigurumi Pattern

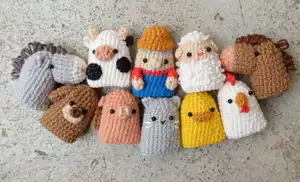
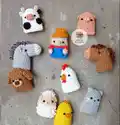
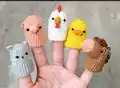
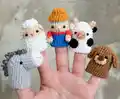
Create an adorable collection of 10 farm finger puppets with this comprehensive crochet pattern. This delightful set includes Old McDonald, Cow, Chicken, Cat, Duck, Pig, Dog, Horse, Donkey, and Lamb - each character crafted with charming details and personality. Using the back loop only technique, these puppets are flat, thin, and perfect for little fingers to bring farm stories to life through interactive play and imaginative adventures.

Beginner Friendly 6-8 Hours

Materials Needed for Farm Finger Puppet Set Amigurumi Pattern

β€” Main Fabric

  • 01
    Yarn in cream color for multiple characters
  • 02
    Yarn in grey color for Old McDonald's hat base, Cat, and Donkey
  • 03
    Yarn in orange color for Chicken and Duck beaks
  • 04
    Yarn in red color for Old McDonald's shirt and Chicken comb
  • 05
    Yarn in blue color for Old McDonald's overalls
  • 06
    Yarn in white color for Cow, Chicken, and Lamb bodies
  • 07
    Yarn in dark grey color for Donkey's mane
  • 08
    Yarn in pink color for Cow nose, Pig body, and Horse nose
  • 09
    Yarn in black color for Cow patches and Cat body
  • 10
    Yarn in brown color for Dog and Horse bodies
  • 11
    Yarn in dark brown color for Horse mane and embroidery details
  • 12
    Yarn in yellow color for Duck body

β€” Tools Required

  • 01
    Crochet hook size 3
  • 02
    Yarn needle for weaving in ends
  • 03
    Sewing needle
  • 04
    Small black beads for eyes (20 beads total for 10 puppets)
  • 05
    Black sewing thread
  • 06
    Orange sewing thread
  • 07
    Red sewing thread
  • 08
    Pink sewing thread
  • 09
    White sewing thread
  • 10
    Grey sewing thread
  • 11
    Brown sewing thread
  • 12
    Cream sewing thread
  • 13
    Toy stuffing (for Horse and Donkey noses)
  • 14
    Scissors
  • 15
    Stitch markers

Progress Tracker

0% Complete

β€” Old McDonald :

Body :

Round 1 :

Start with grey yarn: 5 sc in a magic ring [5]

Round 2 :

inc x 5 [10]

Round 3 :

(sc, inc) x 5 [15]

Round 4 :

(sc 2, inc) x 5 [20]

Round 5 :

(sc 3, inc) x 5 [25]

Info :

Change to cream yarn

Round 6-8 :

sc around [25]

Info :

Change to red yarn

Round 9 :

sc around [25]

Info :

Change to blue yarn

Round 10-14 :

sc around [25], slst

Nose :

Round 1 :

Start with cream yarn: 4 sc in a magic ring [4], slst

Hat :

Round 1 :

Start with orange yarn: 4 sc in a magic ring [4]

Round 2 :

inc x 4 [8]

Round 3 :

(sc, inc) x 4 [12]

Round 4 :

sc around [12]

Round 5 :

(sc 2, inc) x 4 [16]

Round 6 :

(sc 3, inc) x 4 [20], slst

Hands (Make 2) :

Round 1 :

Start with cream yarn: 4 sc in a magic ring [4]

Round 2 :

inc, sc, inc, sc [6]

Info :

Change to red yarn

Round 3 :

sc 6 [6]

Round 4 :

sc 6 [6], slst

β€” Cow :

Body :

Round 1 :

Start with white yarn: 5 sc in a magic ring [5]

Round 2 :

inc x 5 [10]

Round 3 :

(sc, inc) x 5 [15]

Round 4 :

(sc 2, inc) x 5 [20]

Round 5 :

(sc 3, inc) x 5 [25]

Round 6-13 :

sc around [25], slst

Nose :

Round 1 :

Start with pink yarn: 4 sc in a magic ring [4]

Round 2 :

inc x 4 [8], slst

Ears (Make 2) :

Ear 1 :

Start with white yarn: Make a chain [3], turn. Row 2: sc 2, slst

Ear 2 :

Start with black yarn: Make a chain [3], turn. Row 2: sc 2, slst

Horns (Make 2) :

Round 1 :

Start with cream yarn: 3 sc in a magic ring [3]

Round 2 :

sc x 3 [3]

Round 3 :

sc x 3 [3], slst

Black Patch (Make 2) :

Patch 1 :

Start with black yarn: Round 1: 3 sc in a magic ring [3]. Round 2: inc x 3 [6], slst

Patch 2 :

Start with black yarn: Round 1: 4 sc in a magic ring [4]. Round 2: inc x 4 [8], slst

β€” Chicken :

Body :

Round 1 :

Start with white yarn: 5 sc in a magic ring [5]

Round 2 :

inc x 5 [10]

Round 3 :

(sc, inc) x 5 [15]

Round 4 :

(sc 2, inc) x 5 [20]

Round 5 :

(sc 3, inc) x 5 [25]

Round 6-13 :

sc around [25], slst

Chicken Beak :

Info :

Start with orange yarn: Make a chain [4], turn. Row 2: sc 2, inc, sc 2, slst

Chicken Comb :

Info :

Start with red yarn: Make a chain [6], turn. Row 2: sc, dc, slst, dc, sc, slst

β€” Cat :

Body :

Round 1 :

Start with grey yarn: 5 sc in a magic ring [5]

Round 2 :

inc x 5 [10]

Round 3 :

(sc, inc) x 5 [15]

Round 4 :

(sc 2, inc) x 5 [20]

Round 5 :

(sc 3, inc) x 5 [25]

Round 6-13 :

sc around [25], slst

Ears (Make 2) :

Info :

Start with grey yarn: Make a chain [3], turn. Row 2: sc 2, slst

β€” Duck :

Body :

Round 1 :

Start with yellow yarn: 5 sc in a magic ring [5]

Round 2 :

inc x 5 [10]

Round 3 :

(sc, inc) x 5 [15]

Round 4 :

(sc 2, inc) x 5 [20]

Round 5 :

(sc 3, inc) x 5 [25]

Round 6-13 :

sc around [25], slst

Beak :

Info :

Start with orange yarn: Make a chain [5], turn. Round 1: sc 3, inc, sc 3 [8], slst

β€” Pig :

Body :

Round 1 :

Start with pink yarn: 5 sc in a magic ring [5]

Round 2 :

inc x 5 [10]

Round 3 :

(sc, inc) x 5 [15]

Round 4 :

(sc 2, inc) x 5 [20]

Round 5 :

(sc 3, inc) x 5 [25]

Round 6-13 :

sc around [25], slst

Nose :

Round 1 :

Start with pink yarn: 4 sc in a magic ring [4]

Round 2 :

inc, sc, inc, sc [6], slst

Ears (Make 2) :

Info :

Start with pink yarn: Make a chain [3], turn. Row 2: sc 2, slst

β€” Dog :

Body :

Round 1 :

Start with brown yarn: 5 sc in a magic ring [5]

Round 2 :

inc x 5 [10]

Round 3 :

(sc, inc) x 5 [15]

Round 4 :

(sc 2, inc) x 5 [20]

Round 5 :

(sc 3, inc) x 5 [25]

Round 6-13 :

sc around [25], slst

Snout :

Info :

Start with cream yarn: Make a chain [4], turn

Round 2 :

sc, sc, inc, sc, sc, inc [8]

Round 3 :

sc around [8], slst

Nose :

Round 1 :

Start with brown yarn: 4 sc in a magic ring [4], slst

Ears (Make 2) :

Round 1 :

Start with brown yarn: 4 sc in a magic ring [4]

Round 2 :

inc x 4 [8]

Round 3-5 :

sc around [8], slst

β€” Horse :

Body :

Round 1 :

Start with brown yarn: 5 sc in a magic ring [5]

Round 2 :

inc x 5 [10]

Round 3 :

(sc, inc) x 5 [15]

Round 4 :

(sc 2, inc) x 5 [20]

Round 5 :

(sc 3, inc) x 5 [25]

Round 6-13 :

sc around [25], slst

Nose :

Round 1 :

Start with pink yarn: 5 sc in a magic ring [5]

Round 2 :

inc x 5 [10]

Round 3 :

(sc, inc) x 5 [15]

Round 4 :

(sc 2, inc) x 5 [20]

Info :

Change to brown yarn

Round 5-7 :

sc around [20], slst

Ears (Make 2) :

Info :

Start with brown yarn: Make a chain [3], turn. Row 2: sc 2, slst

β€” Donkey :

Body :

Round 1 :

Start with grey yarn: 5 sc in a magic ring [5]

Round 2 :

inc x 5 [10]

Round 3 :

(sc, inc) x 5 [15]

Round 4 :

(sc 2, inc) x 5 [20]

Round 5 :

(sc 3, inc) x 5 [25]

Round 6-13 :

sc around [25], slst

Nose :

Round 1 :

Start with white yarn: 5 sc in a magic ring [5]

Round 2 :

inc x 5 [10]

Round 3 :

(sc, inc) x 5 [15]

Round 4 :

(sc 2, inc) x 5 [20]

Info :

Change to grey yarn

Round 5-7 :

sc around [20], slst

Ears (Make 2) :

Info :

Start with grey yarn: Make a chain [3], turn. Row 2: sc 2, slst

β€” Lamb :

Body :

Round 1 :

Start with white yarn: 5 sc in a magic ring [5]

Round 2 :

inc x 5 [10]

Round 3 :

(sc, inc) x 5 [15]

Info :

Change to cream yarn

Round 4 :

(sc 2, inc) x 5 [20]

Round 5 :

(sc 3, inc) x 5 [25]

Round 6-7 :

sc around [25]

Info :

Change to white yarn

Round 8-13 :

sc around [25], slst

Ears (Make 2) :

Info :

Start with cream yarn: Make a chain [3], turn. Row 2: sc 2, ch 1, slst

Assembly Instructions

  • For Old McDonald: Sew the nose in the center on round 7, then attach eyes on round 7, 1 stitch apart from the nose. Embroider the mustache with grey yarn, sew both hands to the body, and attach the hat on top of the head.
  • For Cow: Make 2 vertical lines on the pink nose with brown yarn and sew it on round 6. Attach eyes between the nose, sew both ears and horns to the top of the head, then add both black patches randomly on the body.
  • For Chicken: Sew the beak on round 5, attach eyes between the beak, embroider the wattle with red yarn under the beak, and sew the comb in the center of the head.
  • For Cat: Sew the eyes on round 5, 4 stitches apart. Embroider the nose with red or black sewing thread, add whiskers beside the eyes using grey thread, and sew both ears on top.
  • For Duck: Sew the beak on round 7, attach eyes between the beak, and sew the crest on top of the head for added character.
  • For Pig: Embroider the nose using cream yarn and sew it on round 6. Attach eyes between the nose and sew both ears on the sides of the head.
  • For Dog: Sew the brown nose onto the cream snout first, then attach the complete snout on round 6. Position eyes above the snout and sew both ears on round 4.
  • For Horse: Embroider the nose with cream yarn, fill it with toy stuffing, and sew to the body. Attach eyes on each side, sew ears 2 stitches apart from eyes, and create the mane with dark brown yarn loops.
  • For Donkey: Embroider the nose with pink yarn, stuff it lightly, and attach to the body. Sew eyes on each side, position ears 2 stitches apart from eyes, and add dark grey yarn loops for the mane.
  • For Lamb: Sew fur loops with white yarn across the body, leaving stitches loose to create texture. Attach eyes on round 6, 4 stitches apart, embroider the mouth with red thread, and sew both ears to the sides.

Important Notes

  • πŸ’‘Use the back loop only technique consistently throughout the body to create the flat, comfortable finger puppet shape
  • πŸ’‘When sewing on small bead eyes, ensure they are securely attached with multiple passes of thread for child safety
  • πŸ’‘Keep tension even during color changes to maintain a smooth, professional appearance without gaps or puckers
  • πŸ’‘Pin all facial features and accessories in place before sewing to ensure proper positioning and character expression
  • πŸ’‘For Horse and Donkey noses, stuff lightly to maintain shape without making the puppet too bulky for finger wear
  • πŸ’‘Use stitch markers to track round beginnings, especially important when working with multiple color changes throughout the pattern
  • πŸ’‘Test each completed puppet on your finger to ensure comfortable fit before gifting or adding to your collection

This delightful Farm Finger Puppet set brings the magic of Old McDonald's farm to life through interactive play! With 10 charming characters including the farmer himself and nine beloved animals, this pattern offers endless storytelling possibilities. The back loop only technique creates comfortable, flat puppets perfect for little hands, while simple stitches make this project accessible and enjoyable. Whether you're creating educational toys, handmade gifts, or building your own puppet theater collection, these adorable farm friends will inspire imagination and creative play for years to come. πŸ„πŸ·πŸ΄ Happy crocheting! 🧢✨

You ask,

we answer.

FAQs

What is the back loop only (BLO) technique and why is it used in this pattern?

The back loop only technique means you crochet into only the back loop of each stitch instead of both loops. This creates a flat, thin texture that makes the finger puppets comfortable to wear and gives them their distinctive flat appearance, perfect for finger play.

How much yarn do I need for the complete set of 10 puppets?

Since each puppet is small and uses minimal yarn, you can make the entire set with small skeins or yarn scraps. Approximately 50-100 yards of each main color should be sufficient, with less needed for accent colors used in small details.

Are these puppets safe for young children?

The puppets can be made child-safe by securely attaching all bead eyes with strong thread and multiple passes. For very young children under 3, consider embroidering eyes instead of using beads to eliminate any choking hazard completely.

Can I make these puppets larger for adult fingers?

Yes! Simply use a larger crochet hook and thicker yarn. A size 4 or 5 hook with worsted weight yarn will create larger puppets suitable for adult fingers while maintaining the same proportions and character details.

Do I need to stuff these finger puppets?

Most parts don't require stuffing since they're meant to be flat and hollow for finger insertion. Only the Horse and Donkey noses require light stuffing to maintain their dimensional shape before attaching to the body.

How long does it take to complete one finger puppet?

Each individual puppet takes approximately 45 minutes to 1 hour to complete, including assembly. The entire set of 10 puppets typically requires 8-10 hours total, making it a perfect weekend project to complete gradually.