🧢 Beautiful ✨ Detailed πŸ’ Adorable

Stretchy Woof Dog Amigurumi Pattern

Stretchy Woof Dog Amigurumi Pattern
4.4β˜… Rating
6-8 Hours Time Needed
3.5K Made This
βœ‚οΈ

Intermediate Level

Ideal for those with basic knitting experience, featuring slightly more advanced stitches and techniques to expand your skills.

⏱️

All-Day Adventure

Requires 8-10 hours, ideal for a full day of immersive knitting.

🐾

Pocket Pal

A mini friend to carry anywhere, providing comfort and companionship in a perfectly portable size.

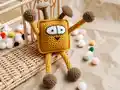
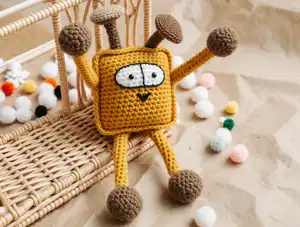
About This Stretchy Woof Dog Amigurumi Pattern

The Woof Stretch Dog pattern is designed to be more than just a toy – it's an interactive learning tool that helps children develop fine motor skills through play. The unique stretchy limbs create endless possibilities for imaginative games and sensory exploration. This 30cm tall companion features carefully crafted details including safety eyes, embroidered facial features, and floppy ears that add personality and charm.

Stretchy Woof Dog Amigurumi Pattern crochet pattern - detailed view of completed project

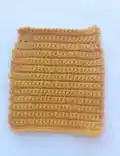
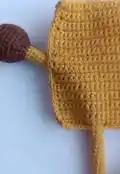
This pattern uses a combination of 2mm and 3mm hooks to create different textures and sizes throughout the dog's body. The gold stretchy sections are worked in continuous rounds without stuffing, while the brown paws and black feet are firmly stuffed for stability.

Why You'll Love This Stretchy Woof Dog Amigurumi Pattern

I absolutely love this pattern because it's unlike any other amigurumi I've made! The stretchy limbs add such a unique interactive element that makes the finished toy truly special. There's something incredibly satisfying about watching those gold sections extend and bounce back, and knowing that this toy will not only bring joy but also help develop fine motor skills makes it even more rewarding. The combination of different hook sizes and the clever construction technique keeps the project interesting from start to finish, and seeing that adorable embroidered face come to life at the end is pure magic!

Stretchy Woof Dog Amigurumi Pattern step 1 - construction progress Stretchy Woof Dog Amigurumi Pattern step 2 - assembly progress Stretchy Woof Dog Amigurumi Pattern step 3 - details and accessories Stretchy Woof Dog Amigurumi Pattern step 4 - final assembly and finishing

Switch Things Up

I love experimenting with different yarn colors to create unique dog breeds! Try using spotted or striped yarn for the body panels to make a Dalmatian or tiger-striped dog. You could even use fuzzy yarn for the ears to add extra texture and personality.

For a more whimsical approach, consider making the stretchy sections in rainbow colors instead of gold. This creates a magical, fantasy-inspired toy that children will absolutely adore. Each limb could even be a different color for extra fun!

If you want to add educational value, try creating the stretchy sections in different lengths. This helps children learn about measurement and comparison while they play. You could make one set of limbs shorter for a puppy version and longer ones for an adult dog.

Consider embroidering or appliquΓ©ing spots, patches, or even a collar onto the body panels before assembly. These personal touches make each dog truly unique and special. You could add a name tag or even a tiny crocheted bone accessory.

For advanced crocheters, try working colorwork into the body panels to create patterns like stripes, hearts, or paw prints. Fair Isle or tapestry crochet techniques would work beautifully with the flat panel construction method used in this pattern.

Common Mistakes & How to Fix Them

βœ— Not stuffing the brown and black sections tightly enough which causes the limbs to become floppy and lose their shape over time βœ— Accidentally stuffing the gold stretchy sections when you should leave them empty for proper stretching ability and flexibility βœ— Placing safety eyes incorrectly or too close together which affects the dog's facial expression and overall appearance significantly βœ— Forgetting to leave long yarn tails for sewing parts together making assembly difficult and resulting in weak connections βœ— Using inconsistent tension throughout the project especially in the long gold sections causing uneven stretching and wonky limbs βœ— Not using stitch markers to track rounds in the body pieces leading to miscounts and misaligned edges during assembly

Stretchy Woof Dog Amigurumi Pattern

Create this unique and interactive stretch dog toy that brings creativity and fun to playtime! This adorable amigurumi features stretchy limbs with a special ability to extend up and down, making it perfect for developing fine motor skills in children aged 2 to 120. With its charming brown body, floppy ears, and expressive embroidered face, this 30cm tall companion combines playful design with educational value. The pattern uses soft YarnArt Jeans yarn in natural colors and includes detailed instructions for creating the stretchy gold sections that make this toy truly one-of-a-kind.

Intermediate 6-8 Hours

Materials Needed for Stretchy Woof Dog Amigurumi Pattern

β€” Main Fabric

  • 01
    YarnArt Jeans 50gr/160m (55% cotton, 45% acrylic)
  • 02
    Shade 40 (brown) for main body, ears, and paws
  • 03
    Shade 28 (black) for feet sections
  • 04
    Shade 84 (gold) for stretchy limb sections and body panels
  • 05
    Shade 03 (white) for eye patches

β€” Tools Required

  • 01
    2mm crochet hook
  • 02
    3mm crochet hook
  • 03
    8mm safety eyes (2 pieces)
  • 04
    Fiber filler (stuffing)
  • 05
    Scissors
  • 06
    Large eye needle
  • 07
    Stitch markers (optional but recommended)

Progress Tracker

0% Complete

β€” Eyes (make 2) :

Info :

Begin crocheting in white with 2mm hook. Chain 10, starting into the 2nd stitch from hook work 9 SC. Make 1 turning CH at the end of each row.

Rows 1-3 :

3 rows straight: 9 SC

Row 4 :

1 SC, DEC, 3 SC, DEC, 1 SC (7)

Row 5 :

1 SC, DEC, 1 SC, DEC, 1 SC (5)

Info :

Install safety eyes between rows 2 and 3, 1 SC away from the left and right edges. Leave a long yarn tail for sewing.

β€” Arms and Legs (make 2) :

Info :

Arms and legs are crocheted in one piece. Begin crocheting in brown with 2mm hook.

Round 1 :

6 MR (6)

Round 2 :

INC*6 (12)

Round 3 :

(1 SC, INC)*6 (18)

Round 4 :

(2 SC, INC)*6 (24)

Round 5 :

(3 SC, INC)*6 (30)

Rounds 6-9 :

4 rnds straight: 30 SC

Round 10 :

(DEC, 3 SC)*6 (24)

Round 11 :

(DEC, 2 SC)*6 (18)

Round 12 :

(DEC, 1 SC)*6 (12)

Info :

Stuff tightly.

Round 13 :

(DEC, 4 SC)*2 (10)

Info :

Switch to gold yarn. Go on crocheting. Don't stuff the gold piece.

Rounds 14-65 :

52 rnds straight: 10 SC

Info :

Switch to black yarn.

Round 66 :

(INC, 4 SC)*2 (12)

Round 67 :

(1 SC, INC)*6 (18)

Round 68 :

(2 SC, INC)*6 (24)

Round 69 :

(3 SC, INC)*6 (30)

Rounds 70-73 :

4 rnds straight: 30 SC

Round 74 :

(DEC, 3 SC)*6 (24)

Round 75 :

(DEC, 2 SC)*6 (18)

Round 76 :

(DEC, 1 SC)*6 (12)

Info :

Stuff the piece.

Round 77 :

DEC*6 fasten off

β€” Ears (make 2) :

Info :

Work in brown with 2mm hook. Don't stuff.

Round 1 :

6 MR (6)

Round 2 :

(1 SC, INC)*3 (9)

Round 3 :

1 rnd straight: 9 SC (9)

Round 4 :

(2 SC, INC)*3 (12)

Round 5 :

(3 SC, INC)*3 (15)

Rounds 6-11 :

6 rnds straight: 15 SC

Round 12 :

(4 SC, INC)*3 (18)

Rounds 13-20 :

8 rnds straight: 18 SC

Round 21 :

(DEC, 4 SC)*3 (15)

Rounds 22-24 :

3 rnds straight: 15 SC

Round 25 :

(DEC, 3 SC)*3 (12)

Rounds 26-28 :

3 rnds straight: 12 SC

Info :

Fold in half and single crochet 6 through both edges. Leave a long yarn tail for sewing.

β€” Body (make 2) :

Info :

Work in gold with 3mm hook. Chain 25, and starting into the 2nd stitch from hook work 24 SC. Make 1 turning CH at the end of each row.

Rows 1-19 :

19 rnds straight: 24 SC

Row 20 :

1 SC, DEC, 18 SC, DEC, 1 SC (22)

Row 21 :

1 rnd straight: 22 SC

Row 22 :

1 SC, DEC, 16 SC, DEC, 1 SC (20)

Rows 23-25 :

3 rnds straight: 20 SC

Info :

Fasten off and cut yarn.

Assembly Instructions

  • Begin joining the body parts together from the right upper corner using 2mm hook by putting two body parts together and working 19 SC through both parts' stitches, then work 2 SC to the corner stitch.
  • Get to the side edge and insert the first arm-leg piece between rows 11 and 15, working 10 SC through both parts' stitches, then 3 SC across the front part only, position the arm-leg piece and continue with 11 SC, finishing with 2 SC to the corner stitch.
  • Work the bottom edge by crocheting 5 SC through both parts' stitches, 3 SC across the front part only, insert the arm-leg piece, work 6 SC across both body parts, add 3 SC across front part only, position the second arm-leg piece, then 5 SC and 2 SC to the corner stitch.
  • Stuff the body firmly before working the other side with 11 SC across both body parts, 3 SC across the front part only, continue stuffing, then complete with 10 SC through both parts' stitches.
  • Attach the ears on the back of the head, positioning them 4 SC away from the left and right edges, bending them slightly in the middle for a natural floppy appearance.
  • Sew on the white eye patches between rows 16-22 in the middle of the face, ensuring they are symmetrical and properly aligned with the safety eyes already installed.
  • Embroider facial features using black yarn: stitch around the eyes contour and in the middle as shown in the pattern, create a nose between rows 13-15, and add a mouth between rows 7-8 for the complete expression.

Important Notes

  • πŸ’‘Use two different hook sizes (2mm and 3mm) for different parts of the pattern to achieve proper proportion and texture
  • πŸ’‘Leave the gold stretchy sections completely unstuffed to maintain their elastic stretching ability while stuffing the brown and black sections tightly
  • πŸ’‘Work continuously in rounds for the limbs and use turning chains for the flat body panels to create the correct construction
  • πŸ’‘Install safety eyes early in the eye patch construction between rows 2 and 3 before completing the pieces for easier installation
  • πŸ’‘Leave long yarn tails when finishing each piece to make assembly easier and create more secure attachments
  • πŸ’‘This toy is suitable for ages 2 to 120 and is designed for fine motor skills development through interactive stretchy play
  • πŸ’‘The finished toy measures approximately 30cm from ears to feet when using the recommended YarnArt Jeans yarn and hook sizes

This delightful Stretchy Woof Dog pattern brings together creativity, education, and endless fun in one adorable package! The unique stretchy limbs make this toy truly interactive, perfect for developing fine motor skills while keeping playtime exciting. With its lovable embroidered expression and floppy ears, this 30cm companion will become a treasured friend for children and adults alike. The clever construction technique and thoughtful design details make this pattern both enjoyable to create and wonderful to gift. 🐢 Happy crocheting! 🧢✨

You ask,

we answer.

FAQs

Why should I leave the gold sections unstuffed?

The gold sections need to remain unstuffed to maintain the toy's unique stretching ability. Stuffing these sections would make them rigid and eliminate the interactive stretchy feature that makes this toy special for developing fine motor skills.

Can I use different yarn colors for this pattern?

Absolutely! While the pattern uses brown, black, gold, and white, you can customize the colors to create different dog breeds or fantasy designs. Just make sure to use yarns with similar weight and texture for consistent results.

How do I prevent the long gold sections from twisting?

Work with consistent tension throughout all 52 rounds of the gold sections and use a stitch marker to track your starting point. Keeping your stitches even and not pulling too tightly will help the tube maintain its shape without twisting.

Is this toy safe for very young children?

The pattern states it's suitable for ages 2 to 120. However, always supervise young children during play and ensure all parts are securely attached. Make sure the safety eyes are installed properly and consider embroidering eyes instead for children under 3.

Why do I need two different hook sizes?

The 2mm hook creates tighter, smaller pieces for the detailed parts like eyes, ears, and limbs, while the 3mm hook works up the body panels more quickly with a slightly looser gauge. This combination creates better proportion and texture throughout the toy.

How do I keep track of which limb goes where during assembly?

The pattern specifies inserting arm-leg pieces between specific rows. Use stitch markers or pins to mark these positions before you begin assembly, and work methodically from one corner around the body following the instructions step by step.

Can I make the stretchy sections longer or shorter?

Yes! The pattern calls for 52 rounds in the gold sections, but you can adjust this number to make the limbs longer or shorter based on your preference. Just make sure both arm-leg pieces are the same length for symmetry.

What's the best way to embroider the facial features?

Use black yarn and a large eye needle to embroider the nose and mouth. Follow the row numbers specified in the pattern for placement, and practice the stitches on a sample piece first if you're new to embroidering on crochet.