🧶 Beautiful ✨ Detailed 💝 Adorable

Weasley Sweater Knitting Pattern

Weasley Sweater Knitting Pattern
4.5★ Rating
18-25 Hours Time Needed
2.4K Made This
✂️

Beginner Friendly Level

Perfect for those just starting their sewing journey, with clear instructions and simple techniques

⏱️

Slow & Steady

A 10-12 hour project—great for savoring the process over several sessions.

🧥

Layered Comfort

Perfect for cozy, stylish layering through changing seasons with versatile, mix-and-match potential.

About This Weasley Sweater Knitting Pattern

Weasley Sweater Knitting Pattern crochet pattern - detailed view of completed project

Constructed from the bottom up with minimal seaming, this sweater uses stockinette stitch for the body and sleeves with ribbed finishing touches. The customizable initial can be knit directly into the fabric or added later using duplicate stitch for ultimate flexibility.

Why You'll Love This Weasley Sweater Knitting Pattern

I absolutely adore this pattern because it captures everything magical about handknit sweaters while remaining surprisingly approachable for beginners. The fact that it's specifically designed as a great first sweater project means the designer has thoughtfully included clear instructions without overwhelming complexity. What really makes my heart sing is the fourteen size options—I can knit matching sweaters for my entire family or friend group, each personalized with their own initial. The tweedy yarn recommendation gives that authentic, slightly rustic look that makes these sweaters feel like genuine Weasley creations straight from The Burrow. I love how the pattern offers flexibility with the initial placement, letting you either challenge yourself with colorwork or play it safe with duplicate stitch later. The drop-shoulder construction means less shaping stress, and the ribbed details add professional polish without fussy techniques. Every time I work on this sweater, I feel like I'm knitting a little piece of Hogwarts magic into reality, creating something that's both practical and deeply meaningful for any Harry Potter fan.

Weasley Sweater Knitting Pattern step 1 - construction progress Weasley Sweater Knitting Pattern step 2 - assembly progress Weasley Sweater Knitting Pattern step 3 - details and accessories Weasley Sweater Knitting Pattern step 4 - final assembly and finishing

Switch Things Up

I love experimenting with this classic Weasley pattern to make each sweater uniquely special while keeping that magical charm intact. One of my favorite modifications is working the entire sweater in house colors—burgundy and gold for Gryffindor, blue and bronze for Ravenclaw, yellow and black for Hufflepuff, or green and silver for Slytherin—with the initial in the contrasting house color.

Sometimes I add horizontal stripes across the chest or sleeves before placing the initial, mimicking the look of different Weasley sweaters seen throughout the films. For a more contemporary look, I've worked the ribbing at the hem, cuffs, and neck in the contrast color, creating a coordinated color-blocked effect that's both modern and nostalgic.

When I'm feeling adventurous, I extend the body length and add a kangaroo pocket to the front, transforming it into a cozy sweater-hoodie hybrid that's perfect for lounging around the common room. I've also tried working the sleeves in raglan style instead of drop-shoulder for a more fitted, athletic look while maintaining the charming personalized initial.

For extra magical details, I sometimes embroider small stars, lightning bolts, or golden snitches around the initial using duplicate stitch or surface embroidery. Another fun variation is creating a fair isle pattern band around the chest area with geometric or snowflake motifs, then placing the initial within or below that decorative band for extra visual interest and texture.

Common Mistakes & How to Fix Them

✗ Forgetting to place the center stitches on holders when creating the neck opening, causing confusion during shoulder shaping ✗ Not marking armhole placement before picking up sleeve stitches, resulting in uneven sleeve attachment and poor fit ✗ Miscounting when picking up stitches around the neckline, leading to a neck opening that's too tight or loose ✗ Failing to center the initial chart properly for your specific size, causing the letter to appear off-center on the finished sweater

Weasley Sweater Knitting Pattern

Channel your inner Weasley magic with this iconic sweater pattern inspired by the beloved Harry Potter series. This comprehensive pattern offers fourteen different sizes ranging from children to adults, making it perfect for the whole family. Featuring a personalized initial worked in contrasting colors, ribbed cuffs, and classic drop-shoulder construction, this tweedy wool sweater captures the cozy, handmade charm of Mrs. Weasley's famous creations. Whether you're crafting for yourself or gifting to a fellow Potterhead, this timeless design combines warmth, nostalgia, and knitting tradition into one magical project.

Beginner Friendly 18-25 Hours

Materials Needed for Weasley Sweater Knitting Pattern

— Main Fabric

  • 01
    Main Color: 3-13 balls Rowan Felted Tweed (50% merino, 25% alpaca, 25% viscose; 190 yards per 50g) or similar gauge tweedy yarn
  • 02
    Contrast Color: 1 ball Rowan Felted Tweed or similar gauge tweedy yarn for initial

— Tools Required

  • 01
    Circular or straight knitting needles size US 5 (3.75mm) or size required to achieve gauge
  • 02
    16-inch circular needle size US 5 (3.75mm) for neck finishing
  • 03
    Tapestry needle for weaving in ends and seaming
  • 04
    Stitch holders or scrap yarn for holding neck stitches
  • 05
    Scissors
  • 06
    Measuring tape
  • 07
    Stitch markers (optional but helpful)

Progress Tracker

0% Complete

— Gauge :

Info :

24 stitches and 32 rows over 4 square inches in stockinette stitch

— Back :

Step 1 :

With MC, cast on 60 (66, 72, 78, 84, 90, 96, 102, 108, 114, 120, 126, 132, 138) stitches

Step 2 :

Work in stockinette stitch until piece measures 12 (13.5, 15, 16.5, 18, 19.5, 21, 22.5, 24, 25.5, 26.5, 26.5, 27.5, 28.5) inches, ending with WS row

Step 3 :

Make shoulders by binding off 18 (20, 22, 24, 26, 28, 30, 32, 34, 36, 38, 40, 42, 44) stitches at the beginning of the next two rows

Step 4 :

Place remaining 24 (26, 28, 30, 32, 34, 36, 38, 40, 42, 44, 46, 48, 50) stitches on holder or scrap yarn for the neck

Info :

If you wish to grade the shoulders, divide shoulder bind offs into two, three, or four groups

Step 5 :

Mark beginning of armhole by measuring 5 (6, 6.5, 6.5, 7, 7.5, 8, 8.5, 9, 9.5, 10, 10.5, 11, 11.5) inches DOWN from each shoulder edge and tying spare yarn around edge stitches

— Front :

Step 1 :

Work as for BACK until piece measures 5 (6, 7, 8, 9, 10, 11, 12, 13, 14, 15, 15, 16, 17) inches from bottom

Info :

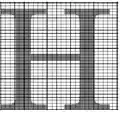
If knitting initial into front, begin working initial chart using separate strand of MC and CC for each color section. Center chart for your size. If adding initial later with duplicate stitch, continue in stockinette with MC only

Step 2 :

After completing chart, continue knitting with MC only until sweater measures 9.75 (11.25, 12.75, 14.25, 15.5, 17, 18.5, 20, 21.5, 22.75, 23.75, 24.75, 24.75, 25.75) inches, ending with WS row

Step 3 :

Make neck opening by knitting across first 24 (26, 29, 31, 34, 36, 39, 41, 44, 46, 49, 51, 54, 56) stitches, placing center 12 (14, 14, 16, 16, 18, 18, 20, 20, 22, 22, 24, 24, 26) stitches onto holder, and knitting remaining 24 (26, 29, 31, 34, 36, 39, 41, 43, 46, 49, 51, 54, 56) stitches

Step 4 :

Continue on right side of neck only, working all neck decreases one stitch in from edge: on WS purl to last 3 stitches, P2tog, P1; on RS K1, K2tog, K to end

Step 5 :

Shape neck by decreasing one stitch at neck edge EVERY row 4 (4, 5, 5, 5, 5, 6, 6, 6, 6, 7, 7, 7, 7) times, then EVERY OTHER ROW 2 (2, 2, 2, 3, 3, 3, 3, 4, 4, 4, 4, 5, 5) times

Step 6 :

Continue in stockinette stitch until front is as long as back to beginning of shoulder shaping and complete as for back

Step 7 :

Join new yarn at armhole edge of left side. Work all neck decreases: on RS knit to last 3 stitches, SSK, K1; on WS P1, SSP, P to end

Step 8 :

Shape neck as for other side

Step 9 :

Mark beginning of armhole by measuring 5 (6, 6.5, 6.5, 7, 7.5, 8, 8.5, 9, 9.5, 10, 10.5, 11, 11.5) inches DOWN from each shoulder edge and tying spare yarn around edge stitches

— Sleeves :

Step 1 :

Sew shoulders together

Step 2 :

Pick up and knit 58 (66, 72, 78, 84, 88, 96, 100, 108, 112, 120, 124, 132, 136) stitches around left armhole from marked stitch on front to marked stitch on back

Step 3 :

Beginning with a purl row, work in stockinette stitch for 1 (1, 1, 1, 1.25, 1.25, 1.25, 1.25, 1.25, 1.5, 1.5, 1.5, 1.5, 1.5) inches

Step 4 :

Begin shaping sleeve by working decreases on each side one stitch in from edge: on RS K1, K2tog, knit to last 3 stitches, SSK, K1; on WS P1, SSP, P to last 3 stitches, P2tog, P1

Step 5 :

Work decreases on next and then on every 6 (6, 6, 6, 5, 5, 5, 5, 5, 4, 4, 4, 4, 4)th row until 38 (42, 46, 50, 54, 54, 58, 58, 62, 62, 66, 66, 70, 70) stitches remain

Step 6 :

When decreases complete, continue in stockinette until sleeve measures 8.5 (9.5, 10.5, 11.5, 12, 13, 14, 15, 16, 16.5, 17, 17.5, 18, 18.5) inches

Step 7 :

Work 2x2 ribbing (beginning and ending each row with K2) for 1.5 (1.5, 1.5, 1.5, 2, 2, 2, 2, 2, 2.5, 2.5, 2.5, 2.5, 2.5) inches

Step 8 :

Bind off in pattern. Repeat for right armhole

— Neck :

Step 1 :

Transfer remaining 24 (26, 28, 30, 32, 34, 36, 38, 40, 42, 44, 46, 48, 50) stitches from back holder onto circular needle

Step 2 :

Beginning at right shoulder, knit across to left side of neck

Step 3 :

Pick up approximately 14 (14, 15, 15, 16, 16, 17, 17, 18, 18, 19, 19, 20, 20) stitches down left neck edge

Step 4 :

Move remaining 12 (14, 14, 16, 16, 18, 18, 20, 20, 22, 22, 24, 24, 26) stitches from front holder to left hand needle and knit across

Step 5 :

Pick up approximately 14 (14, 15, 15, 16, 16, 17, 17, 18, 18, 19, 19, 20, 20) stitches up right neck edge

Info :

You should have approximately 64 (68, 72, 76, 80, 84, 88, 92, 96, 100, 104, 108, 112, 116) stitches total for neck

Step 6 :

Work in the round, knitting all rounds for 1.5 (1.5, 1.5, 1.5, 2, 2, 2, 2, 2, 2.5, 2.5, 2.5, 2.5, 2.5) inches and bind off loosely

— Finishing :

Step 1 :

Sew side seams of body and sleeves and weave in ends. Accio sweater!

— Charts :

Info :

Pattern includes chart templates for smallest, middle, and largest sizes. You can create custom charts using knitter's graph paper from Sweaterscapes and typing your desired initial in your preferred font

Assembly Instructions

  • After completing the back and front pieces separately, sew the shoulder seams together using mattress stitch or your preferred seaming method
  • Mark the armhole placement on both front and back pieces by measuring down from the shoulder seams as specified in the pattern
  • Pick up stitches evenly around each armhole opening between the marked points, working from front to back
  • Complete both sleeves by working decreases as instructed and finishing with ribbed cuffs before binding off
  • Sew the underarm and side seams in one continuous line from the cuff edge down the sleeve and along the body
  • Pick up stitches around the entire neck opening, joining held stitches from front and back with newly picked-up stitches along the sides
  • Work the neck ribbing in the round and bind off loosely to ensure the neck opening stretches comfortably over the head

Important Notes

  • 💡Always knit a gauge swatch before starting to ensure proper fit across all fourteen size options available
  • 💡The pattern includes helpful guidance for adapting to different yarn weights by following stitch counts for smaller sizes
  • 💡Use stitch markers to track your place when working the initial chart and during neck shaping decreases
  • 💡If you're a beginner, consider knitting the front plain and adding the initial afterwards using duplicate stitch technique
  • 💡Keep shoulder bind-off stitches on holders rather than binding off if you want to use three-needle bind-off for neater seams
  • 💡The pattern recommends Rowan Felted Tweed for authentic tweedy texture, but any similar gauge yarn will work beautifully

This Weasley Sweater Pattern brings the magic of handknit love straight from The Burrow to your needles. With fourteen sizes spanning from children to adults, clear instructions suitable for ambitious beginners, and the option to personalize with any initial you choose, this pattern creates more than just a sweater—it creates a cherished heirloom piece. The classic construction and tweedy texture capture that cozy, homemade charm that makes these sweaters so beloved in the wizarding world. Whether you're knitting for yourself or creating gifts for your own magical family, this pattern guides you through every step with clarity and care. Happy knitting, and may your stitches be as warm as a Weasley hug! 🧶✨

You ask,

we answer.

FAQs

What size should I make for the best fit?

The pattern offers sizes from 20 to 46 inches in circumference. Measure around the fullest part of the chest and choose a size with 2-4 inches of positive ease for a comfortable, classic sweater fit. The pattern includes corresponding length measurements for each size.

Can I really make this as my first sweater project?

Absolutely! The pattern is specifically designed as a great first sweater with straightforward construction, minimal shaping, and clear instructions. If you're nervous about the colorwork initial, you can knit the front plain and add the letter later using duplicate stitch.

How do I create a custom initial chart for my sweater?

The pattern includes detailed instructions for creating your own chart using knitter's graph paper from Sweaterscapes. Simply print the graph paper, type your desired letter in a font you like, and adjust the size to match the pattern specifications for your chosen size.

What if I want to use a different yarn weight than worsted?

The pattern includes a helpful hint for adapting to different gauges. Knit a gauge swatch, calculate your stitches per inch, and follow the instructions for a size that gives you the correct stitch count while following length measurements for your actual desired size.

How much yarn do I actually need for my size?

Yarn requirements range from 3 balls for the smallest size to 13 balls for the largest size in the main color, plus 1 ball of contrast color for the initial. Each ball of Rowan Felted Tweed contains 190 yards, so total yardage ranges from approximately 570 to 2,470 yards depending on size.