🧢 Beautiful ✨ Detailed πŸ’ Adorable

Winter Is Coming Beanie Crochet Pattern

Winter Is Coming Beanie Crochet Pattern
4.3β˜… Rating
3-4 Hours Time Needed
1.5K Made This
βœ‚οΈ

Beginner Friendly Level

Perfect for those just starting their sewing journey, with clear instructions and simple techniques

⏱️

Weekend Treat

Takes 5-7 hours, making it an enjoyable project to finish over a couple of days.

❄️

Winter Warmth

Cozy layers for chilly nights that combine practical warmth with beautiful, intricate stitch patterns.

About This Winter Is Coming Beanie Crochet Pattern

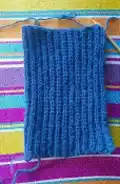
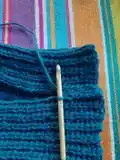
The Winter Is Coming Beanie is a brilliant pattern that teaches you how to recreate the look of knitted fisherman's rib using crochet stitches. By working half double crochet through the back loop only, you create deep, stretchy ribs that have amazing texture and warmth. The pattern is worked flat in rows rather than in the round, then seamlessly joined to create the tube shape. This approach makes it incredibly easy to customize the size by simply adjusting your starting chain length and the number of rows you work.

Winter Is Coming Beanie Crochet Pattern crochet pattern - detailed view of completed project

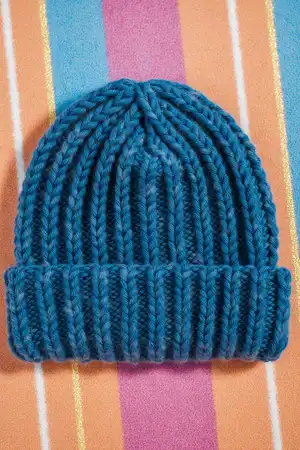
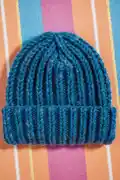
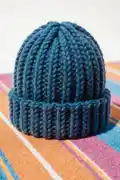
With no strict gauge required, this pattern is forgiving and adaptable to any yarn weight and hook size combination. The finished beanie features a gathered crown and measures approximately 49cm circumference by 32cm height, but you can easily adjust these dimensions.

Why You'll Love This Winter Is Coming Beanie Crochet Pattern

I'm absolutely in love with how this pattern bridges the gap between knitting and crochet aesthetics! The fisherman's rib texture looks so authentically knitted that people are always surprised when I tell them it's crocheted. I appreciate how forgiving this pattern is - there's no need to stress about gauge or getting exact measurements since you're building it to fit as you go. The technique of working through the back loop only creates such a satisfying rhythm once you get into the flow, and watching those beautiful ribs develop row by row is incredibly rewarding. I love that I can use chunky yarn and a large hook to whip up a cozy hat in just a few hours, making it perfect for last-minute gifts or quick personal projects. The customizable nature means I can make matching hats for the whole family without having to hunt down multiple pattern sizes.

Winter Is Coming Beanie Crochet Pattern step 1 - construction progress Winter Is Coming Beanie Crochet Pattern step 2 - assembly progress Winter Is Coming Beanie Crochet Pattern step 3 - details and accessories Winter Is Coming Beanie Crochet Pattern step 4 - final assembly and finishing

Switch Things Up

I love experimenting with different yarn weights to create various looks with this versatile pattern! While the original uses chunky yarn for a quick, cozy result, I've made versions with worsted weight yarn and a 5mm hook for a more refined, fitted beanie that works beautifully for milder weather. The lighter weight versions take a bit longer but create a smoother, more polished look.

Color choices can dramatically change the vibe of this beanie. I've created gradient effects by changing colors every few rows, working from dark to light shades of the same color family. Variegated yarns work exceptionally well with this pattern since the ribbed texture showcases the color changes beautifully without creating busy or chaotic patterns.

For extra warmth and style, I sometimes work a contrasting color for the last few rows before seaming, creating a subtle folded brim effect when worn. You could also add a large pompom to the gathered crown for a playful touch, or keep it simple and minimalist for a more sophisticated look.

I've personalized beanies by adding small embroidered initials or patches after completion, and I've even sewn in fleece linings for extremely cold climates. The pattern works wonderfully for men's styles in neutral colors or bright statement beanies for kids - the customization possibilities are truly endless!

Common Mistakes & How to Fix Them

βœ— Not measuring your starting chain length properly against head circumference which results in a beanie that's too tight or too loose βœ— Accidentally working through both loops instead of back loop only which eliminates the ribbed texture effect completely βœ— Forgetting to add the turning chain at the beginning of each row which throws off your stitch count and creates uneven edges βœ— Not working enough rows to achieve proper width before seaming, resulting in a beanie that doesn't fully wrap around the head βœ— Pulling the gathering stitches too tightly at the crown which creates an awkward pointed top instead of a smooth rounded finish

Winter Is Coming Beanie Crochet Pattern

Create a cozy, textured beanie that mimics the classic fisherman's rib knit stitch using only crochet techniques! This Winter Is Coming Beanie pattern is completely customizable to any head size, making it perfect for the whole family. Worked flat in rows and then seamed, this hat features beautiful ribbed texture created by working half double crochet through the back loop only. The pattern is beginner-friendly with simple stitches and straightforward construction, yet produces a professional-looking hat with impressive visual texture. Whether you're making it for yourself or as a thoughtful handmade gift, this versatile beanie works up quickly with chunky yarn.

Beginner Friendly 3-4 Hours

Materials Needed for Winter Is Coming Beanie Crochet Pattern

β€” Main Fabric

  • 01
    100 grams of Morelfil BigBall yarn or any bulky/chunky weight yarn
  • 02
    Any bulky or super bulky yarn in your preferred color for winter warmth

β€” Tools Required

  • 01
    Crochet hook size 8 mm (or size appropriate for your chosen yarn)
  • 02
    Yarn needle for seaming and weaving in ends
  • 03
    Scissors
  • 04
    Measuring tape

Progress Tracker

0% Complete

β€” WINTER IS COMING BEANIE

Foundation:

Chain to reach about 35 cm, in the example 40 ch

Info:

Crochet in rows, back and forth. All rows except for the last one will be made with HDC stitch made through the back loop

Row 1:

40 hdc

Row 2:

chain, 40 hdc through the back loop

Row 3:

chain, 40 hdc through the back loop

Info:

Repeat Row 2 and 3 until reach a width of 53 cm. In the example 56 rows were worked. You can adjust your width measuring the head less 4 cm

Last Row:

Join the two sides in vertical with 40 slt. You will now have a tube

Finishing:

Cut the yarn and pull yarn through the remaining stitches, tighten together and fasten. Your beanie is ready!

Assembly Instructions

  • Complete all rows working back and forth until you reach the desired width (measure head circumference minus 4cm)
  • Align the first and last rows together with right sides facing to create a tube shape
  • Use slip stitches to join the two short edges together vertically, working through corresponding stitches on both sides
  • Thread your yarn needle with the remaining yarn tail and weave it through all the stitches around the top opening
  • Pull the yarn tight to gather the top of the beanie closed, creating a rounded crown shape
  • Secure the gathered top with a few stitches through the center to reinforce, then weave in all remaining ends

Important Notes

  • πŸ’‘No strict gauge is required for this pattern - simply adjust as you work to fit your head size
  • πŸ’‘The key to the ribbed texture is consistently working through the back loop only on all rows except the first and last
  • πŸ’‘Measure your head circumference and subtract 4cm to determine how wide to make your flat piece for proper stretch
  • πŸ’‘Larger hooks create more pronounced ribs while smaller hooks create tighter, subtler texture
  • πŸ’‘The pattern is highly customizable - adjust chain length and number of rows to fit any head size from child to adult
  • πŸ’‘Work the slip stitch seam loosely to maintain the stretch of the ribbed fabric

This Winter Is Coming Beanie pattern is the perfect introduction to creating knit-look textures with crochet! The simple technique of working through back loops only produces stunning fisherman's rib texture that's warm, stretchy, and beautifully professional-looking. With complete size customization and beginner-friendly construction, you'll be making cozy hats for everyone you know. The quick-working chunky yarn means you can complete a stylish winter essential in just one evening. Bundle up and stay warm with your handmade masterpiece! πŸ§Άβ„οΈβœ¨

You ask,

we answer.

FAQs

Do I need to follow a specific gauge for this beanie pattern?

No strict gauge is required! This pattern is designed to be completely customizable. You can adjust the size as you work by measuring against the intended head size. The example gauge was 14 lines x 20 stitches for 10x10cm, but you can adapt based on your yarn and hook choice.

How do I know what size chain to start with?

Chain to reach approximately 35cm in length, which typically requires around 40 chains with an 8mm hook and bulky yarn. The exact number will vary based on your tension and materials, so measure your chain as you work rather than counting stitches.

What does working through the back loop mean?

When you work through the back loop only, you insert your hook under only the back loop of the stitch (the loop furthest from you) rather than under both loops as usual. This creates the distinctive ribbed texture that mimics fisherman's rib knitting.

How wide should I make the flat piece before seaming?

Measure the head circumference you're making the hat for, then subtract 4cm to account for the natural stretch of the ribbed fabric. For example, if the head measures 53cm, work your flat piece to 49cm wide before joining the sides.

Can I use a different weight yarn than chunky?

Absolutely! You can use any yarn weight, just adjust your hook size accordingly. Lighter weight yarns with smaller hooks will create a more delicate beanie, while super bulky yarns will work up even faster with more pronounced ribs.

Why is the beanie worked flat instead of in the round?

Working flat creates the vertical ribbed texture that characterizes fisherman's rib stitch. When worked in rows and then seamed, the ribs run vertically around the hat, which provides excellent stretch and that classic knitted look that wouldn't be possible working in continuous rounds.