🧢 Beautiful ✨ Detailed πŸ’ Adorable

Wolf Hand Puppet Amigurumi Pattern

Wolf Hand Puppet Amigurumi Pattern
4.5β˜… Rating
4-5 Hours Time Needed
2.1K Made This
βœ‚οΈ

Intermediate Level

Ideal for those with basic knitting experience, featuring slightly more advanced stitches and techniques to expand your skills.

⏱️

Weekend Treat

Takes 5-7 hours, making it an enjoyable project to finish over a couple of days.

🐺

Whimsical Buddy

Playful characters full of personality, designed to spark imagination and become cherished playtime favorites.

About This Wolf Hand Puppet Amigurumi Pattern

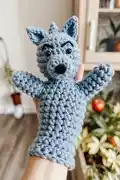
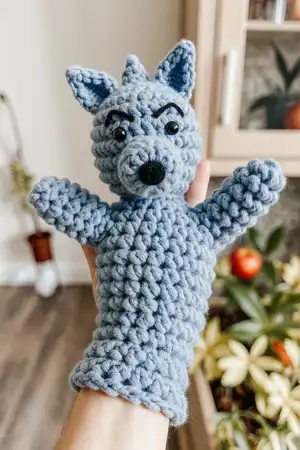
This wolf hand puppet pattern combines the charm of amigurumi with functional puppet design. Using super bulky plush yarn in dark gray, you'll create a soft and huggable character that fits comfortably over your hand. The pattern includes techniques for creating dimensional features like a protruding muzzle, perky ears, and indented eyes that give your wolf incredible personality. The body is designed with an open bottom and integrated arms that allow for expressive hand movements during puppet play.

Wolf Hand Puppet Amigurumi Pattern crochet pattern - detailed view of completed project

Perfect for puppet theater enthusiasts or parents looking to create interactive toys, this pattern teaches you how to assemble facial features for maximum expression and how to structure a puppet body for comfortable wear during extended play sessions.

Why You'll Love This Wolf Hand Puppet Amigurumi Pattern

I absolutely love this wolf puppet pattern because it combines two of my favorite things: amigurumi cuteness and functional play value! The plush yarn makes it incredibly soft and cuddly, while the puppet design means it's not just a decoration but an interactive toy that encourages creativity and storytelling. I'm particularly fond of the eye indentation technique that gives the wolf such a soulful, expressive face. The pattern is straightforward enough to complete in a weekend, yet detailed enough that you'll feel accomplished when you're done. Plus, watching children's faces light up when they put on the puppet and bring it to life is absolutely priceless!

Wolf Hand Puppet Amigurumi Pattern step 1 - construction progress Wolf Hand Puppet Amigurumi Pattern step 2 - assembly progress Wolf Hand Puppet Amigurumi Pattern step 3 - details and accessories Wolf Hand Puppet Amigurumi Pattern step 4 - final assembly and finishing

Switch Things Up

I love experimenting with this wolf puppet pattern to create different characters! One of my favorite variations is changing the color scheme - try using white or cream plush yarn with gray accents for an Arctic wolf, or reddish-brown for a more fox-like appearance. You could even use multiple shades of gray to create a more realistic coat with depth and dimension.

For added personality, I sometimes adjust the ear positioning - placing them further apart creates a friendlier look, while closer together gives a more alert expression. You can also play with the muzzle shape by adjusting the increase rounds to make it longer and more snout-like, or shorter for a cuter appearance.

I've created themed versions too! Add a little red cape and you've got the Big Bad Wolf from Little Red Riding Hood. Stitch on a tiny vest or bow tie for a dapper gentleman wolf perfect for formal puppet performances. For a magical touch, add star-shaped felt patches or use sparkly yarn for the eyebrows to create a mystical forest guardian.

The embroidered eyebrows are another great place to get creative - angle them differently for various expressions like surprised, angry, or sleepy. I've even added small felt fangs peeking out from under the muzzle for a more dramatic character, or embroidered a tongue for a playful, panting wolf.

Common Mistakes & How to Fix Them

βœ— Forgetting to place safety eyes before closing the head completely, making it difficult to position them correctly between rounds ten and eleven βœ— Overstuffing the muzzle which can distort its shape and make it difficult to sew neatly onto the head underneath the eyes βœ— Not leaving enough yarn tail for sewing pieces together, requiring you to reattach yarn which creates unnecessary bulk and weak attachment points βœ— Skipping the eye indentation process which results in a flat appearance instead of the desired dimensional and expressive look for your wolf

Wolf Hand Puppet Amigurumi Pattern

Create an enchanting wolf hand puppet that brings fairy tales to life! This charming amigurumi pattern uses soft plush yarn to craft a cuddly 27cm puppet perfect for storytelling and imaginative play. With detailed instructions for creating expressive features including indented eyes and embroidered eyebrows, you'll bring this woodland character to life. The puppet design allows hands to slip inside for interactive play, making it ideal for puppet shows, bedtime stories, or creative adventures with children.

Intermediate 4-5 Hours

Materials Needed for Wolf Hand Puppet Amigurumi Pattern

β€” Main Fabric

  • 01
    Super bulky plush yarn Himalaya Dolphin Baby in dark gray color (120m/100g or 131yd/3.52oz), 1 skein, color #80369
  • 02
    Cotton sport yarn Yarn Art Jeans (160m/50g or 175yd/1.76oz) in black for nose and eyebrows, color #53

β€” Tools Required

  • 01
    4.5mm crochet hook
  • 02
    2.0mm crochet hook
  • 03
    Plastic safety eyes 8mm diameter (2 pieces)
  • 04
    Fiber filler for stuffing
  • 05
    Large needle for sewing
  • 06
    Knitting markers

Progress Tracker

0% Complete

β€” HEAD :

Info :

Use the dark gray plush yarn, hook 4.5mm

R 1 :

6 sc in MR (6)

R 2 :

inc * 6 (12)

R 3 :

(1 sc, inc) * 6 (18)

R 4 :

(2 sc, inc) * 6 (24)

R 5 :

(3 sc, inc) * 6 (30)

R 6 :

(4 sc, inc) * 6 (36)

R 7-13 :

36 sc (8 rounds)

R 14 :

(4 sc, dec) * 6 (30)

Infos :

Insert safe plastic eyes. Fix eyes between 10 and 11 rounds from the head's top. The distance between the eyes is 7 sc.

R 15 :

(3 sc, dec) * 6 (24)

Info :

Stuff a piece with fiber filler

R 16 :

(2 sc, dec) * 6 (18)

R 17 :

dec * 9 (9)

Info :

Draw the yarn through 9 front loops and tighten. Cut and secure the yarn.

β€” MUZZLE :

Info :

Use the dark gray plush yarn, hook 4.5mm

R 1 :

6 sc in MR (6)

R 2 :

inc * 6 (12)

R 3 :

1 sc, 3 inc, 3 sc, 3 inc, 2 sc (18)

R 4-6 :

18 sc - 3 rounds

R 7 :

(4 sc, dec) * 3, sl st (15)

Info :

Stuff a piece with fiber filler. Leave the tail for sewing, cut the yarn. Sew the muzzle under eyes in the middle.

β€” NOSE :

Info :

Use the black cotton yarn and hook 2mm

R 1 :

6 sc in MR (6)

R 2 :

inc * 6 (12)

R 3 :

12 sc

R 4 :

(2 sc, inc) * 4 (16)

R 5 :

16 sc

R 6 :

(2 sc, dec) * 4 (12)

Info :

Leave 20 cm for sewing, cut the thread. Stuff the piece with fiber filler. Sew nose over the muzzle.

β€” HOW TO INDENT AMIGURUMI EYES :

Info :

Use the black cotton yarn

Step 1 :

Take the thread. Pull it through the back of the head and pull it out above the right eye. Leave the tail on back head's part.

Step 2 :

Pass the needle from below under the left eye and pull out under the right eye. Make sure that the yarn falls from the inside of the left eye.

Step 3 :

Next, pass the needle from above the right eye, making sure that the thread lies on the inside of the eye. And pull out the needle in the same place behind the head.

Step 4 :

Tighten both threads so that the eyes are sunken. Tie a knot, hide the tail inside the head.

β€” EARS (2 pieces) :

Info :

Use the dark gray plush yarn, hook 4.5mm

R 1 :

4 sc in MR (4)

R 2 :

4 inc (8)

R 3 :

(1 sc, inc) * 4 (12)

R 4 :

12 sc

R 5 :

(2 sc, inc) * 4 (16)

R 6 :

16 sc

Info :

Leave 20 cm for sewing. Cut the thread. Sew ears on the head's top. Distance 6 rounds.

β€” EMBROIDERY EYEBROWS :

Info :

Use the black cotton yarn and a large needle. Embroider eyebrows.

β€” ARMS :

Info :

Use the dark gray plush yarn. Crochet hook 4.5mm

R 1 :

6 sc in MR (6)

R 2 :

inc * 6 (12)

R 3 :

(2 sc, inc) * 4 (16)

R 4-5 :

16 sc (2 rounds)

R 6 :

(2 sc, dec) * 4 (12)

R 7-9 :

12 sc (3 rounds)

Info :

Make sl st, cut the yarn. Don't stuff. Make 2 pieces.

β€” BODY :

Info :

Use the dark gray plush yarn. Crochet hook 4.5mm. Leave the tail for sewing, begin crochet without sl st. Make 24 ch, sl st in the first loop. Make a circle.

R 1 :

24 sc

R 2 :

(3 sc, inc) * 6 (30)

R 3 :

(4 sc, inc) * 6 (36)

R 4 :

(5 sc, inc) * 6 (42)

R 5 :

crochet together with arm - 7 sc, 13 sc only on the body, 7 sc together with another arm, 15 sc only on the body (42)

Info :

Crochet sc2tog on both sleeves sides to avoid holes

R 6 :

sc2tog, crochet only on the arm - 4 sc, sc2tog, 12 sc only on the body, sc2tog, 4 sc only on the another arm, sc2tog, 14 sc only on the body (38)

R 7 :

dec, 2 sc, dec, 12 sc, dec, 2 sc, dec, 14 sc (34)

R 8 :

34 sc, ch

R 9-14 :

34 dc (6 rounds)

Info :

Sew the body to the head as shown in the photos

Assembly Instructions

  • Attach the stuffed muzzle to the head underneath the eyes, centering it carefully for a balanced appearance
  • Sew the stuffed nose onto the center front of the muzzle using the black cotton yarn tail left for sewing
  • Create indented eyes following the detailed instructions using black cotton yarn to add dimension and expression to the face
  • Embroider eyebrows above the eyes using black cotton yarn to add character and personality to your wolf puppet
  • Sew the ears to the top of the head with 6 rounds distance between them for proper positioning
  • Attach both unstuffed arms to the body during round 5 as indicated in the body instructions, crocheting them together
  • Finally, sew the completed body to the head using the yarn tail left at the beginning of the body construction

Important Notes

  • πŸ’‘Use stitch markers to keep track of your starting point in each round, especially important when working with plush yarn
  • πŸ’‘Plush yarn can be challenging to see individual stitches, so work in good lighting and count carefully
  • πŸ’‘Do not stuff the arms as they need to remain flat and flexible for the puppet functionality
  • πŸ’‘Position safety eyes between rounds 10-11 with exactly 7 single crochets between them before closing the head completely
  • πŸ’‘The body is designed to remain open at the bottom to allow your hand to slip inside for puppet manipulation
  • πŸ’‘When attaching arms to body in round 5, ensure they are positioned symmetrically for balanced appearance during puppet play

This charming wolf hand puppet pattern brings storytelling magic to life! Designed with soft plush yarn and expressive features, this 27cm puppet combines cuddly amigurumi charm with interactive functionality. The pattern includes special techniques like eye indentation for added dimension and a clever body construction that keeps the bottom open for comfortable hand insertion. Perfect for puppet shows, educational play, or bringing bedtime stories to life with woodland adventure! 🐺🧢✨

You ask,

we answer.

FAQs

Can I use regular worsted weight yarn instead of plush yarn?

Yes, you can substitute with worsted weight yarn, but you'll need to use a smaller hook (3.5mm) and your finished puppet will be smaller and have a different texture. The plush yarn gives the wolf its soft, cuddly appearance.

Why shouldn't I stuff the arms?

The arms are left unstuffed so they remain flexible and can move naturally when you manipulate the puppet. Stuffed arms would be too rigid and interfere with the puppet's movement and expressiveness during play.

What if I can't find 8mm safety eyes?

You can use 6mm or 10mm safety eyes as alternatives, though the expression will change slightly. You could also embroider eyes with black yarn if making this for very young children who might pull at plastic eyes.

Is the eye indentation technique difficult?

The eye indentation takes practice but the pattern includes detailed step-by-step instructions. Take your time with this step as it really brings personality to your wolf. You can practice on a test piece first if you're nervous.

How do I keep the bottom opening the right size for my hand?

The pattern creates a body that fits an average adult hand. If making for a child, you can reduce the starting chain to 20 stitches instead of 24, which will create a smaller opening.