๐Ÿงถ Beautiful โœจ Detailed ๐Ÿ’ Adorable

Iron Man Amigurumi Pattern

Iron Man Amigurumi Pattern
4.0โ˜… Rating
8-10 Hours Time Needed
3.9K Made This
โœ‚๏ธ

Advanced Level

Designed for experienced knitters, these patterns involve intricate designs and complex techniques to challenge and inspire.

โฑ๏ธ

All-Day Adventure

Requires 8-10 hours, ideal for a full day of immersive knitting.

๐Ÿงธ

Cute Companion

An adorable friend to cherish, handcrafted with love to bring comfort and joy for years to come.

About This Iron Man Amigurumi Pattern

This Iron Man amigurumi pattern showcases exceptional technical detail with complex color work throughout the body and legs to recreate the iconic armor design. The helmet is constructed using an innovative technique that creates a removable piece with a separate yellow face plate held in place by red straps, complete with light blue arc reactor details. The pattern features intricate shaping with back-and-forth rows for the helmet's face opening, strategic color changes in the legs to represent the boots, and dimensional elements like the helmet 'ears' and multiple laser accents. The body construction cleverly connects two separately crocheted legs with chains to form the torso in one continuous piece.

Iron Man Amigurumi Pattern crochet pattern - detailed view of completed project

What sets this pattern apart is the attention to authentic Iron Man details - from the embroidered facial features visible through the helmet opening to the light blue lasers on the palms and the prominent chest arc reactor. The pattern includes detailed assembly instructions with photos showing proper eye placement techniques and embroidery guidance.

Why You'll Love This Iron Man Amigurumi Pattern

I'm completely obsessed with this Iron Man pattern because it perfectly captures everything that makes Tony Stark's armor so iconic while translating it into the cutest amigurumi form imaginable. There's such a thrill in working through those complex color changes in the legs and body - watching the red and yellow sections come together to actually look like his armor is incredibly satisfying. The helmet construction is pure genius - creating that removable piece with the face opening feels like you're engineering actual Iron Man tech with yarn and a hook. I especially love the challenge of the back-and-forth rows that shape the face opening perfectly to fit around the head. Adding those tiny light blue lasers to the palms and that prominent chest arc reactor brings the whole character to life - it's those small details that make you feel like a true craftsperson. The embroidery work for Tony's face peeking through the helmet adds such personality and charm. This isn't just following a pattern; it's building a superhero from scratch, piece by piece, color by color. Every Marvel fan who sees this finished piece will instantly recognize the attention to detail and craftsmanship. It's challenging enough to keep you engaged throughout the entire process but rewarding in ways that make every hour worth it.

Iron Man Amigurumi Pattern step 1 - construction progress Iron Man Amigurumi Pattern step 2 - assembly progress Iron Man Amigurumi Pattern step 3 - details and accessories Iron Man Amigurumi Pattern step 4 - final assembly and finishing

Switch Things Up

I love experimenting with different Marvel universe variations using this Iron Man base pattern. For a War Machine version, I swap all the red yarn for dark gray or charcoal, keep the silver/light gray where the yellow is, and maintain the light blue arc reactor. Adding some black accents with surface crochet or embroidery creates that military armor look perfectly. For the Mark 42 'House Party Protocol' suit, I reverse the color dominance - use gold/yellow as the main color with red accents instead, creating that iconic orange-gold armor Tony wore in Iron Man 3.

The Rescue armor (Pepper Potts' suit) is another fantastic variation - work the entire piece in shades of blue and silver with purple accents instead of the traditional red and gold. I've even created a 'Stealth Mode' Iron Man using all black yarn with just hints of dark blue for the arc reactors, giving it that covert ops appearance. For fans of the comics, the Silver Centurion armor can be achieved by using silver or light gray as the primary color with deep red and gold accents.

Size variations open up even more possibilities. Using sport weight yarn and a 1.5mm hook creates a tiny 10cm Iron Man perfect as a keychain or ornament - I attach a small jump ring to the top of the helmet for hanging. Going the opposite direction with chunky yarn and a 5mm hook produces a massive 35cm+ version that makes an impressive display piece or pillow. I've made an entire Avengers lineup by adapting the base pattern with different color schemes and minor modifications.

The helmet is where you can get really creative. I've made versions without the removable helmet feature - just crocheting the red helmet directly onto the head and embroidering a simple face plate design with yellow and light blue yarn. For a battle-damaged look, I intentionally create small holes or frayed sections in the helmet and arms, adding gray or black embroidery floss to simulate scorch marks and scratches. Some makers add tiny LED lights inside the chest and palm lasers for an illuminated effect - just use small battery-operated craft lights and crochet loosely around them.

Don't forget about accessories! I've crocheted tiny repulsor blast effects using translucent light blue or white yarn in cone shapes that attach to the palms. Creating a small display stand using a wooden base and dowel lets Iron Man pose in flight. For holiday versions, add a miniature Santa hat during Christmas or create tiny heart shapes to attach during Valentine's Day. The pattern is so versatile that once you've mastered the basic construction, your imagination is truly the only limit!

Common Mistakes & How to Fix Them

โœ— Not maintaining tight consistent tension when working with multiple colors, causing the yellow boot sections to show gaps between color changes โœ— Forgetting to cut and fasten off yellow threads after completing leg sections before connecting legs to form the body โœ— Crocheting the helmet too tightly at the same tension as the head, making it impossible to fit properly over the completed head โœ— Not positioning the yellow helmet face plate correctly with the straps before final assembly, resulting in an asymmetrical or crooked appearance โœ— Overstuffing the arms which should be stuffed lightly only up to round ten, making them too stiff and bulky โœ— Skipping the additional twelve single crochet stitches at the end of body construction that properly position the beginning of the row

Iron Man Amigurumi Pattern

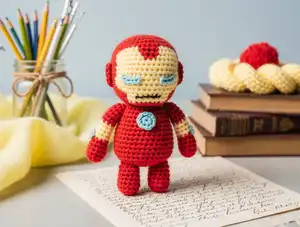
Bring Marvel's iconic superhero to life with this incredible Iron Man amigurumi pattern! Standing at 17cm (6.7 inches) tall, this detailed pattern features Tony Stark's signature red and gold armor complete with an intricate helmet design, yellow face plate with light blue arc reactor details, embroidered facial features, and light blue laser accents on the palms and chest. The pattern includes comprehensive instructions for creating the removable helmet with detailed shaping, body with integrated yellow boot details, arms with laser inserts, and all the authentic Iron Man design elements. Perfect for Marvel fans and superhero enthusiasts, this pattern combines multiple color changes, advanced shaping techniques, and creative embellishments to capture Iron Man's heroic presence in adorable amigurumi form.

Advanced 8-10 Hours

Materials Needed for Iron Man Amigurumi Pattern

โ€” Main Fabric

  • 01
    Alize Cotton Gold yarn in flesh/color 382
  • 02
    Alize Cotton Gold yarn in red/color 56
  • 03
    Yarn Art Jeans in yellow/color 88
  • 04
    Yarn Art Jeans in light blue/color 76
  • 05
    Hollofayber or polyester fiberfill stuffing

โ€” Tools Required

  • 01
    2mm crochet hook (Clover No2 recommended)
  • 02
    10-12mm safety eyes with stalks (or black half beads)
  • 03
    Craft glue
  • 04
    Black sewing thread
  • 05
    Thick sewing needle for detail attachment
  • 06
    Scissors
  • 07
    Stitch marker or contrasting thread
  • 08
    Thick knitting needle No5.5 (5.5mm) for eye hole expansion

Progress Tracker

0% Complete

โ€” Head :

Info :

Start to crochet with the flesh thread, stuff tightly in the course of crocheting

Round 1 :

6 sc in MR (6)

Round 2 :

6 inc (12)

Round 3 :

(1 sc, inc)*6 (18)

Round 4 :

1 sc, inc, (2 sc, inc)*5, 1 sc (24)

Round 5 :

(3 sc, inc)*6 (30)

Round 6 :

2 sc, inc, (4 sc, inc)*5, 2 sc (36)

Round 7 :

(5 sc, inc)*6 (42)

Round 8 :

3 sc, inc, (6 sc, inc)*5, 3 sc (48)

Round 9 :

(7 sc, inc)*6 (54)

Round 10 :

4 sc, inc, (8 sc, inc)*5, 4 sc (60)

Round 11 :

(9 sc, inc)*6 (66)

Round 12-22 :

66 sc (11 rows)

Info :

If you want to insert the eyes with stalks, insert them between 18th and 19th rows, the space between them is 10 sc

Round 23 :

(9 sc, dec)*6 (60)

Round 24 :

4 sc, dec, (8 sc, dec)*5, 4 sc (54)

Round 25 :

(7 sc, dec)*6 (48)

Round 26 :

3 sc, dec, (6 sc, dec)*5, 3 sc (42)

Round 27 :

(5 sc, dec)*6 (36)

Round 28 :

2 sc, dec, (4 sc, dec)*5, 2 sc (30)

Round 29 :

(3 sc, dec)*6 (24)

Round 30 :

1 sc, dec, (2 sc, dec)*5, 1 sc (18)

Round 31 :

(1 sc, dec)*6 (12)

Round 32 :

6 dec (6)

Finishing :

Cut a thread, tighten the opening, hide the end of a thread in the detail

โ€” Legs (2 Details) :

Info :

Start to crochet with the red thread. Crochet the right and left legs up to the 9th row in the same way according to the scheme

Round 1 :

6 sc in MR (6)

Round 2 :

6 inc (12)

Round 3 :

(1 sc, inc)*6 (18)

Round 4-8 :

18 sc (5 rows)

โ€” Right Leg :

Info :

Looking at the back of the head

Round 9-12 :

1 sc with the red thread, 6 sc with the yellow thread, 11 sc with the red thread (4 rows)

Finishing :

Don't cut the yellow thread, cut the red thread, fasten off

โ€” Left Leg :

Info :

Looking at the back of the head

Round 9-12 :

10 sc with the red thread, 6 sc with the yellow thread, 2 sc with the red thread (4 rows)

Finishing :

Don't cut either the red or yellow threads

โ€” Body :

Info :

Start to connect the legs. Make chain 6 ch from the second leg and insert the hook in the first loop of the first leg and crochet according to the scheme

Round 1 :

On the right leg (looking at the back of the head): 1 sc with the red thread, 6 sc with the yellow thread, 11 sc with the red thread. On the chain: 6 sc with the red thread. On the left thread (looking at the back of the head): 10 sc with the red thread, 6 sc with the yellow thread, 2 sc with the red thread. On the other side of the chain: 10 sc with the red thread, 6 sc with the yellow thread, 2 sc with the red thread. We should have 48 sc in this row

Info :

Cut the yellow threads, fasten off. Stuff the legs and continue to crochet the body. Stuff the detail tightly in the course of crocheting

Round 2 :

(7 sc, inc)*6 (54)

Round 3-11 :

54 sc (9 rows)

Round 12 :

(7 sc, dec)*6 (48)

Round 13-15 :

48 sc (3 rows)

Round 16 :

3 sc, dec, (6 sc, dec)*5, 3 sc (42)

Round 17-19 :

42 sc (3 rows)

Round 20 :

(5 sc, dec)*6 (36)

Round 21-23 :

36 sc (3 rows)

Round 24 :

2 sc, dec, (4 sc, dec)*5, 2 sc (30)

Round 25-26 :

30 sc (2 rows)

Round 27 :

(3 sc, dec)*6 (24)

Round 28 :

24 sc

Finishing :

Crochet additional 12 sc to move the beginning of the row back. Cut the thread, leaving a long end for sewing
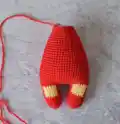
โ€” Arms (2 Details) :

Info :

Start to crochet with the red thread, stuff not tightly up the 10th row

Round 1 :

5 sc in MR (5)

Round 2 :

5 inc (10)

Round 3-13 :

10 sc (10 rows)

Round 14-18 :

4 sc with the yellow thread, 6 sc with the red thread (5 rows)

Info :

Cut the yellow thread, fasten off

Round 19-21 :

10 sc (3 rows)

Round 22 :

(3 sc, dec)*2 (8)

Finishing :

Fold the detail in half and connect the edges by 4 sc. Cut a thread, leaving a long end for sewing

โ€” Helmet :

Info :

Crochet with the red thread. Recommend crocheting the helmet less tightly than the head or using a larger hook

Round 1 :

6 sc in MR (6)

Round 2 :

6 inc (12)

Round 3 :

(1 sc, inc)*6 (18)

Round 4 :

1 sc, inc, (2 sc, inc)*5, 1 sc (24)

Round 5 :

(3 sc, inc)*6 (30)

Round 6 :

2 sc, inc, (4 sc, inc)*5, 2 sc (36)

Round 7 :

(5 sc, inc)*6 (42)

Round 8 :

3 sc, inc, (6 sc, inc)*5, 3 sc (48)

Round 9 :

(7 sc, inc)*6 (54)

Round 10 :

4 sc, inc, (8 sc, inc)*5, 4 sc (60)

Round 11 :

(9 sc, inc)*6 (66)

Round 12-17 :

66 sc (6 rows)

Info :

Cut the thread, fasten off. Attach the red thread to the 46th loop of the last helmet's row and crochet 42 sc. This will be the 18th row, turn the crocheting and further crochet in back-and-forth rows

Round 19-22 :

1 ch, 42 sc, turn the crocheting (4 rows)

Round 23 :

1 ch, 6 sc, dec, (12 sc, dec)*2, 6 sc, turn the crocheting (39)

Round 24 :

1 ch, (11 sc, dec)*3, turn the crocheting (36)

Round 25 :

1 ch, 5 sc, dec, (10 sc, dec)*2, 5 sc, turn the crocheting (33)

Round 26 :

1 ch, (dec, 9 sc)*3, turn the crocheting (30)

Round 27 :

1 ch, 4 sc, dec, (8 sc, dec)*2, 4 sc, turn the crocheting (27)

Round 28 :

1 ch, (7 sc, dec)*3, turn the crocheting (24)

Round 29 :

1 ch, 3 sc, dec, (6 sc, dec)*2, 3 sc, turn the crocheting (21)

Round 30 :

1 ch, (dec, 5 sc)*3, turn the crocheting (18)

Finishing :

Cut the thread, leaving a long end for sewing

โ€” Ears (2 Details) :

Info :

Crochet with the red thread, don't stuff

Round 1 :

6 sc in MR (6)

Round 2 :

6 inc (12)

Round 3-4 :

12 sc (2 rows)

Round 5 :

6 dec (6)

Finishing :

Cut the thread, tighten the opening, hide the end of the thread

โ€” Yellow Part of the Helmet :

Info :

Crochet with the yellow thread in back-and-forth rows. Make chain 12 ch and crochet according to the scheme

Round 1 :

1 ch, 12 sc, turn the crocheting

Round 2 :

1 ch, (3 sc, inc)*3, turn the crocheting (15)

Round 3 :

1 ch, 15 sc, turn the crocheting

Round 4 :

1 ch, 2 sc, inc, (4 sc, inc)*2, 2 sc, turn the crocheting (18)

Round 5 :

1 ch, 18 sc, turn the crocheting

Round 6 :

1 ch, (inc, 5 sc)*3, turn the crocheting (21)

Round 7 :

1 ch, 21 sc, turn the crocheting

Round 8 :

1 ch, 3 sc, inc, (6 sc, inc)*2, 3 sc, turn the crocheting (24)

Round 9 :

1 ch, 24 sc, turn the crocheting

Round 10 :

1 ch, (7 sc, inc)*3, turn the crocheting (27)

Round 11-12 :

1 ch, 6 sc with the yellow thread, 5 sc with the light blue thread, 5 sc with the yellow thread, 5 sc with the light blue thread, 6 sc with the yellow thread (2 rows)

Round 13-14 :

1 ch, 27 sc, turn the crocheting

Finishing :

Crochet 1 row of sc around the perimeter of the detail, crochet one increase in the corners. Cut the thread, fasten off. Insert the hook on the side between the 5th and 6th rows and make chain 15 ch with the red thread. Make 1 sl st in the corner loop of the detail. Cut the thread, fasten off, hide the end. Make the 2nd strap in the same way. Insert the hook in the corner loop on the other detail's side and make chain 15 ch with the red thread. Make 1 sl st between the 5th and 6th rows. Cut the thread, fasten off, hide the end of the thread
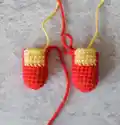
โ€” Hand Lasers (2 Details) :

Instructions :

With the light blue thread, crochet 1 ch, 8 sc in MR, sl st to join in the end. Tighten the ring, cut the thread, leaving a long end for sewing

โ€” Chest Laser :

Instructions :

Crochet 2 ch, 12 hdc in MR, sl st to join in the end. Tighten the ring, cut the thread, leaving a long end for sewing

Assembly Instructions

  • Sew the head to the body, stuffing the neck very tightly during sewing so the head doesn't dangle due to its weight.
  • If using safety eyes with stalks, insert them between rounds 18-19 with 10 sc space between them. Use a thick knitting needle to gradually expand the crocheted fabric at marked points, apply glue inside the holes and to inner eye surface, insert and press for a couple minutes.
  • Embroider facial details: whites of eyes with white thread, nose with flesh thread between rounds 20-21 (width of 3 sc), mouth and eyebrows with black sewing thread (2 threads), cheeks with red thread between rounds 21-22 (width of 2 sc).
  • Mark with pins where helmet edges should be located. Sew the bottom of the helmet first, then sew the face mask along the entire inner border.
  • Sew the light blue hand lasers on the inside of the arms, then attach arms between rounds 26-27 of the body (recommend steaming them first).
  • Sew the helmet 'ears' on the sides symmetrically to each other. Place the yellow part of the helmet with straps over the helmet.
  • Sew the large light blue chest laser (arc reactor) to the center of the chest. Embroider the mouth on the yellow helmet face plate with black sewing thread (2 threads).

Important Notes

  • ๐Ÿ’กCrochet in a spiral without slip stitches, using a marker or contrasting thread to mark the first loop of each new row
  • ๐Ÿ’กThe helmet should be crocheted less tightly than the head or with a larger hook to ensure proper fit
  • ๐Ÿ’กWhen connecting legs to form body, ensure you have exactly 48 sc in round 1 before continuing
  • ๐Ÿ’กDon't cut yellow threads from legs until after connecting them to body and verifying color placement is correct
  • ๐Ÿ’กArms should be stuffed lightly only up to round 10, leaving the upper portion less stuffed for natural movement
  • ๐Ÿ’กUse glue on safety eyes even if they have stalks for better security and to prevent thread running under the eye
  • ๐Ÿ’กSteam or press arms before attaching to body for better shaping and positioning

This spectacular Iron Man amigurumi pattern was designed to bring Marvel's genius billionaire playboy philanthropist to life in the most adorable way possible! With incredible attention to detail including the removable helmet with face plate, authentic red and gold color blocking, light blue arc reactor accents, and embroidered Tony Stark features, this pattern captures everything fans love about Iron Man. Whether displayed on a shelf as a collectible or gifted to a Marvel superfan, this Iron Man will bring joy and heroic inspiration to any space. I am Iron Man! ๐Ÿฆพโค๏ธ Happy crocheting! โœจ๐Ÿ’›

You ask,

we answer.

FAQs

Why does the pattern recommend crocheting the helmet less tightly than the head?

The helmet needs to fit over the completed head, so it must be slightly larger. If you crochet it at the same tension as the head, it will be too tight to fit properly. Either consciously loosen your tension slightly when working the helmet, or use a hook size 0.5mm larger than you used for the head. This ensures the helmet slides on and off easily without stretching or damaging the stitches.

How do I correctly position the yellow sections on the legs for the boot details?

The pattern specifies different placement for left and right legs when looking at the back of the head. For the right leg: work 1 sc red, 6 sc yellow, 11 sc red. For the left leg: work 10 sc red, 6 sc yellow, 2 sc red. This creates the appearance of Iron Man's boots when the legs are attached to the body. Make sure to follow the correct pattern for each leg and don't cut the threads until after connecting the legs.

What's the technique for attaching the eyes if I'm using ones with stalks?

The pattern recommends a unique gluing technique even with stalk eyes. First, use a thick knitting needle (5.5mm) to gradually expand the crocheted fabric between rounds 18-19 where the eyes will go. Apply glue inside the resulting holes and also coat the inner surface of the eyes with glue. Insert the eyes and press firmly for a couple minutes. This prevents the plug from interfering with facial embroidery and stops thread from running under the eyes.

How does the yellow helmet face plate attach and stay in place?

The yellow face plate is a separate piece crocheted with strategic increases to create the proper shape. It features two red chain straps (15 chains each) crocheted directly onto the piece - one on each side between rounds 5-6. These straps loop over the helmet to hold the face plate in position. The light blue arc reactor details are worked directly into the yellow piece using color changes in rounds 11-12. You can adjust strap length if needed for better fit.

Why do I need to crochet an additional 12 sc at the end of the body construction?

The additional 12 single crochet stitches after round 28 move the beginning of the row to the back of the body. This repositioning is important for proper assembly - it ensures that when you sew the head to the body, the seam ends up at the back where it's less visible, and the front of the body faces forward correctly for attaching the chest arc reactor. Don't skip this step or your assembly positioning will be off.