🧢 Beautiful ✨ Detailed πŸ’ Adorable

Freestyle Beanie Pattern

Freestyle Beanie Pattern
4.3β˜… Rating
2-3 Hours Time Needed
3.8K Made This
βœ‚οΈ

Beginner Friendly Level

Perfect for those just starting their sewing journey, with clear instructions and simple techniques

⏱️

Bite-Sized Project

Complete in under 2 hoursβ€”quick, fun, and perfect for a little creative escape.

🧣

Snug Essential

Everyday comfort with practical charm, designed for both functionality and style through changing seasons.

About This Freestyle Beanie Pattern

Freestyle Beanie Pattern crochet pattern - detailed view of completed project

The beauty of this method lies in its flexibility - choose your yarn weight, adjust the height and circumference to fit perfectly, and add your own creative embellishments. From classic simplicity to funky cactus designs, the possibilities are endless!

Why You'll Love This Freestyle Beanie Pattern

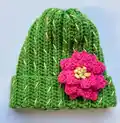
I absolutely love this freestyle approach because it takes all the pressure out of hat-making! There's something incredibly liberating about not having to count stitches obsessively or worry about following complex pattern instructions. I find myself reaching for this technique whenever I need a quick gift or want to experiment with new yarns. The back loop only texture creates beautiful ridges that give the beanie structure and visual interest without any complicated stitchwork. What really excites me is how customizable it is - I can adjust the fit in real-time by simply trying it on as I work. Plus, the personalization options are endless! I've made everything from sleek minimalist beanies to wild cactus-inspired designs with embroidered spines and flower toppers. It's perfect for using up yarn from your stash, and because you're not locked into a specific gauge, you can work with whatever hook feels right for your yarn. This method has completely changed how I approach beanie-making!

Freestyle Beanie Pattern step 1 - construction progress Freestyle Beanie Pattern step 2 - assembly progress Freestyle Beanie Pattern step 3 - details and accessories Freestyle Beanie Pattern step 4 - final assembly and finishing

Switch Things Up

I love experimenting with different embellishment styles to give each Freestyle Beanie its own personality! One of my favorite variations is adding a chunky cable-knit look by working front post stitches every few rows instead of just back loops - it creates amazing texture. I've also tried striping with multiple colors, changing yarns every 4-6 rows for a bold, graphic effect that really pops.

For a more bohemian vibe, I sometimes add fringe to the bottom edge before folding up the brim - it peeks out just enough to add movement and interest. Tassels instead of pompoms are another fun option, especially when made in contrasting colors. I've even created reversible beanies by working two rectangles and seaming them together wrong sides facing, giving you two color options in one hat!

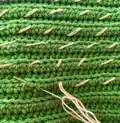
The cactus design shown in the pattern has inspired me to try other embroidered elements - I've done constellations with metallic thread, abstract line art, and even initials for personalized gifts. Adding appliquΓ©s is another route I love exploring - crocheted flowers, hearts, or stars sewn onto the finished beanie create dimension and whimsy.

For a more polished look, I sometimes work the entire beanie in a different stitch pattern like the moss stitch or even alternate between HDC and DC rows for subtle stripes. Playing with brim styles is fun too - instead of a simple fold, try a ribbed brim by working in the third loop, or create a slouchy beanie by adding several extra inches to the height!

Common Mistakes & How to Fix Them

βœ— Starting with a chain that's too short, leaving you without enough height for your desired beanie size and forcing you to start over βœ— Forgetting to work in back loops only after the first row, which eliminates the beautiful ridge texture that gives structure βœ— Not measuring the width frequently as you work, resulting in a beanie that's either too tight or too loose to fit properly βœ— Working an odd number of rows so the working loop and starting tail aren't opposite, making seaming more difficult and visible

Freestyle Beanie Pattern

Create your own custom beanie without following strict pattern rules! This freestyle approach teaches you how to design a perfectly fitted hat in any yarn weight you prefer. Whether you're working with worsted, bulky, or super bulky yarn, you'll learn the simple technique of creating a rectangle that transforms into a cozy beanie. The pattern includes endless personalization options from pompoms to embroidered details, buttons, or edgy studs. Perfect for gift-giving or creating something uniquely yours, this beanie-making method gives you complete creative freedom!

Beginner Friendly 2-3 Hours

Materials Needed for Freestyle Beanie Pattern

β€” Main Fabric

  • 01
    Worsted weight yarn (#4) - approximately 290 yards for medium adult size
  • 02
    Bulky weight yarn (#5) - approximately 225 yards for medium adult size
  • 03
    Super bulky weight yarn (#6) - approximately 190 yards for medium adult size
  • 04
    Any yarn weight can be used - adjust yardage accordingly for size

β€” Tools Required

  • 01
    Crochet hook appropriate for chosen yarn weight (G/6 (4.0mm) for worsted, I/9 (5.5mm) for bulky, K/L (6.5-8.0mm) for super bulky)
  • 02
    Measuring tape
  • 03
    Yarn needle for seaming
  • 04
    Scissors
  • 05
    Stitch markers (optional but helpful)
  • 06
    Pompom maker (optional for embellishments)
  • 07
    Pins for trying on and fitting

Progress Tracker

0% Complete

β€” Getting Started :

Step 1 :

Determine desired beanie height by measuring from bottom edge to center top (add brim height if planning a folded brim)

Step 2 :

Make a beginning chain slightly longer than desired height by about 1 inch, then add 1 more chain for turning chain

β€” Foundation Row :

Row 1 :

Beginning with second chain from hook and working into bottom of chain, make 1 HDC in each st across (or make 1 SC in each st as alternative)

Info :

Monitor width of row (this becomes the height of finished hat). Unravel extra chains if needed. Check gauge after a few rows to ensure on target.

β€” Main Body :

Continuing Rows :

Make ch-2 for turning chain (does not count as stitch), turn work and make 1 HDC in back loop only of each stitch across

Info :

Repeat until rectangle measures desired circumference minus 1-3 inches (should stretch to fit). Work even number of rows so working loop is opposite beginning tail.

β€” Shaping Top :

Step 1 :

Rotate piece to work along top edge into row-ends

Step 2 :

Make SC decreases (SC2tog) across top edge: insert hook into next ridge, YO and pull up loop, insert hook into following ridge, YO and pull up loop, YO and pull through all 3 loops on hook

Step 3 :

Repeat SC2tog across until all ridges have been worked. If one ridge remains at end, work one SC into last ridge

β€” Assembly :

Step 1 :

Fasten off leaving long tail for sewing

Step 2 :

Using yarn needle, weave yarn tail through each SC worked along top edge and pull tight to close top of hat

Step 3 :

Continue using yarn tail to whip stitch the seam in hat. Insert needle under just the top loop of last row worked, but under both loops of foundation edge

Step 4 :

Weave in ends and block

Assembly Instructions

  • After completing all rows, rotate your work to access the top edge and work single crochet decreases across all row-ends.
  • Fasten off leaving a long tail (approximately 24 inches) for seaming and closing the top of the hat.
  • Thread the yarn tail through a yarn needle and weave it through each single crochet stitch along the top edge.
  • Pull the yarn tail firmly to cinch and close the top of the beanie, creating the crown shape.
  • Use the same tail to whip stitch the side seam, working under the top loop of the last row and both loops of the foundation edge for an invisible seam.
  • Weave in all remaining ends securely, ensuring they won't come loose with wear.
  • Block the beanie gently if desired to even out stitches and perfect the shape before wearing or gifting.

Important Notes

  • πŸ’‘Choose a hook size that creates fairly firm gauge with no large holes between stitches for best structure
  • πŸ’‘Always work an even number of rows so the working loop ends opposite the starting tail for easier seaming
  • πŸ’‘Measure circumference frequently as you work - the long side should be 1-3 inches smaller than head circumference
  • πŸ’‘Remember to add extra height if planning a folded brim - measure the brim height and add it to total hat height
  • πŸ’‘The back loop only technique creates beautiful ridges that give the beanie structure and visual appeal
  • πŸ’‘Yarn amounts vary based on yarn weight, hat size, and how much brim is folded - buy extra to be safe

This Freestyle Beanie pattern is a game-changer for anyone who wants creative freedom in their crochet projects! By teaching you the simple technique of creating a rectangle that transforms into a perfectly fitted beanie, this pattern eliminates the stress of following complicated instructions. You'll love how you can customize every aspect - from yarn weight to size to embellishments - making each beanie truly one-of-a-kind. Whether you keep it classic and simple or go wild with cactus spines and flower toppers, this method ensures success every time. Happy freestyling! 🧢✨

You ask,

we answer.

FAQs

What yarn weight should I use for this beanie?

You can use any yarn weight! The pattern recommends worsted (#4) with G/6 hook, bulky (#5) with I/9 hook, or super bulky (#6) with K or L hook. Just choose a hook that gives you fairly firm gauge with no large holes between stitches.

How do I know what size to make?

Measure your head circumference or use an existing beanie as reference. The rectangle's long side should measure 1-3 inches smaller than your head circumference so it stretches to fit. For height, measure from where you want the bottom edge to sit up to the center top of your head.

Why must I work an even number of rows?

Working an even number of rows ensures that your working loop ends up opposite from where your beginning yarn tail is. This makes seaming much easier and creates a more invisible seam when you whip stitch the sides together.

Can I make this beanie without a folded brim?

Absolutely! Simply make your starting chain the exact height you want the finished beanie to be, without adding extra for a brim. The beanie will have a simple, fitted edge without any fold.

What if my rectangle is too short or too tall after I start?

That's the beauty of this method! Since you're measuring as you go, you can simply add more rows if it's too short, or work fewer rows if it's getting too tall. Just remember to end on an even number of rows.

How do I add embellishments like the cactus design or buttons?

The pattern includes detailed inspiration photos and instructions for various embellishments. Embroidery is added with a yarn needle after completion, buttons are sewn through both layers, and pompoms are attached to the closed top. Get creative and make it your own!