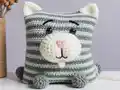
Create your own soft and cuddly cat-shaped pillow with this delightful crochet pattern! This charming pillow cat measures approximately 30x33 centimeters and features adorable details including perky white ears with gray trim, a sweet white nose, cute little arms and legs, and expressive button eyes. Made with plush Himalaya Dolphin baby yarn, this pillow combines comfort with cuteness, making it perfect for children's rooms, nurseries, or as a cozy companion for cat lovers of all ages. The striped cylindrical body design adds visual interest while the attached facial features bring personality to this huggable home decor piece.
Progress Tracker
0% Complete
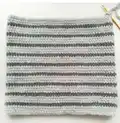
— Pillow :
Info :
Use light gray plush yarn. Do not forget to fix the beginning of each new circle with a pin or thread.
Round 1 :
90 ch, connect with the first loop
Info :
We will change colors
Round 4 :
gray: 90 sc {90}
Round 5-7 (3 rounds) :
light gray: 90 sc {90}
Round 8 :
gray: 90 sc {90}
Round 9-11 (3 rounds) :
light gray: 90 sc {90}
Round 12 :
gray: 90 sc {90}
Round 13-15 (3 rounds) :
light gray: 90 sc {90}
Round 16 :
gray: 90 sc {90}
Round 17-19 (3 rounds) :
light gray: 90 sc {90}
Round 20 :
gray: 90 sc {90}
Round 21-23 (3 rounds) :
light gray: 90 sc {90}
Round 24 :
gray: 90 sc {90}
Round 25-27 (3 rounds) :
light gray: 90 sc {90}
Round 28 :
gray: 90 sc {90}
Round 29-31 (3 rounds) :
light gray: 90 sc {90}
Round 32 :
gray: 90 sc {90}
Round 33-35 (3 rounds) :
light gray: 90 sc {90}
Round 36 :
gray: 90 sc {90}
Round 37-39 (3 rounds) :
light gray: 90 sc {90}
Infos :
Leave a long thread and sew the top of the pillow. We fasten the thread and hide inside the pillow. Fill tightly and evenly. Fill the angle of the pillow well. Sew the bottom of the pillow and fasten the thread and hide inside the pillow.
— Ear (2 details) :
Info :
Use white plush yarn
Row 2 :
we begin to work from the second loop from the hook: 10 sc, 1 ch, turn
Row 3 :
we begin to work from the second loop from the hook: dec, 6 sc, dec, 1 ch, turn
Row 4 :
we begin to work from the second loop from the hook: dec, 4 sc, dec, 1 ch, turn
Row 5 :
we begin to work from the second loop from the hook: dec, 2 sc, dec, 1 ch, turn
Row 6 :
we begin to work from the second loop from the hook: dec, dec, 1 ch, turn
Row 7 :
we begin to work from the second loop from the hook: dec
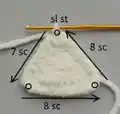
Infos :
We crochet around the ear. Make 7 cs, make inc in the left bottom angle, then make 8 sc, inc in the right bottom angle, 8 sc, sl st. We fasten the thread and cut it off
Info :
Use light gray yarn
Row 2 :
we begin to work from the second loop from the hook: 10 sc, 1 ch, turn
Row 3 :
we begin to work from the second loop from the hook: dec, 6 sc, dec, 1 ch, turn
Row 4 :
we begin to work from the second loop from the hook: dec, 4 sc, dec, 1 ch, turn
Row 5 :
we begin to work from the second loop from the hook: dec, 2 sc, dec, 1 ch, turn
Row 6 :
we begin to work from the second loop from the hook: dec, dec, 1 ch, turn
Row 7 :
we begin to work from the second loop from the hook: dec
Infos :
We crochet around the ear. Make 7 cs, make inc in the left bottom angle, then make 8 sc, inc in the right bottom angle, 8 sc, sl st. We fasten the thread and cut it off
Infos :
We put together white and light gray details and crochet ears together (use light gray yarn). We start from the bottom right corner and make: 10 sc, inc (in the upper corner), inc, 10 sс (hide all the ends inside ears). Leave a long thread for sewing.
— Nose :
Info :
Use white plush yarn
Round 2 :
we begin to work from the second loop from the hook: 12 sc, 3 sc in 1 loop, 12 sc {27}
Round 3 :
3 in 1 loop, 12 sc, inc, inc, inc, 12 sc {33}
Round 4 :
inc, inc, inc, 13 sc, inc, sc, inc, sc, inc, 12 sc {39}
Round 5 :
sc, inc, sc, inc, sc, inc, 13 sc, inc, 2 sc, inc, 2 sc, inc, 13 sc {45}
Round 6 :
8 sc, hdc, (dc) – repeat 5 times, hdc, sc, hdc, (dc) – repeat 5 times, hdc, 22 sc {45}
Round 7 :
10 sc, inc, 10 sc, inc, 23 sc {45}
— Lip :
Info :
Use white plush yarn
Round 1 :
6 sc in magic Ring {6}
Round 2 :
(inc) – repeat 6 times {12}
Infos :
Sew 2 halves with 6 sc. Leave a long thread for sewing
— Leg (2 details) :
Info :
Use brown plush yarn
Round 1 :
6 sc in magic Ring {6}
Round 2 :
(inc) – repeat 6 times {12}
Round 3 :
(1 sc, inc) – repeat 6 times {18}
Info :
Leave a long thread for sewing
— Arm (2 details) :
Info :
Use brown plush yarn
Round 1 :
6 sc in magic Ring {6}
Round 2 :
(inc) – repeat 6 times {12}
Info :
Leave a long thread for sewing
This adorable Pillow Cat pattern combines the best of both worlds: a functional, comfortable pillow and an utterly charming decorative piece that adds personality to any space. The simple construction using plush yarn makes this an achievable project for beginners, while the sweet details like the striped body, perky ears, and expressive face make it special enough to treasure for years. Whether you're making it for a child's room, as a thoughtful handmade gift, or simply to add a cozy touch to your own space, this pillow cat is sure to bring smiles and comfort. 🧶 Happy crocheting! 🐱✨