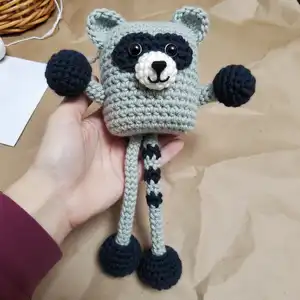
Discover the magic of creating Rac the Raccoon, a unique stretchy amigurumi toy with incredible movable limbs that stretch up and down! This interactive pattern stands 27 cm tall and features arms and legs designed with a special construction technique that allows them to extend and retract, making it perfect for developing fine motor skills in children ages 2 and up. The adorable raccoon combines grey, black, white, and dark grey yarns to create authentic raccoon markings including a distinctive striped tail and charming face mask. This engaging pattern is ideal for creating developmental toys that encourage creative play while providing hours of entertainment. Whether you're crafting for your own little ones or making special gifts, this stretchy raccoon will become an instant favorite!
Progress Tracker
0% Complete
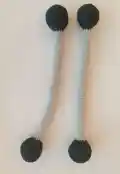
— Arms and Legs (make 2):
Info:
Arms and legs are crocheted in one piece. Begin crocheting in black with 2 mm hook. Stuff only the black sections at both ends.
Round 3:
(1 SC, INC)*6 (18)
Round 4:
(2 SC, INC)*6 (24)
Round 5:
(3 SC, INC)*6 (30)
Round 6-9:
4 rnds straight: 30 SC
Round 10:
(DEC, 3 SC)*6 (24)
Round 11:
(DEC, 2 SC)*6 (18)
Round 12:
(DEC, 1 SC)*6 (12)
Round 13:
(DEC, 4 SC)*2 (10)
Info:
Switch to grey yarn. Go on crocheting. Don't stuff the grey piece.
Round 14-65:
52 rnds straight: 10 SC
Info:
Switch to black yarn.
Round 66:
(INC, 4 SC)*2 (12)
Round 67:
(1 SC, INC)*6 (18)
Round 68:
(2 SC, INC)*6 (24)
Round 69:
(3 SC, INC)*6 (30)
Round 70-73:
4 rnds straight: 30 SC
Round 74:
(DEC, 3 SC)*6 (24)
Round 75:
(DEC, 2 SC)*6 (18)
Round 76:
(DEC, 1 SC)*6 (12)
Round 77:
DEC*6 fasten off.
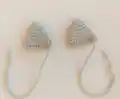
— Ears (make 2):
Info:
Work in grey with 2 mm hook.
Round 2:
(1 SC, INC)*3 (9)
Round 3:
1 rnd straight: 9 SC (9)
Round 4:
(2 SC, INC)*3 (12)
Round 5:
(3 SC, INC)*3 (15)
Round 6:
1 rnd straight: 15 SC
Round 7:
(4 SC, INC)*3 (18)
Round 8:
1 rnd straight: 18 SC
Info:
Fold in half and single crochet 9 through both edges. Leave a long yarn tail for sewing.
— Snout (nose):
Info:
Work in white with 2 mm hook.
Round 4-6:
3 rnds straight: 24 SC
Info:
Leave a long yarn tail for sewing. Stuff the piece.
— Eyes (make 2):
Info:
Work in dark grey with 2 mm hook. Chain 4 as if into MR, but do not join in the round, work in turning rows. Make 1 turning CH at the end of each row.
Row 1-2:
2 rows straight: 4 SC
Row 4-5:
2 rows straight: 6 SC
Info:
Leave a long yarn tail for sewing.
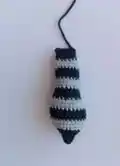
— Tail:
Info:
Alternate grey and black yarn every 3 rounds. Use 2 mm hook. Stuff the tail gradually.
Round 1:
In black: 6 MR (6)
Round 2:
(1 SC, INC)*3 (9)
Round 3:
1 rnd straight: 9 SC (9)
Round 5:
1 rnd straight: 18 SC (18). Switch to grey.
Round 6:
(1 SC, INC)*9 (27)
Round 7-8:
2 rnds straight: 27 SC. Switch to black.
Round 9-11:
3 rnds straight: 27 SC. Switch to grey.
Round 12-14:
3 rnds straight: 27 SC. Switch to black.
Round 15:
(1 SC, DEC)*9 (18)
Round 16-17:
2 rnds straight: 18 SC. Switch to grey.
Round 18-20:
3 rnds straight: 18 SC. Switch to black.
Round 21-23:
3 rnds straight: 18 SC. Switch to grey.
Round 24-25:
2 rnds straight: 18 SC
Round 26:
(1 SC, DEC)*6 (12). Switch to black.
Round 27-29:
3 rnds straight: 12 SC in black.
Info:
Fold in half and single crochet 6 through both edges. Leave a long yarn tail for sewing.
— Body (make 2):
Info:
Work in grey with 3 mm hook.
Foundation:
Chain 25, and starting into the 2nd stitch from hook work 24 SC.
Row 1-19:
19 rows straight: 24 SC, make 1 turning CH at the end of each row.
Row 20:
1 SC, DEC, 18 SC, DEC, 1 SC (22)
Row 21:
1 rnd straight: 22 SC
Row 22:
1 SC, DEC, 16 SC, DEC, 1 SC (20)
Row 23-25:
3 rnds straight: 20 SC
Info:
Fasten off and cut yarn.
— Assembly:
Body Assembly:
Begin joining the body parts together from the right upper corner using 2 mm hook. Put the two parts together and work 19 SC through both parts' stitches, work 2 SC to the corner stitch.
First Side Edge:
Get to the side edge. Insert the arm-leg piece between rows 11 and 15. Work 10 SC through both parts' stitches, then 3 SC across the front part of the body only (skip 3 stitches on the back body part), put the arm-leg piece and go on crocheting across both body parts 11 SC, 2 SC to the corner stitch.
Bottom Edge:
Get to the bottom edge. 5 SC through both parts' stitches, 3 SC across the front part only, put the arm-leg piece, 6 SC across both body parts, 3 SC across the front part only, put the second arm-leg piece, 5 SC, 2 SC to the corner stitch. Stuff the body.
Second Side Edge:
Work the other side alike: 11 SC across both body parts, 3 SC across the front part only, stuff the body, 10 SC through both parts' stitches.
— Decoration:
Ears:
Sew on the ears on outer corners.
Eyes:
Install safety eyes in the second row. Sew eye patches between rows 16-22 in the middle. Make eye whites with white yarn.
Snout:
Sew on the snout in the middle below the eyes at the level of rows 12-13.
Nose:
Embroider a nose in black.
Tail:
Attach the tail on the back in the middle.
Rac the Stretch Raccoon is a truly innovative amigurumi pattern that brings interactive play to traditional crochet toys! With stretchy limbs that move up and down, this adorable raccoon provides endless entertainment while supporting fine motor skill development in young children. The clever construction technique creates a durable toy that can withstand enthusiastic play while maintaining its charming raccoon features—from the distinctive face mask and white snout to the beautifully striped tail. Whether you're an intermediate crocheter looking to try something new or searching for the perfect developmental toy to gift, this stretchy raccoon friend will capture hearts and imaginations! 🦝✨🧶