🧶 Beautiful ✨ Detailed 💝 Adorable

Frog Prince Amigurumi Pattern

Frog Prince Amigurumi Pattern
4.5★ Rating
8-10 Hours Time Needed
2.5K Made This
✂️

Intermediate Level

Ideal for those with basic knitting experience, featuring slightly more advanced stitches and techniques to expand your skills.

⏱️

All-Day Adventure

Requires 8-10 hours, ideal for a full day of immersive knitting.

🧸

Cute Companion

An adorable friend to cherish, handcrafted with love to bring comfort and joy for years to come.

About This Frog Prince Amigurumi Pattern

This Frog Prince pattern combines classic fairy tale charm with modern amigurumi techniques. Standing at 17 inches tall, this regal amphibian features carefully crafted details including folded eyelids for extra character, a golden crown, and optional cape for that princely touch. The pattern uses worsted weight yarn in vibrant green with white and yellow accents, creating a project that's both engaging to make and delightful to display.

Frog Prince Amigurumi Pattern crochet pattern - detailed view of completed project

With detailed instructions for the head, body, limbs, eyes with eyelids, and crown, this pattern takes you step-by-step through assembly. The result is a charming character that captures the whimsy of the beloved fairy tale.

Why You'll Love This Frog Prince Amigurumi Pattern

I absolutely love this Frog Prince pattern because it brings such personality to life! The folded eyelids give him an endearing expression that makes every finished piece unique. I appreciate how the pattern breaks down each component clearly, making what seems complex actually quite manageable. The size is perfect—not too small to be fiddly, not too large to be overwhelming. Plus, adding that little crown transforms him from a simple frog into true royalty! It's a project that feels rewarding at every stage, and the final result always brings smiles.

Frog Prince Amigurumi Pattern step 1 - construction progress Frog Prince Amigurumi Pattern step 2 - assembly progress Frog Prince Amigurumi Pattern step 3 - details and accessories Frog Prince Amigurumi Pattern step 4 - final assembly and finishing

Switch Things Up

When I work on this Frog Prince pattern, I love experimenting with different color combinations to create unique personalities! Instead of traditional green, I've made versions in blue for a water-dwelling prince or even purple for a more mystical fairy tale vibe. The crown is another fun area to personalize—try using metallic gold yarn or adding tiny beads for extra sparkle and royal elegance.

I've also found that adjusting the eyelid positioning can dramatically change your frog's expression. Placing them slightly lower creates a sleepy, adorable look, while positioning them higher gives a more alert and curious appearance. For the body, you could add embroidered details like a little vest or bow tie using embroidery thread to give your prince even more character.

If you're making this as a gift, consider creating a whole fairy tale set! I've paired my Frog Prince with a crocheted princess doll and a tiny lily pad made from a flattened green circle. You could even crochet a little pond scene as a base. The cape tutorial mentioned can be customized with different fabrics to match your color scheme—I love using felt with glitter for extra magic!

Common Mistakes & How to Fix Them

✗ Forgetting to stuff the body as you go—stuff continuously between rounds 19-30 to maintain proper shape and avoid difficult stuffing later ✗ Placing safety eyes incorrectly between rounds—position them between rounds 5 and 6 as specified for proper facial proportions and expression ✗ Not using stitch markers consistently—mark the beginning of each round to prevent miscounting and maintain the continuous spiral correctly ✗ Overstuffing or understuffing limbs—arms and legs should be stuffed only partially to allow for proper folding and natural positioning when assembled

Frog Prince Amigurumi Pattern

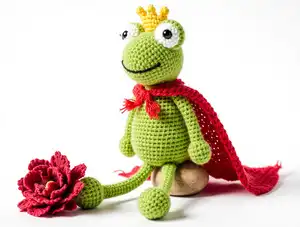
Create your very own enchanting Frog Prince with this delightful amigurumi pattern! This charming 17-inch companion features adorable details including expressive safety eyes, a regal crown, and the option to add a superhero cape. Perfect for fairy tale lovers and crochet enthusiasts alike, this pattern guides you through crafting a whimsical frog complete with poseable arms and legs. Whether as a gift or a personal keepsake, this Frog Prince brings storybook magic to life through your hands.

Intermediate 8-10 Hours

Materials Needed for Frog Prince Amigurumi Pattern

— Main Fabric

  • 01
    Worsted Weight #4 yarn, approximately 150g of green (Color A)
  • 02
    Worsted Weight #4 yarn, approximately 50g total of white (Color B) and yellow (Color C)

— Tools Required

  • 01
    Crochet hook size F or 3.75 mm
  • 02
    18 mm safety eyes
  • 03
    Scissors
  • 04
    Sewing needle
  • 05
    Stitch marker
  • 06
    Fiberfill stuffing
  • 07
    Black embroidery thread

Progress Tracker

0% Complete

— Head :

Info :

Worked from top to bottom with Color A

Round 1 :

Make 6 sc into a magic ring (6)

Round 2 :

Increase in each st around (12)

Round 3 :

(sc, inc) x 6 (18)

Round 4 :

sc, inc, (2 sc, inc) x 5, sc (24)

Round 5 :

(3 sc, inc) x 6 (30)

Round 6 :

2 sc, inc, (4 sc, inc) x 5, 2 sc (36)

Round 7 :

(5 sc, inc) x 6 (42)

Round 8 :

3 sc, inc, (6 sc, inc) x 5, 4 sc (48)

Round 9 :

(7 sc, inc) x 6 (54)

Round 10 :

4 sc, inc, (8 sc, inc) x 5, 4 sc (60)

Round 11 :

(9 sc, inc) x 6 (66)

Round 12-19 :

sc in each st around (66)

Round 20 :

(9 sc, dec) x 6 (60)

Round 21 :

4 sc, dec, (8 sc, dec) x 5, 4 sc (54)

Round 22 :

(7 sc, dec) x 6 (48)

Round 23 :

3 sc, dec, (6 sc, dec) x 5, 3 sc (42)

Round 24 :

(5 sc, dec) x 6 (36)

Round 25 :

2 sc, dec, (4 sc, dec) x 5, 2 sc (30)

Round 26 :

(3 sc, dec) x 6 (24)

Round 27 :

(2 sc, dec) x 6 (18)

Info :

F/O

— Body :

Info :

With Color A

Round 1 :

Make 6 sc into a magic ring (6)

Round 2 :

Increase in each st around (12)

Round 3 :

(sc, inc) x 6 (18)

Round 4 :

(2 sc, inc) x 6 (24)

Round 5 :

(3 sc, inc) x 6 (30)

Round 6 :

(4 sc, inc) x 6 (36)

Round 7 :

(5 sc, inc) x 6 (42)

Round 8 :

(6 sc, inc) x 6 (48)

Round 9-15 :

Sc in each st around (48)

Round 16 :

(6 sc, dec) x 6 (42)

Round 17-18 :

Sc in each st around (42)

Info :

Start stuffing the body

Round 19 :

(5 sc, dec) x 6 (36)

Round 20-21 :

Sc in each st around (36)

Round 22 :

(4 sc, dec) x 6 (30)

Round 23-25 :

Sc in each st around (30)

Round 26 :

(3 sc, dec) x 6 (24)

Round 27-29 :

Sc in each st around (24)

Round 30 :

(2 sc, dec) x 6 (18)

Round 31-32 :

Sc in each st around (18)

Info :

F/O and leave a long tail for sewing

— Eyes (Make 2) :

Info :

With Color B

Round 1 :

Make 6 sc into a magic ring (6)

Round 2 :

Increase in each st around (12)

Round 3 :

(sc, inc) x 6 (18)

Round 4-6 :

sc in each st around (18)

Info :

Place the safety eyes between rounds 5 and 6. F/O and leave a long tail for sewing

— Eyelids (Make 2) :

Info :

With Color A

Round 1 :

Make 6 sc into a magic ring (6)

Round 2 :

Increase in each st around (12)

Round 3 :

(sc, inc) x 6 (18)

Round 4 :

(2 sc, inc) x 6 (24)

Round 5 :

(3 sc, inc) x 6 (30)

Round 6-9 :

Sc in each st around (30)

Info :

Fold the eyelid in half and sc it closed. F/O and leave a long tail for sewing

— Arms (Make 2) :

Info :

With Color A

Round 1 :

Make 6 sc into a magic ring (6)

Round 2 :

Increase in each st around (12)

Round 3 :

(sc, inc) x 6 (18)

Round 4-6 :

sc in each st around (18)

Info :

Start stuffing the arms

Round 7 :

(4 sc, dec) x 3 (15)

Round 8 :

(3 sc, dec) x 3 (12)

Round 9 :

(2 sc, dec) x 3 (9)

Info :

Stop stuffing the arms

Round 10-27 :

sc in each st around (9)

Info :

Fold the arms in half and sc the opening closed. F/O and leave a long tail for sewing

— Legs (Make 2) :

Info :

With Color A

Round 1 :

Make 6 sc into a magic ring (6)

Round 2 :

Increase in each st around (12)

Round 3 :

(sc, inc) x 6 (18)

Round 4 :

(2 sc, inc) x 6 (24)

Round 5 :

(3 sc, inc) x 6 (30)

Round 6-9 :

Sc in each st around (30)

Info :

Start stuffing the legs

Round 10 :

(2 sc, dec) x 4, 14 sc (26)

Round 11 :

(sc, dec) x 4, 14 sc (22)

Round 12 :

Dec x 4, 14 sc (18)

Round 13 :

(sc, dec) x 6 (12)

Round 14 :

(2 sc, dec) x 3 (9)

Info :

Stop stuffing the legs

Round 15-35 :

sc in each st around (9)

Info :

Fold the legs in half and sc the opening closed. F/O and leave a long tail for sewing

— Crown :

Info :

With Color C

Step 1 :

Ch 12

Round 1 :

sl st to 1st ch to make a ring

Round 2-3 :

sc in each st around (12)

Round 4 :

ch 3, sl st in 2nd ch from hook, sc in next chain, sc in next st on crown. Repeat 5 more times to have 6 points

Info :

F/O and leave a long tail for sewing

Assembly Instructions

  • Sew the eyes onto the head at the desired position for facial expression
  • Sew the eyelids around the eyes to frame them and add character
  • Attach the head securely onto the body using the long tail and sewing needle
  • Sew the arms onto the sides of the body at appropriate positions
  • Sew the legs onto the bottom of the body, positioning them for stability
  • Sew the crown in between the eyes onto the head for the princely touch
  • Optional: Create and attach a no-sew cape following the tutorial link provided

Important Notes

  • 💡Do not join rounds unless stated, work in a continuous spiral throughout the pattern
  • 💡Use a stitch marker to mark the beginning of each round to avoid losing your place
  • 💡All stitches are worked in both loops unless stated otherwise in the pattern instructions
  • 💡Stuff body parts firmly but not too tightly to maintain proper shape and proportion
  • 💡Pin all pieces in place before sewing to ensure correct positioning and balance
  • 💡Safety eyes should be secured between rounds 5 and 6 of the eye pieces before closing

This enchanting Frog Prince pattern transforms simple yarn into a fairy tale character brimming with personality and charm! The combination of carefully crafted features—from the folded eyelids to the golden crown—creates a truly regal amphibian friend. Whether you're making him for a fairy tale enthusiast, a child who loves stories, or simply to add whimsy to your home, this 17-inch prince is sure to capture hearts. The pattern's clear instructions and thoughtful construction make the process as magical as the finished result. 🐸👑✨

You ask,

we answer.

FAQs

What size will my finished Frog Prince be?

The finished Frog Prince will measure approximately 17 inches from bottom to top of head when made with worsted weight #4 yarn and a 3.75mm (F) hook as specified in the pattern.

Can I use different yarn weights for this pattern?

Yes, you can use different yarn weights, but this will change the final size of your Frog Prince. Using lighter yarn will create a smaller frog, while heavier yarn will make a larger one. Adjust your hook size accordingly to match your yarn weight.

Do I need to know any special techniques to make this pattern?

This is an intermediate level pattern requiring basic crochet skills including magic ring, single crochet, increases, and decreases. You should be comfortable working in continuous spirals and have patience for assembly.

How do I attach the folded eyelids properly?

After completing the eyelids, fold them in half and single crochet the opening closed as instructed. Then sew them around the eyes using the long tail, positioning them to create the desired expression for your Frog Prince.

Is the cape included in this pattern?

The cape is optional and uses a no-sew tutorial that is linked in the pattern. The main pattern focuses on crocheting the Frog Prince body, head, limbs, eyes, eyelids, and crown.

What if I want to make the arms and legs poseable?

While not specified in the original pattern, you can insert pipe cleaners or floral wire into the arms and legs before closing them to make them poseable. Just ensure they're safe if making this for young children.