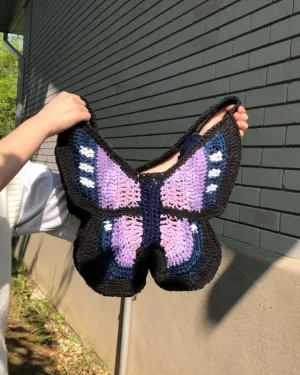
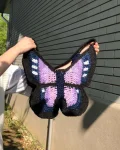
Get ready to carry a bit of garden magic wherever you go! This isn't just a bag; it's a wearable piece of art that mimics the delicate beauty of a butterfly. You will love watching the vibrant wings emerge from the center abdomen, using clever color changes to create that iconic patterned look. It is the perfect project for when you want something truly unique that will turn heads at the farmer's market or on a sunny stroll.
Progress Tracker
0% Complete
— 1. Abdomen :
Info :
The abdomen is worked in rounds. Use your main body color.
Round 1 :
Work 1 sc into the 2nd ch from your hook, then 14 sc. In the next ch, work 3 sc. Continue along the other side of the chain with 14 sc, then work 1 sc inc in the last ch. Join with a sl st and ch 1. (34)
Round 2 :
Work 16 sc, then 1 sc inc. Work another 16 sc, then 1 sc inc. Join with a sl st and fasten off. (36)
— 2. Left Forewing :
Info :
Colors: Light purple (1), medium purple (2), dark purple (3), blue (4), white (5). Attach yarn-2 to the 3rd st of the abdomen with the right side facing you.
Row 1 :
Join yarn and ch 1, work 1 sc in that same st (switch to yarn-1), 3 dc, 1 sc, ch 3, TO. (5)
Row 2 :
Work 1 dc inc in each of the next 2 sts (switch to yarn-2), 1 dc, 1 dc inc, ch 3, TO. (8)
Row 3 :
Work 1 dc in the first st, 1 dc inc (switch to yarn-1), 2 tr, 4 dc (switch to yarn-2), ch 1, TO. (10)
Row 4 :
Work 1 sc (switch to yarn-1), 5 sc (switch to yarn-2), 1 sc, 2 dc, 1 dc inc (switch to yarn-3), ch 3, TO. (11)
Row 5 :
Work 1 dc in the first st, 2 dc (switch to yarn-2), 1 dc inc, 2 dc, 2 tr inc, 1 dc (switch to yarn-3), 2 dc, ch 1, TO. (15)
Row 6 :
Work 3 sc (switch to yarn-2), 7 sc (switch to yarn-3), 4 sc, 1 sc inc, ch 3, TO. (16)
Row 7 :
Work 1 dc in the first st, 2 dc, 4 tr, 4 dc, 5 sc (switch to yarn-4), ch 1, TO. (17)
Row 8 :
Work 1 sc in every st across the row, ch 3, TO. (17)
Row 9 :
Work 1 dc in the first st, 2 dc (switch to yarn-5), 2 dc (switch to yarn-4), 2 dc (switch to yarn-5), 2 dc (switch to yarn-4), 2 dc (switch to yarn-5), 2 dc (switch to yarn-4), 4 dc, ch 1, TO. (18)
Row 10 :
Work 4 sc (switch to yarn-5), 2 dc (switch to yarn-4), 2 dc (switch to yarn-5), 2 dc (switch to yarn-4), 2 dc (switch to yarn-5), 2 dc (switch to yarn-4), 3 dc, 1 sc inc, ch 3, TO. (19)
Row 11 :
Work 1 dc in the first st, 4 dc, 2 tr, ch 4, sl st into the 2nd tr of the row, 2 tr, 4 dc, 2 hdc, 3 sc, sl st and fasten off. (20)
— 3. Right Forewing :
Info :
Attach yarn-1 to the 28th st of the abdomen with the right side facing up.
Row 1 :
Join and ch 1, work 1 sc in the same st, 3 dc (switch to yarn-2), 1 sc, ch 3, TO. (5)
Row 2 :
Work 1 dc in the first st, 1 dc (switch to yarn-1), 2 dc inc, 1 dc, ch 3, TO. (8)
Row 3 :
Work 3 dc, 2 tr (switch to yarn-2), 2 dc inc, ch 3, TO. (10)
Row 4 :
Work 1 dc in the first st, 2 dc, 1 sc (switch to yarn-1), 5 sc (switch to yarn-2), 1 sc (switch to yarn-3), ch 3, TO. (11)
Row 5 :
Work 1 dc (switch to yarn-2), 1 dc, 2 tr inc, 2 dc, 1 dc inc (switch to yarn-3), 2 dc, 1 dc inc, ch 1, TO. (15)
Row 6 :
Work 1 sc inc, 4 sc (switch to yarn-2), 7 sc (switch to yarn-3), 3 sc, ch 1, TO. (16)
Row 7 :
Work 5 sc, 4 dc, 4 tr, 2 dc, 1 dc inc (switch to yarn-4), ch 1, TO. (17)
Row 8 :
Work 1 sc in every st across, ch 3, TO. (17)
Row 9 :
Work 3 dc (switch to yarn-5), 2 dc (switch to yarn-4), 2 dc (switch to yarn-5), 2 dc (switch to yarn-4), 2 dc (switch to yarn-5), 2 dc (switch to yarn-4), 2 dc, 1 dc inc, ch 1, TO. (18)
Row 10 :
Work 1 sc inc, 3 sc (switch to yarn-5), 2 dc (switch to yarn-4), 2 dc (switch to yarn-5), 2 dc (switch to yarn-4), 2 dc (switch to yarn-5), 2 dc (switch to yarn-4), 4 sc, ch 1, TO. (19)
Row 11 :
Work 1 sl st, 3 sc, 2 hdc, 4 dc, 2 tr, ch 4, sl st into the 2nd tr, 2 tr, 4 dc, 1 dc inc and fasten off. (20)
— 4. Left Hindwing :
Info :
Attach yarn-1 to the 10th st of the abdomen with the right side facing up.
Row 1 :
Join and ch 3, work 1 dc in the next st, 3 tr in one st, 1 dc inc, 1 sc inc, ch 1, TO. (9)
Row 2 :
Work 1 sc inc, 3 hdc, 1 dc, 1 dc inc, 1 dc, 2 tr (switch to yarn-2), ch 1, TO. (11)
Row 3 :
Work 1 sc, 2 hdc, 1 dc inc, 2 tr, 2 dc, 2 hdc, 1 sc (switch to yarn-3), ch 1, TO. (12)
Row 4 :
Work 5 sc, 1 hdc inc, 2 dc, 1 tr inc, 1 dc, 1 hdc, 1 sc (switch to yarn-4), ch 1, TO. (14)
Row 5 :
Work 3 sc, 1 sc inc, 5 sc, 1 sc inc, 4 sc, ch 1, TO. (16)
Row 6 :
Work 9 sc, 1 hdc inc, 1 dc inc, 2 dc (switch to yarn-5), 2 dc (switch to yarn-4), 1 sc, ch 3, TO. (18)
Row 7 :
Work 5 dc, 3 dc inc, 3 dc, ch 4, sl st into the final dc, 4 sc, 2 sl st and fasten off. (21)
— 5. Right Hindwing :
Info :
Attach yarn-1 to the 21st st of the abdomen with the right side facing up.
Row 1 :
Join and ch 1, work 1 sc inc in the same st, 1 dc inc, 3 tr in the next st, 2 dc, ch 4, TO. (9)
Row 2 :
Work 1 tr, 1 dc, 1 dc inc, 1 dc, 3 hdc, 1 sc inc (switch to yarn-2), ch 1, TO. (11)
Row 3 :
Work 1 sc, 2 hdc, 2 dc, 2 tr, 1 dc inc, 2 hdc, 1 sc (switch to yarn-3), ch 1, TO. (12)
Row 4 :
Work 1 sc, 1 hdc, 1 dc, 1 tr inc, 2 dc, 1 hdc inc, 5 sc (switch to yarn-4), ch 1, TO. (14)
Row 5 :
Work 4 sc, 1 sc inc, 5 sc, 1 sc inc, 3 sc, ch 1, TO. (16)
Row 6 :
Work 1 sc (switch to yarn-5), 2 dc (switch to yarn-4), 2 dc, 1 dc inc, 1 hdc inc, 9 sc, ch 1, TO. (18)
Row 7 :
Work 2 sl st, 4 sc, ch 4, sl st into the 4th sc, 3 dc, 3 dc inc, 6 dc and fasten off. (21)
— 6. Border :
Info :
Use your border color (black). Attach to the final stitch of the abdomen with the right side up.
Row 1 - Part A :
Left Forewing: ch 1, 17 sc, 2 hdc, 2 dc, ch 3, sl st into the 2nd dc, dc into that same st, 1 dc, 2 tr, 4 dc, 16 sc, ch 3, sl st to the final sc, sc into that same st, 16 sc.
Row 1 - Part B :
Left Hindwing: 10 sc, ch 2, sl st to the last sc, sc into that same st, 3 sc, 2 hdc, 4 dc, 2 hdc, 13 sc, ch 3, sl st to the last sc, sc into that same st, 3 sc, 2 hdc, 2 dc, 4 sc, 1 dc.
Row 1 - Part C :
Right Hindwing: 1 dc, 2 hdc, 4 sc, ch 3, sl st to the last sc, sc into that same st, 12 sc, 2 hdc, 4 dc, 2 hdc, 4 sc, ch 2, sl st to the last sc, sc into that same st, 11 sc.
Row 1 - Part D :
Right Forewing: 15 sc, ch 3, sl st to the last sc, sc into that same st, 15 sc, 4 dc, 2 tr, 2 dc, ch 3, sl st to the last dc, dc into that same st, 1 dc, 2 hdc, 17 sc, sl st and ch 1. (214)
Row 2 :
Work 1 sc, 1 sc3tog, 8 sc, 5 hdc, 4 dc, 3 tr, 3 dc, 5 tr, 4 dc, 5 hdc, 14 sc.
Note :
Fold the butterfly in half with right sides together. Join the bottom of the forewing and the top of the hindwing using 11 sc. Fasten off.
Row 2 Continued :
Attach yarn to the 2nd ch at the top left of the left hindwing. ch 1, sc in same st, 4 sc, 2 hdc, 2 dc inc, 9 dc, 9 hdc, 1 hdc inc, 7 hdc, 1 hdc3tog, 2 sl st, 1 hdc3tog, 7 hdc, 1 hdc inc, 9 hdc, 9 dc, 2 dc inc, 2 hdc, 5 sc. Connect wings again with 11 sc and fasten off.
Row 2 Final :
Attach yarn to the 4th st from the right after the ch 3 at the bottom of the right forewing. ch 1, sc in same st, 13 sc, 5 hdc, 4 dc, 5 tr, 3 dc, 3 tr, 4 dc, 5 hdc, 8 sc, 1 sc3tog, 1 sc, sl st and fasten off. (208)
Info :
Repeat this entire process to create a second identical butterfly. Block or iron them flat if they are curling.
— 7. Strap :
Row 1 :
ch 8 (or your preferred strap width). Work 1 sc into the 2nd ch from hook and in each ch across. ch 1 and TO.
Row 2 :
Work 1 sc in every st across. ch 1 and TO.
Info :
Repeat Row 2 until the strap reaches your desired length. Remember to account for the size of the butterflies when measuring.
Finishing :
Join the ends of the strap together using your preferred method (sc, sl st, or sewing) with wrong sides facing up.
You've done it! Your Butterfly Bag is ready to take flight. This project is such a rewarding way to practice colorwork and shaping, and the result is a functional accessory that feels truly magical. I hope you enjoy every compliment you get while wearing it — you definitely earned them with those intricate wings! Don't forget to give it a light steam if the edges need a bit of smoothing. Happy crafting, and I can't wait to see what color combinations you chose for your fluttery friend! 🧶 ✨ 🦋