About This Grumpy Mini Octopus Amigurumi Pattern
This little guy is the perfect size for a keychain or a car mirror hanger. His grumpy face is sure to bring a smile to anyone who sees him hanging around your workspace or home.
Ideal for those with basic crocheting experience, featuring slightly more advanced stitches and techniques to expand your skills.
Fits nicely into a free afternoon — 2 to 5 hours of focused, enjoyable crocheting.
Playful characters full of personality, designed to spark imagination and become cherished playtime favorites.
This little guy is the perfect size for a keychain or a car mirror hanger. His grumpy face is sure to bring a smile to anyone who sees him hanging around your workspace or home.
I love how the arms have their own mind of their own depending on which direction you crochet. It's such a fun, experimental project that doesn't take all day but still feels very rewarding once those grumpy eyes are in place.


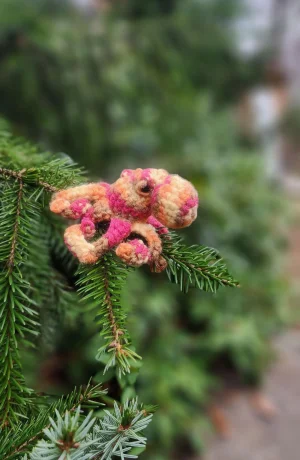
I have been having so much fun lately creating a whole little sea world for my nieces. I wanted something small enough to fit on an advent calendar, but everything I found was just a bit too bulky. That's how this grumpy little guy was born! He's got that classic 'big nose' look but in a much more manageable size.
One of my favorite things about this pattern is how the arms behave. It's almost like magic — if you work them clockwise, they reach up toward the head, but if you go counter-clockwise, they curl down toward the ground. I personally love the look of them curling down, as it makes him look even more like he's pouting!
I really recommend reaching for those variegated yarns for this one. I used some Red Heart Super Saver I had in my stash, and the way the colors shift across the arms and the nose makes each octopus feel like a completely different character. It's a great 'palette cleanser' project between bigger blankets or sweaters. I hope you have as much fun making these moody little friends as I did!
This little octopus has so much personality packed into a tiny frame! Whether you're looking for a quick desk buddy or a unique ornament for your holiday tree, this grumpy sea creature is a joy to work up. The variegated yarn does all the heavy lifting for the colors, making every single one you make completely unique. You'll love how quickly these come together, and they make the most charming little gifts for friends who appreciate a bit of sass.
Start with 6 sc into a mc (6)
Work 6 inc around the circle (12)
Repeat the sequence of 1 sc followed by 1 inc a total of 6 times (18)
Work 1 sc into every st around (18)
Work 1 sc into every st around (18)
Repeat the sequence of 1 sc followed by 1 dec a total of 6 times (12)
Repeat the sequence of 2 sc followed by 1 dec a total of 3 times (9)
Fasten off but do not pull the hole closed. Leave a long tail for sewing later. Stuff the nose firmly and set it aside.
ch 9 and join with a sl st into the first ch to create a ring (9)
Work 1 sc in each st around (9)
Work 1 sc in each st around (9)
Repeat the sequence of 2 sc followed by 1 inc a total of 3 times (12)
Repeat the sequence of 2 sc followed by 1 inc a total of 4 times (16)
Working in BLO only, work 1 sc in each st around (16)
Place the 6mm safety eyes between rounds 2 and 3, leaving about 4 to 5 stitches of space between them. You can also embroider little V-shaped eyelids now to give him a grumpy look. Lightly stuff the body, keeping it somewhat flat.
Work 8 dec around (8)
Fasten off and close the hole. Now, reattach your yarn to the FLO of Round 6 to begin the lower part of the body.
Working in the FLO of the previous Round 6, work 1 sc in each st around (16)
Work 1 sc in each st around (16)
Work 1 sc in each st around (16)
The arms are worked directly off Round 8. If you work clockwise, they curl up; counter-clockwise makes them curl down.
ch 20 and turn, then sl st into the 2nd ch from your hook, 5 x 1 sc, 1 x sc3tog, 2 x 1 sc, 5 x 1 hdc, 3 x 1 dc. This should bring you back to the base. Skip 1 st and work 1 sc into the next st.
ch 15 and turn, then sl st into the 2nd ch from your hook, 7 x 1 sc, 6 x 1 hdc. Skip 1 st and work 1 sc into the next st.
ch 18 and turn, then sl st into the 2nd ch from your hook, 3 x 1 sc, 1 x hdc3tog, 7 x 1 hdc, 3 x 1 dc. Skip 1 st and work 1 sc into the next st.
ch 20 and turn, then sl st into the 2nd ch from your hook, 4 x 1 sc, 3 x 1 hdc, 1 x hdc3tog, 5 x 1 hdc, 3 x 1 dc. Skip 1 st and work 1 sc into the next st.
Repeat the patterns for Arm 1 through Arm 4 one more time until you have a total of 8 arms. Once finished, sl st into the first ch of the very first arm. Fasten off and leave a tail for finishing. Use a needle to close the small gaps left by the skipped stitches and weave in your ends.
I can't wait for you to see your grumpy little friend come to life! There's something so charming about a toy with a bit of an attitude, and this mini octopus is the perfect example. This pattern is a great way to use up those colorful scraps of variegated yarn you've been saving in your stash. Whether you make a whole army of them for an advent calendar or just one special buddy for your desk, I hope you enjoy every stitch of the process. Happy crocheting and enjoy your new sea creature! 🐙✨
