🧢 Beautiful ✨ Detailed πŸ’ Adorable

Bonnie Beanie Hat Pattern

Bonnie Beanie Hat Pattern
4.3β˜… Rating
2-3 Hours Time Needed
2.5K Made This
βœ‚οΈ

Beginner Friendly Level

Perfect for those just starting their sewing journey, with clear instructions and simple techniques

⏱️

Bite-Sized Project

Complete in under 2 hoursβ€”quick, fun, and perfect for a little creative escape.

🧣

Snug Essential

Everyday comfort with practical charm, designed for both functionality and style through changing seasons.

About This Bonnie Beanie Hat Pattern

Bonnie Beanie Hat Pattern crochet pattern - detailed view of completed project

The pattern includes detailed sizing for five different age ranges, ensuring a perfect fit as your little one grows. The textured brim detail and cheerful pom pom make this beanie both functional and fashionable.

Why You'll Love This Bonnie Beanie Hat Pattern

I absolutely love how versatile this Bonnie Beanie pattern is! The fact that it comes in five different sizes means you can make matching hats for siblings or create them as baby grows. I'm particularly fond of the unique brim construction - it looks complex but it's actually quite simple once you get the rhythm. The continuous round technique means minimal weaving in of ends, which is always a win in my book. Plus, there's something incredibly satisfying about watching the hat take shape from that tiny magic ring at the crown. The color options suggested are absolutely dreamy, and I love that you can customize it with different pom pom styles to match any outfit or personality!

Bonnie Beanie Hat Pattern step 1 - construction progress Bonnie Beanie Hat Pattern step 2 - assembly progress Bonnie Beanie Hat Pattern step 3 - details and accessories Bonnie Beanie Hat Pattern step 4 - final assembly and finishing

Switch Things Up

I love playing around with this pattern to create different looks! One of my favorite variations is to skip the pom pom and add a cute crocheted flower or bow instead - it's perfect for baby girls and adds a touch of elegance. You could also experiment with stripes by changing colors every few rounds in the hat body for a fun, modern look.

For boys, I sometimes work the entire hat in a solid neutral color and add a contrasting color for just the brim - it creates a subtle but stylish detail. You can also adjust the brim width by working more or fewer rows, making it narrower for a subtle edge or wider for more warmth and coverage.

Another fun idea is to work the pattern in self-striping or variegated yarn - the continuous rounds really showcase the color changes beautifully! If you're feeling adventurous, try adding simple surface crochet designs or embroidery after completing the hat for personalization. I've also made versions with earflaps by adding triangular sections to the sides for extra warmth during winter months.

Common Mistakes & How to Fix Them

βœ— Forgetting to place and move your stitch marker each round, which can throw off your stitch count and sizing completely βœ— Working the brim slip stitches too tightly, causing the brim to pucker or not lay flat against the hat body properly βœ— Missing the back loop only and front loop only instructions in the brim, resulting in a less defined textured appearance βœ— Not changing to the smaller hook size for the brim section, which affects the brim's structure and finished look

Bonnie Beanie Hat Pattern

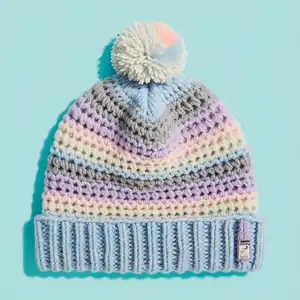
Create this adorable Bonnie Beanie hat perfect for little ones from newborn to toddler age! This charming design features a cozy fit with a delightful textured brim that adds character and warmth. Available in five sizes to accommodate babies from 0-24 months, this beanie works up beautifully in colorful DK weight yarn. The continuous round construction makes it a joy to crochet, while the cute pom pom topper adds that finishing touch of sweetness.

Beginner Friendly 2-3 Hours

Materials Needed for Bonnie Beanie Hat Pattern

β€” Main Fabric

  • 01
    Paintbox Yarns Baby DK Prints in Mermaid, Misty Forest, or Pastel Party
  • 02
    1-2 balls of 1.75oz/50g depending on size (larger sizes require 2 balls)

β€” Tools Required

  • 01
    US E/4 (3.5mm) crochet hook for hat body
  • 02
    US D/3 (3mm) crochet hook for brim
  • 03
    Stitch marker
  • 04
    Yarn needle for weaving in ends
  • 05
    Scissors
  • 06
    Pom pom maker or materials to make a pom pom

Progress Tracker

0% Complete

β€” Hat :

Round 1 :

1 ch (does not count as st), 6 sc in MR, do not join or turn (6)

Round 2 :

2 sc in each st around (12)

Info :

PM in last st of round and move up as you work each round

Round 3 :

[2 sc in next st, 1 sc in next st] 6 times (18)

Round 4 :

[2 sc in next st, 1 sc in next 2 sts] 6 times (24)

Round 5 :

[2 sc in next st, 1 sc in next 3 sts] 6 times (30)

Round 6 :

[2 sc in next st, 1 sc in next 4 sts] 6 times (36)

Round 7 :

[2 sc in next st, 1 sc in next 5 sts] 6 times (42)

Round 8 :

[2 sc in next st, 1 sc in next 6 sts] 6 times (48)

Round 9 :

[2 sc in next st, 1 sc in next 7 sts] 6 times (54)

Round 10 :

[2 sc in next st, 1 sc in next 8 sts] 6 times (60)

Round 11 :

[2 sc in next st, 1 sc in next 9 sts] 6 times (66)

Round 12 :

[2 sc in next st, 1 sc in next 10 sts] 6 times (72)

For size 0-3 months :

Rounds 13-32: 1 sc in each st around (72). Continue to brim.

For size 3-6 months :

Round 13: [2 sc in first st, 1 sc in next 11 sts] 6 times (78). Rounds 14-35: 1 sc in each st around. Continue to brim.

For size 6-12 months :

Round 13: [2 sc in first st, 1 sc in next 11 sts] 6 times (78). Round 14: [2 sc in first st, 1 sc in next 12 sts] 6 times (84). Rounds 15-38: 1 sc in each st around. Continue to brim.

For size 12-18 months :

Round 13: [2 sc in first st, 1 sc in next 11 sts] 6 times (78). Round 14: [2 sc in first st, 1 sc in next 12 sts] 6 times (84). Round 15: [2 sc in first st, 1 sc in next 13 sts] 6 times (90). Rounds 16-40: 1 sc in each st around. Continue to brim.

For size 18-24 months :

Round 13: [2 sc in first st, 1 sc in next 11 sts] 6 times (78). Round 14: [2 sc in first st, 1 sc in next 12 sts] 6 times (84). Round 15: [2 sc in first st, 1 sc in next 13 sts] 6 times (90). Round 16: [2 sc in first st, 1 sc in next 14 sts] 6 times (96). Rounds 17-42: 1 sc in each st around. Continue to brim.

β€” Brim :

Info :

Without fastening off, ss in next st at end of final round of hat body, turn to work at right angles to the hat body. Switch to US D/3 (3mm) hook.

Setup :

Make 6 ch

Row 1 :

1 sc in second ch from hook and in each of next 4 ch, ss in next st on final round of hat body, turn (5 sc and 1 ss)

Row 2 :

Miss 1 ss, 1 sc in BLO of next 5 sts, turn (5 sc BLO)

Row 3 :

1 ch (does not count as st), 1 sc in BLO of next 5 sts, ss in next 2 sts on final round of body, turn (5 sc BLO and 2 ss)

Row 4 :

Miss 2 ss, 1 sc in BLO of next 5 sts, turn (5 sc BLO)

Info :

Repeat rows 3 and 4 around the bottom of the hat finishing on a row 4

To join the brim :

Working on the wrong side from the outside edge back towards the body of the hat, ss in FLO of each st of previous row and BLO of each corresponding ch from 1st row. Fasten off and weave in ends.

Assembly Instructions

  • After completing the hat and brim, make a small pom pom using your preferred method or a pom pom maker.
  • Locate the center of the magic ring at the crown of the hat where you began working.
  • Securely sew the pom pom to the center of the magic ring, ensuring it's firmly attached.
  • Weave in all remaining yarn ends throughout the hat using a yarn needle.
  • Check that the brim is properly joined and lies flat against the hat body.
  • Give the hat a gentle steam or block if needed to help it hold its shape.
  • Try the hat on your little one to ensure proper fit and adjust if necessary.

Important Notes

  • πŸ’‘Always use a stitch marker and move it up each round to track your progress accurately
  • πŸ’‘Remember to switch to the smaller hook size (US D/3) when working the brim section
  • πŸ’‘Pay close attention to the BLO and FLO instructions in the brim for proper texture
  • πŸ’‘Work the brim slip stitches loosely to prevent puckering and ensure the brim lays flat
  • πŸ’‘The pattern uses US terminology with UK terms in parentheses - make sure you're following the correct notation
  • πŸ’‘Gauge is important for proper sizing - take time to check your tension before starting

This sweet Bonnie Beanie pattern is perfect for keeping tiny heads warm and stylish throughout the seasons! With five carefully graded sizes, you can create the perfect fit for babies from newborn through toddlerhood. The unique perpendicular brim construction adds beautiful texture and dimension while remaining beginner-friendly. Top it off with a fluffy pom pom in coordinating colors, and you've got an adorable handmade gift that any parent will treasure. This quick-working pattern is perfect for using up special yarn and creating cherished keepsakes! 🧢✨

You ask,

we answer.

FAQs

Which size should I make for my baby?

The pattern includes five sizes with specific age ranges and measurements. Measure your baby's head circumference and compare it to the finished measurements in the pattern. The sizes range from 12 inches (0-3 months) to 16 inches (18-24 months). When in doubt, size up for growing room.

Can I substitute a different yarn for the Paintbox Yarns Baby DK?

While the pattern recommends Paintbox Yarns Baby DK, you can substitute any DK weight yarn. Just ensure you match the gauge of 24 stitches and 27 rows over 4 inches using the specified hook sizes to maintain proper sizing.

Why do I need two different hook sizes?

The larger US E/4 (3.5mm) hook is used for the main hat body to create the proper drape and fit, while the smaller US D/3 (3mm) hook is used for the brim to create a tighter, more structured edge that holds its shape better.

How do I work the brim perpendicular to the hat body?

After completing the hat body, you'll turn your work at right angles and create rows that are slip stitched to the hat body as you go. The pattern provides detailed instructions for this technique, working in back loops only to create the textured appearance.

Do I need to know how to make a pom pom?

A pom pom maker is helpful but not required. You can make a pom pom using the traditional method with cardboard circles, your fingers, or a fork. There are many tutorials available online if you're new to making pom poms.