๐Ÿงถ Beautiful โœจ Detailed ๐Ÿ’ Adorable

Parrot Minecraft Character Amigurumi Pattern

Parrot Minecraft Character Amigurumi Pattern
3.9โ˜… Rating
6-7 Hours Time Needed
1.4K Made This
โœ‚๏ธ

Advanced Level

Designed for experienced knitters, these patterns involve intricate designs and complex techniques to challenge and inspire.

โฑ๏ธ

All-Day Adventure

Requires 8-10 hours, ideal for a full day of immersive knitting.

๐Ÿฆœ

Charming Critter

Delightful animal designs with sweet details that capture the essence of your favorite woodland and farmyard friends.

About This Parrot Minecraft Character Amigurumi Pattern

This Parrot amigurumi pattern is the most colorful and detailed Minecraft character featuring vibrant multi-color construction! Using red, blue, yellow, black, white, and tan yarns, you'll create multiple dimensional pieces that attach to form this tropical bird. The pattern teaches advanced techniques including oval construction for the beak and forehead, gradient color-changing for wings and tail, turning chain techniques for the unique hair feathers, and structured foot construction with back loop only shaping for definition.

Parrot Minecraft Character Amigurumi Pattern crochet pattern - detailed view of completed project

With seven separate pieces to construct and assemble plus intricate embroidered eye details, this pattern offers the most complexity in the Minecraft collection. The combination of color blocking, dimensional attachments, and detailed finishing creates an impressive showpiece that truly captures Parrot's playful personality and vibrant in-game appearance.

Why You'll Love This Parrot Minecraft Character Amigurumi Pattern

I absolutely love this Parrot pattern because it's such a vibrant, joyful explosion of color that makes me smile every time I work on it! The multi-colored construction is incredibly satisfying - watching the blue, yellow, and red sections come together to form those gradient wings is pure magic. I find the hair feather piece particularly fascinating because it uses turning chains to create that unique angular, geometric shape that's so different from typical amigurumi. The beak construction is wonderfully dimensional and really brings personality to the face. I especially love how this pattern challenges you with multiple techniques: oval shaping, color gradients, strategic piece placement, and even back-loop-only work in the feet for added texture. Creating three wing/tail pieces with identical gradient patterns teaches color-change precision, and seeing them all attached transforms the cube into something truly special. This is the kind of pattern that showcases your skills and becomes a conversation starter!

Parrot Minecraft Character Amigurumi Pattern step 1 - construction progress Parrot Minecraft Character Amigurumi Pattern step 2 - assembly progress Parrot Minecraft Character Amigurumi Pattern step 3 - details and accessories Parrot Minecraft Character Amigurumi Pattern step 4 - final assembly and finishing

Switch Things Up

I love creating all five Minecraft parrot color variants from this pattern! The blue parrot uses cyan body with dark blue and white wings, the green parrot features lime green with emerald and yellow gradients, the cyan parrot combines turquoise with light blue and white, and the grey parrot uses different shades of grey for a sophisticated monochrome look. Each variant has its own personality!

For the wings, I sometimes add extra definition by surface crocheting in darker yarn along the color change lines to emphasize that pixelated Minecraft aesthetic. You could also embroider small geometric patterns on the wing sections to mimic in-game texture details.

I've successfully made a jumbo parrot using worsted weight yarn and a 5mm hook, creating an impressive 10-inch tall bird with dramatic wing span. The larger size really showcases all the gradient color work! For keychains, use sport weight yarn and a 2.5mm hook for adorable mini versions.

Try posing the wings in different positions before sewing - wings spread wide for flying pose, wings folded at sides for perching, or one wing up for a waving effect. Some crafters add small wire armatures inside the wings for poseable display options.

For a fun twist, create tiny crocheted items for your parrot to 'hold' - make miniature cookies (the food parrots love in Minecraft), tiny music note shapes since they dance to music, or small shoulder perches. You could even make a whole flock of different colored parrots displayed together on a crocheted jungle vine for an impressive scene!

Common Mistakes & How to Fix Them

โœ— Not maintaining consistent color change points across the three wing pieces resulting in mismatched gradient patterns that don't align visually โœ— Forgetting to work in back loops only for the foot base which eliminates the defined ridge that creates the foot shape โœ— Sewing the forehead piece too low on the head instead of directly above the beak causing disproportionate facial features โœ— Pulling turning chains too tightly when creating hair feathers which distorts the angular geometric shape and causes curling edges

Parrot Minecraft Character Amigurumi Pattern

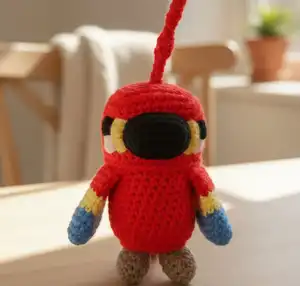
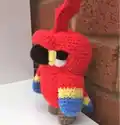
Create the vibrant and colorful Parrot from Minecraft with this detailed amigurumi crochet pattern! This pattern features the iconic red, blue, and yellow cubic body with a distinctive black beak, forehead piece, colorful wings and tail, decorative hair feathers, and tan feet. Perfect for Minecraft jungle enthusiasts and bird lovers, this pattern uses cube-shaping techniques with multiple color-blocked elements. With step-by-step instructions for the square body and head, dimensional beak, wings with gradient colors, unique hair feather construction, and structured feet, you'll craft an adorable tropical companion!

Advanced 6-7 Hours

Materials Needed for Parrot Minecraft Character Amigurumi Pattern

โ€” Main Fabric

  • 01
    DK yarn in red, black, yellow, white, blue, and tan

โ€” Tools Required

  • 01
    3.5mm crochet hook
  • 02
    Embroidery needle
  • 03
    Scissors
  • 04
    Toy stuffing
  • 05
    4 clip markers

Progress Tracker

0% Complete

โ€” Body :

Info :

Make with red yarn

Round 1 :

8SC into a magic loop {8}

Round 2 :

(SC1, 3SC into the next ST) 4 times {16}

Round 3 :

SC2, 3SC into next ST, (SC3, 3SC into next ST) 3 times, SC1 {24}

Round 4 :

SC3, 3SC into next ST, (SC5, 3SC into next ST) 3 times, SC2 {32}

Round 5-16 :

SC around {32}

Info :

Add clip marker into 4 corners where decreases will be, with 7 stitches between every 2 stitches. Replace markers after each row

Round 17 :

(SC to stitch before marker SC3TOG) 4 times, SC to end, remove markers {24}

Round 18 :

(SC to stitch before marker SC3TOG) 4 times, SC to end {16}

Info :

Stuff body

Round 19 :

(SC to stitch before marker SC3TOG) 4 times, SC to end, remove markers {8}

Info :

Join and FO. With yarn tail pick up front loop only of remaining 8 stitches in order, pull tight to close

โ€” Head :

Info :

Make with red yarn

Round 1 :

8SC into a magic loop {8}

Round 2 :

(SC1, 3SC into the next ST) 4 times {16}

Round 3 :

SC2, 3SC into next ST, (SC3, 3SC into next ST) 3 times, SC1 {24}

Round 4 :

SC3, 3SC into next ST, (SC5, 3SC into next ST) 3 times, SC2 {32}

Round 5 :

SC4, 3SC into next ST, (SC6, 3SC into next ST) 3 times, SC2 {40}

Round 6-15 :

SC around {40}

Info :

Add clip marker into 4 corners where decreases will be, with 9 stitches between every 2 stitches. Replace markers after each row

Round 16 :

(SC to stitch before marker SC3TOG) 4 times, SC to end {32}

Round 17 :

(SC to stitch before marker SC3TOG) 4 times, SC to end {24}

Round 18 :

(SC to stitch before marker SC3TOG) 4 times, SC to end {16}

Info :

Stuff head

Round 19 :

(SC to stitch before marker SC3TOG) 4 times, SC to end, remove markers {8}

Info :

Join and FO. With yarn tail pick up front loop only of remaining 8 stitches in order, pull tight to close. Sew head onto body

โ€” Beak :

Info :

Make with black yarn

Round 1 :

CH6, SC in 2nd chain from hook, SC across, 3SC into last chain, working down opposite side of foundation chain, SC3, 2SC in the last ST (first ST of previous round) {12}

Round 2 :

2SC into 1st ST, SC3, 2SC into next 3 STS, SC3, 2SC into last 2 STS {18}

Round 3-5 :

SC around {18}

Info :

Join and FO. Stuff beak, pin and sew into place in centre of Parrot's head

โ€” Forehead :

Info :

Make with red yarn

Round 1 :

CH10, SC in 2nd chain from hook, SC across, 3SC into last chain, working down opposite side of foundation chain, SC7, 2SC in the last ST (first ST of previous round) {20}

Round 2 :

2SC into 1st ST, SC7, 2SC into next 3 STS, SC7, 2SC into last 2 STS {26}

Round 3-4 :

SC around {26}

Info :

Join and FO. Pin and sew directly above beak of Parrot

โ€” Face Detail :

Info :

With yellow, black and white yarn sew eyes onto Parrot. Sew shapes first, then fill in with colour

โ€” Wings and Tail :

Info :

Make 3, begin with blue yarn

Round 1 :

CH6, SC in 2nd chain from hook, SC across, 3SC into last chain, working down opposite side of foundation chain, SC3, 2SC in the last ST (first ST of previous round) {12}

Round 2 :

2SC into 1st ST, SC3, 2SC into next 3 STS, SC3, 2SC into last 2 STS {18}

Round 3-5 :

SC around {18}

Info :

Change to yellow yarn

Round 6-8 :

SC around {18}

Info :

Change to red yarn

Round 9-12 :

SC around {18}

Info :

Join and FO. Pin and sew 2 into place on either side of Parrot, and 1 on back for tail

โ€” Hair Feathers :

Info :

Make 2 with red yarn

Round 1 :

CH4, SC into 2nd CH from hook and all other chains, CH1, T {3}

Round 2 :

SC across, CH1, T {3}

Round 3 :

SC across, CH4, T

Round 4 :

SC into 2nd CH from hook and all other chains/stitches across, CH1, T {6}

Round 5 :

SC across, CH1, T {6}

Round 6 :

SC3, CH1, T {3}

Round 7 :

SC across, CH4, T

Round 8 :

SC into 2nd CH from hook and all other chains/stitches across, CH1, T {6}

Round 9 :

SC across {6}

Info :

Join and FO. SC around two pieces into consecutive stitches to join. Do 3SC in corners to turn. Sew on top of head

โ€” Feet :

Info :

Make with tan yarn

Round 1 :

CH6, SC in 2nd chain from hook, SC across, 3SC into last chain, working in bottom of foundation chain, SC3, 2SC in the last ST (first ST of previous round) {12}

Round 2 :

In BLO SC around {12}

Round 3 :

SC3, (SC2TOG) 3 times, SC3 {9}

Round 4 :

(SC1, SC2TOG) 3 times {6}

Round 5-6 :

SC around {6}

Info :

Join and FO. Stuff feet and legs, pin and sew onto bottom of Parrot

Assembly Instructions

  • Sew completed head onto body ensuring proper alignment and that all facial features will be forward-facing
  • Attach stuffed black beak to center of face, positioning it prominently as the focal point of Parrot's expression
  • Pin and sew red forehead piece directly above the beak creating the distinctive head shape characteristic of parrots
  • Embroider detailed eyes using yellow base, black pupils, and white highlights positioned on either side of beak
  • Attach two gradient wings (blue-yellow-red) to either side of body at shoulder level for symmetrical appearance
  • Sew one gradient wing/tail piece to back of body as the tail, ensuring it points downward naturally
  • Attach two joined hair feather pieces to top of head for that unique Minecraft parrot crest detail
  • Sew stuffed tan feet to bottom of body ensuring Parrot can stand upright and balanced on its own

Important Notes

  • ๐Ÿ’กThis is the most complex Minecraft pattern with seven separate pieces requiring precise assembly and color coordination
  • ๐Ÿ’กMake all three wing/tail pieces with identical color changes at the same round numbers for consistent gradient appearance
  • ๐Ÿ’กThe hair feather construction uses turning chains creating a unique angular shape - follow turning instructions carefully
  • ๐Ÿ’กWork in back loops only for Round 2 of feet to create the defined ridge that shapes the foot base
  • ๐Ÿ’กPin all pieces in place before sewing to visualize final appearance and ensure balanced, symmetrical placement
  • ๐Ÿ’กThe forehead piece should sit directly above the beak, not too high or low, for proper parrot facial proportions
  • ๐Ÿ’กUse invisible color change method for the wing gradients to create smooth transitions between blue, yellow, and red sections
  • ๐Ÿ’กTake time with eye embroidery as the detailed colorwork brings the character to life and adds personality

This stunning Parrot amigurumi pattern is the crown jewel of the Minecraft collection with vibrant colors and intricate details! Featuring gradient wings, dimensional beak and forehead pieces, unique hair feathers, and structured feet, this advanced pattern showcases multiple crochet techniques. The explosion of red, blue, yellow, and black creates a show-stopping tropical companion that captures Minecraft Parrot's playful spirit perfectly! ๐Ÿฆœ๐ŸŒˆ Happy crocheting! โœจ

You ask,

we answer.

FAQs

How do I keep the color changes consistent across all three wing pieces?

Write down exactly which round you change colors on the first wing piece and follow those same round numbers for the other two. Making all three in one sitting helps maintain consistency in tension and appearance.

The hair feathers are confusing - can you explain the turning technique?

You're working in rows that turn back and forth rather than continuous rounds. CH1 and T means chain one, then turn your work to crochet back across. The CH4 sections create the angular extensions that give the feathers their geometric shape.

Should I stuff all the dimensional pieces?

Stuff the beak and feet firmly for structure. The forehead can be lightly stuffed or left flat. Wings and tail should be unstuffed or very lightly stuffed so they remain flexible and can be positioned naturally.

Can I make different colored parrot variants?

Absolutely! Minecraft has five parrot color variants: red, blue, green, cyan, and grey. Simply substitute the main body colors while keeping the black beak, tan feet, and adjusting wing gradients to match your chosen variant.

How do I attach the two hair feather pieces together?

After making both pieces separately, use single crochet to join them by working through the edge stitches of both pieces simultaneously. Work 3SC into corner stitches to turn smoothly, creating one unified crest piece.