🧶 Beautiful ✨ Detailed 💝 Adorable

Embla's Mom Sweater Knitting Pattern

Embla's Mom Sweater Knitting Pattern
3.9★ Rating
45-60 Hours Time Needed
1.3K Made This
✂️

Advanced Level

Designed for experienced knitters, these patterns involve intricate designs and complex techniques to challenge and inspire.

⏱️

Slow & Steady

A 10-12 hour project—great for savoring the process over several sessions.

🧥

Layered Comfort

Perfect for cozy, stylish layering through changing seasons with versatile, mix-and-match potential.

About This Embla's Mom Sweater Knitting Pattern

Embla's Mom is a beautifully crafted top-down sweater that showcases the artistry of Nordic colorwork knitting. The pattern features a stunning forest-inspired yoke design worked in three complementary colors, creating visual interest that draws the eye. What sets this sweater apart is its thoughtful construction with optional waist shaping specifically designed for the back panel, offering a feminine fit without compromising the traditional aesthetic. The ribbed neckline, cuffs, and hem provide classic finishing touches that ensure this sweater will remain a beloved piece in your wardrobe for years to come.

Embla's Mom Sweater Knitting Pattern crochet pattern - detailed view of completed project

This intermediate to advanced pattern guides you through colorwork techniques, increases worked into the yoke, and strategic shaping for a custom fit. The detailed instructions include seven sizes ranging from XS to XXL, ensuring a perfect fit for every body type.

Why You'll Love This Embla's Mom Sweater Knitting Pattern

I absolutely love this pattern because it perfectly balances traditional Nordic design with modern, wearable style. The forest colorwork on the yoke is captivating without being overwhelming, and I appreciate how the designer included optional waist shaping that lets you customize the fit to your preferences. What really draws me to this pattern is the thoughtful construction—working top-down means you can try it on as you go and adjust the length exactly how you want it. The fact that it uses DK or sport weight yarn means it's lighter than traditional heavy wool sweaters, making it perfect for layering. I love that this isn't just another basic sweater pattern; it's a statement piece that showcases your skills while remaining incredibly practical and comfortable to wear.

Embla's Mom Sweater Knitting Pattern step 1 - construction progress Embla's Mom Sweater Knitting Pattern step 2 - assembly progress Embla's Mom Sweater Knitting Pattern step 3 - details and accessories Embla's Mom Sweater Knitting Pattern step 4 - final assembly and finishing

Switch Things Up

I love experimenting with this pattern to make each sweater uniquely mine! One of my favorite modifications is playing with the colorwork—instead of the forest pattern, I've tried geometric motifs or even created my own chart inspired by nature photography. The three-color palette is perfect for using up yarn from your stash, and I often choose unexpected color combinations that reflect the season I'm knitting for.

Another way I personalize this pattern is by adjusting the waist shaping. For a more dramatic hourglass silhouette, I work the decrease rounds more frequently (every 2cm instead of 3cm) and add an extra set of increases. If I'm making a cozy winter version, I skip the shaping entirely for a relaxed, layering-friendly fit that works beautifully over turtlenecks.

I also love playing with sleeve length—I've made both bracelet-length three-quarter sleeves for spring and extra-long sleeves with thumbholes for winter. The ribbing sections are another opportunity for creativity; I've substituted 1x1 rib for a tighter fit or worked a wider rib band (7-8cm instead of 5cm) for a more modern look. Sometimes I even work the hem ribbing in a contrasting color for an unexpected pop of personality.

Common Mistakes & How to Fix Them

✗ Forgetting to maintain gauge throughout colorwork sections can result in a yoke that's too tight or too loose for the body proportions ✗ Not checking the yoke depth before dividing for sleeves often leads to armholes that are too shallow or too deep for comfort ✗ Skipping the optional waist shaping without adjusting overall stitch counts can create an unflattering boxy silhouette that doesn't follow body curves ✗ Failing to pick up extra stitches at underarm joins where cast-on stitches meet held stitches creates visible holes that are difficult to close later ✗ Working sleeve decreases too quickly or forgetting to track them properly results in sleeves that are too tight at the wrist or have awkward bunching

Embla's Mom Sweater Knitting Pattern

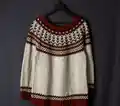
Transform your knitting skills with this stunning top-down sweater featuring an enchanting forest colorwork pattern on the yoke. Designed with a feminine silhouette through strategic back shaping, this beautiful garment combines traditional Scandinavian design with modern fit. The pattern includes detailed waist and hip shaping for a flattering hourglass figure while maintaining the classic wool sweater aesthetic. Perfect for knitters ready to explore colorwork techniques and create a wardrobe staple that's both elegant and timeless.

Advanced 45-60 Hours

Materials Needed for Embla's Mom Sweater Knitting Pattern

— Main Fabric

  • 01
    DK or sport weight yarn in 3 colors - Color A: 650-1000 meters (711-1094 yards)
  • 02
    Color B: 170-350 meters (186-383 yards)
  • 03
    Color C: 125-320 meters (137-350 yards)
  • 04
    Sample shown in Rauma 3tråds, colors: 178 (Color A), 1561 (Color B), 103 (Color C)
  • 05
    Alternative yarn: Rauma Finull, colors: 4078 (Color A), 0425 (Color B), 0422 (Color C)

— Tools Required

  • 01
    3mm (US 2.5) circular needles - 40cm (16 inches)
  • 02
    3mm (US 2.5) double-pointed needles (DPNs)
  • 03
    3.5mm (US 4) circular needles - 40cm, 60cm, 80cm (16, 24, 32 inches)
  • 04
    3.5mm (US 4) double-pointed needles (DPNs)
  • 05
    Stitch markers
  • 06
    Scrap yarn or stitch holders
  • 07
    Tapestry needle for weaving in ends

Progress Tracker

0% Complete

— NECK :

Setup :

With 3mm (US 2.5) needles, cast on 92 (100) 108 (116) 124 (132) 140 stitches loosely using Color B. Join to knit in the round and place marker at beginning of round.

Ribbing :

Work [K2, p2] to end of round. Repeat until work measures approximately 3cm (1.25 inches).

— YOKE :

Setup :

Switch to 3.5mm (US 4) needles. Next round: knit to end.

Main Chart :

Begin working from Main Chart and increase as instructed. From row 30 of Main Chart onwards you should have 276 (300) 324 (348) 372 (396) 420 stitches on your needles.

Continue :

Continue working from Main Chart until the yoke measures approximately 20 (20) 21 (22) 23 (24) 25cm or 7.75 (7.75) 8.25 (8.75) 9 (9.5) 9.75 inches, or until the yoke reaches your desired depth.

Dividing for Body and Sleeves :

Transfer 60 (64) 68 (72) 76 (80) 84 stitches onto a stitch holder, cast on 4 stitches, place beginning of round marker, cast on 4 stitches, knit 78 (86) 94 (102) 110 (118) 126 stitches, then transfer 60 (64) 68 (72) 76 (80) 84 stitches onto another stitch holder, cast on 4 stitches, place marker, cast on 4 stitches, knit to end of round. You should now have 172 (188) 204 (220) 236 (252) 268 stitches on your needles for the body.

— BODY :

Setup :

Begin working the body in the round. If Main Chart has not been completed, finish it. Switch to using only Color A upon completion of Main Chart.

Waist Shaping - Decreases (Optional) :

All shaping is done only to the Back of the garment (first half of stitches counting from beginning of round marker). Shaping is completely optional and can be skipped. Work Dec Round every 3cm (1.25 inches), for a total of 6 (6) 5 (6) 6 (6) 6 times.

Dec Round :

K1, k2tog, knit to 3 stitches before next marker, ssk, knit to end (2 stitches decreased). You should have 160 (176) 194 (208) 224 (240) 256 stitches on your needles.

Info :

Finish decreasing when the body measures approximately 20 (21) 21 (22) 22 (23) 23cm or 7.75 (8.25) 8.25 (8.75) 8.75 (9) 9 inches from the underarm, or when the garment reaches the narrowest part of your waist.

Hip Shaping - Increases :

Work Inc Round every 2 (2) 2 (2) 1.5 (1.5) 1.5cm or 0.75 (0.75) 0.75 (0.75) 0.5 (0.5) 0.5 inches, for a total of 7 (7) 7 (9) 9 (9) 9 times.

Inc Round :

K1, m1L, knit to 1 stitch before next marker, m1R, knit to end. You should now have 174 (190) 208 (226) 242 (258) 274 stitches on your needles.

Body Length :

When your work measures 34 (35) 35 (36) 36 (37) 37cm or 13.5 (13.75) 13.75 (14.25) 14.25 (14.5) 14.5 inches from the underarm, or when the garment is approximately 9cm (3.5 inches) shorter than your preferred length, begin working from Finishing Chart.

Body Ribbing :

After completing Finishing Chart, switch to 3mm (US 2.5) needles and work 2x2 rib (k2, p2) in the round in Color B until the ribbing measures 5cm (2 inches). Bind off all stitches in pattern.

— SLEEVES :

Setup :

Join yarns needed for the remainder of Main Chart or Color A if Main Chart is already completed. Starting in the middle of one of the underarm cast-ons, pick up (do not knit) 4 stitches from the underarm cast-on, pick up an extra stitch where the underarm cast-on stitches meet the on-hold stitches to avoid holes, transfer the 60 (64) 68 (72) 76 (80) 84 sleeve stitches that were put on hold back onto your needles, pick up an extra stitch to avoid holes, pick up 4 stitches along the underarm cast-on. Place marker to mark beginning of round. You should now have 70 (74) 78 (82) 86 (90) 94 stitches on your needles.

Sleeve Body :

Work in stockinette stitch in the round and complete Main Chart if necessary.

Sleeve Decreases :

Work Dec Round every 2cm (0.75 inches) as you progress, a total of 13 (13) 15 (15) 17 (17) 19 times.

Dec Round :

K2tog, knit to 2 stitches before end, ssk (2 stitches decreased). You should now have 44 (48) 48 (52) 52 (56) 56 stitches on your needles.

Sleeve Length :

Continue working in stockinette stitch until the sleeve measures approximately 37 (38) 38 (39) 39 (40) 41cm or 14.5 (15) 15 (15.25) 15.25 (15.75) 16.25 inches from the underarm, or when the sleeve is approximately 9cm (3.5 inches) shorter than your preferred length. Start working Finishing Chart.

Sleeve Ribbing :

Upon completion of Finishing Chart, switch to 3mm (US 2.5) needles and work 2x2 rib (k2, p2) in the round in Color B until the ribbing measures 5cm (2 inches) or to your preferred length. Bind off all stitches in pattern.

Second Sleeve :

Make the second sleeve in the same manner.

— FINISHING :

Final Steps :

Weave in all ends and sew any gaps around the underarm shut if necessary.

Assembly Instructions

  • Block the finished sweater according to yarn specifications to even out colorwork and achieve proper measurements
  • Weave in all yarn ends securely, especially at color changes in the yoke colorwork pattern
  • Check underarm areas where sleeves join the body and close any small gaps with matching yarn using mattress stitch
  • Steam or wet block the ribbing sections gently to maintain elasticity while ensuring they lay flat
  • Examine all cast-on and bind-off edges to ensure they have consistent tension and adjust if needed

Important Notes

  • 💡Maintain consistent gauge throughout the project, especially during colorwork sections, as gauge changes will affect fit
  • 💡The waist shaping is optional and completely customizable—you can increase or decrease the frequency of shaping rounds for your desired fit
  • 💡When working colorwork, carry floats loosely across the back to maintain fabric elasticity and prevent puckering
  • 💡Try on the sweater as you work to check yoke depth and body length before committing to final measurements
  • 💡Use lifelines in the yoke section when working colorwork to make it easier to fix mistakes without frogging too much work
  • 💡The suggested ease is -2 to +4cm, meaning this sweater is designed to fit close to the body with slight positive or negative ease
  • 💡Consider making a gauge swatch in colorwork pattern as it often differs from stockinette gauge

This stunning Embla's Mom sweater pattern brings together traditional Scandinavian colorwork with modern shaping techniques to create a truly special garment. The forest-inspired yoke design tells a story while the thoughtful construction ensures a flattering fit that you'll reach for again and again. Whether you're expanding your colorwork skills or looking for your next statement sweater project, this pattern offers both challenge and reward. The detailed instructions and multiple size options make it accessible while the beautiful design keeps it interesting from cast-on to bind-off. Happy knitting! 🧶✨

You ask,

we answer.

FAQs

What does 'top-down construction' mean and why is it beneficial?

Top-down construction means you start knitting at the neck and work downward to the hem. This method is beneficial because you can try on the sweater as you go, easily adjust body and sleeve length, and avoid the hassle of seaming shoulders and setting in sleeves.

Can I skip the waist shaping if I prefer a more relaxed fit?

Absolutely! The pattern specifically states that waist shaping is optional. If you prefer a straighter, more relaxed silhouette, simply work the body in stockinette stitch without the decrease and increase rounds, maintaining the stitch count from the underarm division.

How do I manage three colors of yarn during the colorwork yoke?

When working colorwork with multiple colors, carry the unused yarns loosely along the wrong side of the work (called floats). Keep floats loose enough that they don't pucker the fabric but neat enough that they won't snag. You can catch long floats by twisting the working yarn around the carried yarn every few stitches.

What's the best way to handle the increases in the yoke section?

The pattern includes increases worked into the Main Chart. Follow the chart carefully and use stitch markers to divide the yoke into sections. This helps track where increases should occur and makes it easier to spot mistakes early.

How much positive or negative ease should I choose?

The pattern suggests -2 to +4cm of ease. Negative ease (sweater smaller than body measurements) creates a fitted look, while positive ease (sweater larger than body) gives a more relaxed fit. For this style, slight negative to neutral ease showcases the shaping, while positive ease creates a cozier, oversized feel.

Can I use a different yarn weight than DK or sport?

While you can substitute yarn weights, you'll need to recalculate all measurements and potentially adjust the pattern. DK and sport weight are specified because they create the right fabric density for colorwork while remaining lightweight. Using a different weight will significantly change the finished dimensions.

What should I do if my yoke seems too short or too long?

The beauty of top-down knitting is that you can try it on! Before dividing for body and sleeves, try the sweater on and check that the yoke reaches your desired depth. You can work additional rounds or stop earlier than the pattern suggests to achieve the perfect fit.