🧢 Beautiful ✨ Detailed πŸ’ Adorable

Lion Hand Puppet Amigurumi Pattern

Lion Hand Puppet Amigurumi Pattern
3.9β˜… Rating
4-5 Hours Time Needed
3.8K Made This
βœ‚οΈ

Intermediate Level

Ideal for those with basic knitting experience, featuring slightly more advanced stitches and techniques to expand your skills.

⏱️

Weekend Treat

Takes 5-7 hours, making it an enjoyable project to finish over a couple of days.

🧸

Cute Companion

An adorable friend to cherish, handcrafted with love to bring comfort and joy for years to come.

About This Lion Hand Puppet Amigurumi Pattern

This lion hand puppet pattern combines the charm of amigurumi with the interactive fun of puppet play. Designed with a hollow body that fits over your hand, it features movable arms that bring storytelling to life. The detailed mane made with looped chains creates a fluffy, dimensional look that captures the lion's majestic appearance. With embroidered facial features and careful eye placement, this puppet has an expressive personality that delights children and adults alike.

Lion Hand Puppet Amigurumi Pattern crochet pattern - detailed view of completed project

The pattern uses super bulky plush yarn for a soft, cuddly finish and includes techniques for attaching arms directly to the body while crocheting. The combination of colors and textures makes this lion puppet both visually appealing and tactilely satisfying.

Why You'll Love This Lion Hand Puppet Amigurumi Pattern

I absolutely love how this pattern transforms traditional amigurumi into an interactive toy that sparks imagination! The hand puppet design means children can actually play with their creation, making it more engaging than a regular stuffed animal. I'm excited about the clever construction technique that integrates the arms during body assembly, eliminating bulky seams. The looped chain mane is such a creative touch that adds dimension without complicated stitching. What really makes me smile is how the embroidered details give this lion so much personalityβ€”those indented eyes create an expression that's both sweet and playful, perfect for storytelling adventures!

Lion Hand Puppet Amigurumi Pattern step 1 - construction progress Lion Hand Puppet Amigurumi Pattern step 2 - assembly progress Lion Hand Puppet Amigurumi Pattern step 3 - details and accessories Lion Hand Puppet Amigurumi Pattern step 4 - final assembly and finishing

Switch Things Up

I love experimenting with this pattern to create different lion personalities! Try using a golden yellow or tan yarn for the body instead of dark yellow to create a different lion shade. You could even make a white lion by using cream or white plush yarn throughout.

For the mane, I've discovered that mixing two shades of brown creates incredible depth and dimension - try alternating between light and dark brown in the two mane rounds. You could also experiment with orange or rust-colored yarn for a more vibrant, autumn-inspired look.

I sometimes add embroidered freckles or whiskers using the black cotton yarn to give each lion unique facial features. Another fun variation is creating a lioness by skipping the mane entirely and just working single crochet rounds around the face instead.

Consider making a whole pride with different sizes by adjusting your yarn weight and hook size! I've made tiny keychain versions using fingering weight yarn and larger cuddle-buddy sizes with jumbo yarn. Each size brings its own charm to puppet shows.

For themed variations, try adding accessories like a little crown crocheted separately for a royal lion, or a tiny scarf for a winter lion character. The puppet format makes it easy to swap accessories between performances, keeping your storytelling fresh and exciting!

Common Mistakes & How to Fix Them

βœ— Forgetting to stuff the head firmly before closing can result in a floppy puppet that loses its shape during play βœ— Not positioning eyes correctly between rounds five and six with proper spacing makes the face look unbalanced or cross-eyed βœ— Skipping the sc2tog stitches when attaching arms leaves visible gaps that weaken the puppet's structure and durability βœ— Crocheting the mane loops too tightly prevents them from standing out properly, creating a flat appearance instead of fluffy volume

Lion Hand Puppet Amigurumi Pattern

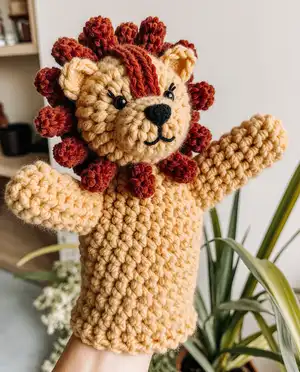
Create an adorable lion hand puppet that brings storytelling to life! This charming amigurumi pattern features a golden mane, expressive embroidered details, and functional arms perfect for puppet play. Standing at 28cm tall, this cuddly lion is designed to fit comfortably on your hand while captivating children during playtime. The plush yarn gives it a soft, huggable texture that makes it ideal for interactive storytelling sessions. Whether you're crafting for a child's birthday or adding to your handmade toy collection, this lion puppet combines functionality with irresistible charm.

Intermediate 4-5 Hours

Materials Needed for Lion Hand Puppet Amigurumi Pattern

β€” Main Fabric

  • 01
    Super bulky plush yarn - Himalaya Dolphin baby (120m/100g) in dark yellow color for head and body
  • 02
    Super bulky plush yarn - Himalaya Dolphin baby in brown color for mane
  • 03
    Sport cotton yarn - Yarn Art Jeans (160m/50g) in black for embroidery details

β€” Tools Required

  • 01
    4.5 mm crochet hook
  • 02
    Large needle for sewing and embroidery
  • 03
    Plastic safety eyes (2 pieces, 7mm diameter)
  • 04
    Fiber filler for stuffing
  • 05
    Knitting markers
  • 06
    Scissors

Progress Tracker

0% Complete

β€” HEAD :

Round 1 :

6 sc in MR (6)

Round 2 :

6 inc (12)

Round 3 :

(1 sc, inc) x 6 (18)

Round 4 :

(1 sc, inc) x 6, 6 sc (24)

Round 5 :

(2 sc, inc) x 6, 6 sc (30)

Round 6 :

(3 sc, inc) x 6, 6 sc (36)

Round 7 :

(4 sc, inc) x 6, 6 sc (42)

Round 8-12 :

42 sc (5 rounds)

Round 13 :

(5 sc, dec) x 6 (36)

Round 14 :

(4 sc, dec) x 6 (30)

Round 15 :

(3 sc, dec) x 6 (24)

Info :

Insert safe plastic eyes. Fix eyes between 5 and 6 rounds from MR on the nose. The distance between the eyes is 10 sc. Stuff the head with fiber filler.

Round 16 :

(2 sc, dec) x 6 (18)

Round 17 :

(1 sc, dec) x 6 (12)

Round 18 :

dec x 6 (6)

Info :

Draw the yarn through 6 front loops and tighten. Cut and secure the yarn.

β€” EYE INDENTING :

Step 1 :

Use black cotton yarn. Pull it through the back of the head and pull it out above the right eye. Leave the tail on back head's part.

Step 2 :

Pass the needle from below under the left eye and pull out under the right eye. Make sure that the yarn falls from the inside of the left eye.

Step 3 :

Pass the needle from above the right eye, making sure that the thread lies on the inside of the eye. Pull out the needle in the same place behind the head.

Step 4 :

Tighten both threads so that the eyes are sunken. Tie a knot, hide the tail inside the head.

β€” EARS :

Info :

Make 2 ears

Round 1 :

6 sc in MR (6)

Round 2 :

inc x 6 (12)

Round 3 :

(1 sc, inc) x 3, sl st (9)

Info :

Leave the tail for sewing and cut it. Sew ears between 10-11 rounds from the MR on the nose. Distance 11 st.

β€” MANE :

Round 1 :

Attach the yarn to the st between 9-10 rounds from the nose, 5 st below left ear. Crochet 8 ch, sl st in the next st. Repeat this step around upper part lion's face. Cut the yarn.

Round 2 :

Attach the yarn to the st between 11-12 rounds from the nose, 5 st below right ear. Crochet 9 ch, sl st in the next st. Repeat this step around upper part lion's face. Cut the yarn.

β€” EMBROIDER NOSE :

Step 1 :

Use brown plush yarn and large needle. Embroider 4 lines from the MR center to the mane. Cut and secure the yarn.

Step 2 :

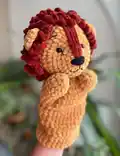
Use black cotton yarn and large needle. Embroider the black nose as shown on pictures. After embroider a mouth.

Step 3 :

Use thin cotton yarn and large needle. Embroider eyes, eyebrows and mouth lines.

β€” ARMS :

Info :

Don't stuff. Make 2 pieces

Round 1 :

6 sc in MR (6)

Round 2 :

inc x 6 (12)

Round 3 :

(2 sc, inc) x 4 (16)

Round 4-5 :

16 sc (2 rounds)

Round 6 :

(2 sc, dec) x 4 (12)

Round 7-9 :

12 sc (3 rounds)

Info :

Make sl st, cut the yarn.

β€” BODY :

Info :

Leave the tail for sewing, begin crochet without sl st. Make 24 ch, sl st in the first loop. Make a circle.

Round 1 :

24 sc

Round 2 :

(3 sc, inc) x 6 (30)

Round 3 :

(4 sc, inc) x 6 (36)

Round 4 :

(5 sc, inc) x 6 (42)

Round 5 :

Crochet together with arm - 7 sc, 13 sc only on the body, 7 sc together with another arm, 15 sc only on the body (42). Crochet sc2tog on both sleeves sides to avoid holes.

Round 6 :

sc2tog, crochet only on the arm - 4 sc, sc2tog, 12 sc only on the body, sc2tog, 4 sc only on the another arm, sc2tog, 14 sc only on the body (38)

Round 7 :

dec, 2 sc, dec, 12 sc, dec, 2 sc, dec, 14 sc (34)

Round 8 :

34 sc, ch

Round 9-14 :

34 dc (6 rounds)

Info :

Make 1 sc, 1 sl st, cut and secure the yarn.

Assembly Instructions

  • Sew the ears to the head between rounds 10-11 from the magic ring, with 11 stitches distance between them for proper placement
  • Attach the brown plush yarn mane in two layers around the upper part of the lion's face for dimensional volume
  • Embroider the nose details using brown yarn radiating from the center, then add black nose and mouth features
  • Add final embroidery details including eye highlights, eyebrows, and mouth lines using thin cotton yarn for expression
  • Sew the completed body to the head using the tail left for sewing, ensuring secure attachment for puppet use

Important Notes

  • πŸ’‘Use plush yarn consistently throughout for a cohesive soft texture that's perfect for children's play
  • πŸ’‘When indenting eyes, pull threads firmly but not too tight to create natural-looking sunken eye sockets
  • πŸ’‘The body is intentionally hollow to fit over your hand - do not stuff it or the puppet won't function
  • πŸ’‘Take care when attaching arms during body construction using sc2tog to prevent gaps and ensure durability
  • πŸ’‘Pin all pieces before sewing to test positioning and ensure the puppet has balanced proportions
  • πŸ’‘The mane loops should be consistent in length for each round to create an even, fluffy appearance

This delightful Lion Hand Puppet pattern brings the magic of interactive play to your crochet projects! Combining amigurumi techniques with functional puppet design, it creates an engaging toy perfect for storytelling and imaginative adventures. The fluffy mane, expressive embroidered face, and movable arms make this lion come alive in your hands. Whether crafting for a special child or building your handmade toy collection, this pattern delivers charm and playability in one cuddly package. 🦁✨ Happy crocheting! 🧢

You ask,

we answer.

FAQs

Can I use regular yarn instead of plush yarn?

Yes, you can substitute with worsted weight yarn and a smaller hook (3.5mm), but the finished puppet will be smaller and less fluffy than the original design.

How do I make sure the puppet fits my hand properly?

The body creates a hollow tube designed to fit most adult and older children's hands. You can adjust the initial chain count in the body (add or reduce chains in multiples of 6) to customize the opening size.

Why shouldn't I stuff the arms?

Leaving the arms unstuffed allows them to be more flexible and movable during puppet play, creating more realistic and engaging movement when performing.

What's the best way to create the looped mane?

Work the chain loops consistently and don't pull too tightly - they should stand out from the head naturally. The two layers create dimension, so take your time spacing them evenly around the face.

Can I make this puppet smaller for a child's hand?

Absolutely! Use sport weight yarn with a 3mm hook and reduce the initial body chain to 18-20 chains. This will create a child-sized puppet perfect for little hands.