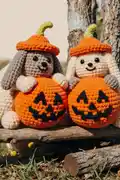
About This Bunny Pumpkin Amigurumi Pattern
This bunny pumpkin pattern combines creative seasonal design with practical crochet techniques to create a truly unique amigurumi. The body is worked in the shape of a round pumpkin with characteristic ridges created through back loop only stitching, while decorative bobble stitches in contrasting brown add realistic pumpkin segment details. The adorable hat sits perfectly atop the head, and you can customize the face with felt pieces or embroidery to give your bunny its own personality.
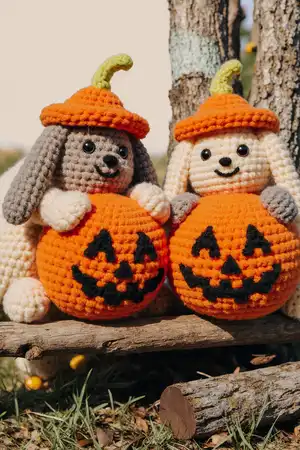
Working with chenille yarn gives this project a wonderfully soft and plush texture that makes it perfect for cuddling or displaying as autumn decor. The pattern flows seamlessly from head to body with clever shaping techniques that create the distinctive pumpkin silhouette.
Why You'll Love This Bunny Pumpkin Amigurumi Pattern
I absolutely love how this pattern transforms a classic bunny shape into something completely fresh and seasonal! The combination of the pumpkin body with those sweet bunny ears creates such a delightful character that's both whimsical and cozy. I'm particularly fond of the bobble stitch details that add texture and visual interest without being overly complicated. The chenille yarn makes every stitch feel luxurious, and watching the pumpkin shape emerge as you crochet is incredibly satisfying. Plus, you can really make it your own by choosing whether to use felt for the face or try your hand at embroidery—I love that creative freedom!
Switch Things Up
I love experimenting with different yarn types to see how they transform this little bunny pumpkin! While the pattern calls for chenille, I've tried it with velvet yarn for an even plusher feel, and the results were absolutely dreamy. You could also play with the color palette—imagine a white "ghost" pumpkin bunny or even a teal pumpkin to represent food allergy awareness.
For the facial features, I sometimes skip the felt entirely and use safety eyes with an embroidered jack-o-lantern smile, which gives it more of a classic Halloween vibe. If you want to make it more realistic as a rabbit, you could add some pink felt to the inner ears and give it a fluffy cotton tail on the back.
The bobble stitches are perfect for customization too! I've added extra bobbles to create more defined pumpkin segments, or worked them in different shades of orange and brown for a gradient effect. Some crafters even add a small green leaf or tendril near the stem using the green yarn for extra autumn charm.
If you're making this for a child, consider using embroidered features instead of safety eyes for added security. You could also make the bunny slightly larger by using a bulkier yarn weight and bigger hook, though you'll need to adjust your stuffing accordingly to maintain that adorable chubby shape!
Common Mistakes & How to Fix Them
✗ Forgetting to work in back loops only for the ribbed pumpkin texture can result in a smooth body without characteristic pumpkin ridges
✗ Not stretching the work sideways after completing the body rounds will leave your pumpkin looking too tall and narrow instead of round
✗ Placing safety eyes too close together or at the wrong rounds can throw off the bunny's facial proportions and expression
✗ Insufficient stuffing before closing the body will cause your pumpkin bunny to look flat and lose its appealing plump shape
✗ Skipping the bobble stitches or working them too loosely will eliminate the decorative pumpkin segment details that make this design special