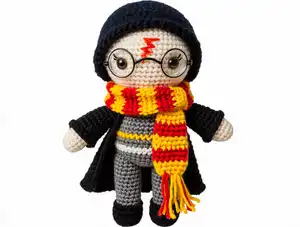
Bring the magic of Hogwarts to life with this enchanting Harry Potter amigurumi pattern that creates an adorable 30cm wizard complete with iconic glasses, lightning bolt scar, and Gryffindor colors. This detailed pattern guides you through crafting Harry from head to toe, including his signature black hair, round spectacles, striped Gryffindor scarf, and flowing black cloak. Perfect for Harry Potter fans and crochet enthusiasts alike, this pattern offers clear instructions with multiple size options depending on your yarn and hook choices. Whether you're making this magical companion for yourself or as a gift for a fellow Potterhead, you'll love watching the Boy Who Lived take shape stitch by stitch.
Progress Tracker
0% Complete
— Arms (Make 2) :
Info :
Using flesh coloured yarn
Round 1 :
4 sc into magic ring (4)
Rounds 3-4 :
8 sc (2 rounds)
Info :
Change to light grey coloured yarn
Rounds 7-14 :
8 sc (8 rounds)
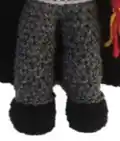
— Body Starting at Feet :
Infos :
Stuff as you go. Using black coloured yarn for legs
Round 1 :
6 sc into magic ring (6)
Round 3 :
(3 sc, 3 inc) 2 times (18)
Round 6 :
2 sc, 7 dec, 2 sc (11)
Info :
Change to dark grey coloured yarn
Round 9-18 :
11 sc (10 rounds)
Info :
Fasten off. Make second leg, but do not fasten off
Info :
If you are not already at the side of leg with foot facing forward, sc until there. Chain 1 stitch
— Body :
Round 1 :
11 sc around leg that you fastened off (so legs are then attached to each other), 1 sc in ch, 11 sc around second leg, 1 sc in ch (24)
Round 2 :
10 sc, dec, 10 sc, dec (22)
Info :
sc until at centre of back. Change to light grey coloured yarn
Info :
Change to yellow coloured yarn
Info :
Change to light grey coloured yarn
Round 7-8 :
22 sc (2 rounds)
Round 9 :
5 sc, 1 dec, 9 sc, 1 dec, 4 sc (20)
Round 10-11 :
20 sc (2 rounds)
Info :
Sc to side of body with feet facing forward if not already there
Round 12 :
8 sc around arm, 10 sc on body, 8 sc around other arm, 10 sc on body (36)
Round 13 :
(1 sc, 1 dec) x 12 (24)
Info :
Change to flesh coloured yarn
Round 19-26 :
48 sc (8 rounds)
Info :
Place safety eyes between rounds 24 and 25, making sure they are centre on face and 8 stitches apart
Round 27 :
(6 sc, 1 dec) x 6 (42)
Round 28 :
(5 sc, 1 dec) x 6 (36)
Round 29 :
(4 sc, 1 dec) x 6 (30)
Round 30 :
(3 sc, 1 dec) x 6 (24)
Round 31 :
(2 sc, 1 dec) x 6 (18)
Round 32 :
(1 sc, 1 dec) x 6 (12)
Info :
Fasten off, gather around fasten off stitches and pull tight to close hole at top of head
— Hair :
Info :
Using black coloured yarn
Round 1 :
7 sc into magic ring
Round 3 :
(1 sc, 1 inc) (21)
Round 4 :
(2 sc, 1 inc) (28)
Round 5 :
(3 sc, 1 inc) (35)
Round 6 :
(4 sc, 1 inc) (42)
Round 7 :
(5 sc, 1 inc) (49)
Rounds 8-13 :
49 sc (6 rounds)
Round 14 :
(1 sc, 1 dc, 1 dc, 1 tr, 1 dc, 1 dc, 1 sc) x 7
Infos :
Fasten off. Pin hair to head and then sew into place. Using red yarn, embroider lightning bolt scar on forehead. Working around posts of yellow stitches on jersey, 20 sl stitches in red
— Scarf :
Info :
Using red coloured yarn
Round 1 :
8 ch and join in a loop
Rounds 2-5 :
8 sc (4 rounds)
Info :
Using yellow coloured yarn
Rounds 6-9 :
8 sc (4 rounds)
Info :
Using red coloured yarn
Round 10-13 :
8 sc (4 rounds)
Info :
Repeat the previous 8 rounds until you have 13 stripes in total. Fasten off. Fold scarf flat, sew together cast on stitches, sew together cast off stitches. Cut eight 10 cm lengths of yellow yarn and eight 10 cm lengths of red yarn. Using one length of red and one length of yellow, fold lengths in half, draw loop through scarf and then pull cut ends through loop
— Cloak :
Sleeves (Make Two) :
Using black colour yarn
Round 1 :
12 ch and join in a loop
Rounds 2-11 :
12 sc (10 rounds)
Main Body of Cloak :
Using black coloured yarn
Row 2 :
starting in second chain from hook 20 sc
Row 3-24 :
1 ch, starting in second chain from hook 20 sc (22 rows)
Row 25 :
1 ch 5 sc, 12 sc around arm, 10 sc, 12 sc around other arm, 5 sc (44)
Row 26 :
1 ch, 22 dec (22)
Row 27-28 :
1 ch, 22 sc (2 rounds)
Row 29 :
1 ch, 11 dec (11)
Info :
Fasten off. Weave in yarn ends
This magical Harry Potter amigurumi pattern lets you create your very own Boy Who Lived, complete with every detail that makes him instantly recognizable to fans worldwide. From his messy black hair and lightning bolt scar to his round glasses, Gryffindor scarf, and flowing wizard's cloak, this pattern captures Harry's essence perfectly. Whether you're crafting him for your own collection, as a gift for a Potterhead friend, or to inspire young readers, this little wizard will bring a touch of Hogwarts magic into your home. The pattern's clear instructions and detailed construction make the process enjoyable from start to finish. Happy crocheting, and may your stitches be as magical as the wizarding world itself! 🧙♂️⚡✨