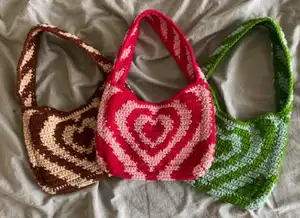
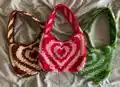
Create your own adorable heart-shaped shoulder bag inspired by the iconic Powerpuff Girls aesthetic! This charming accessory combines tapestry crochet techniques with vibrant color-blocking to bring a playful heart design to life. Perfect for everyday use or as a statement piece, this bag features a comfortable strap and spacious interior. Whether you're heading out for a casual day or want to add some nostalgic charm to your outfit, this pattern guides you through creating a functional and eye-catching accessory that's sure to turn heads.
Progress Tracker
0% Complete
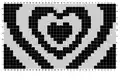
— Part 1A: Creating the rectangular portion of the main body
Setup :
Begin by chaining 37 in C1
ROW 1 :
7 scs in C1, change colour, 5 scs in C2, change colour, 4 scs in C1, change colour, 4 scs in C2, change colour, 4 scs in C1, change colour, 5 scs in C2, change colour, 7 scs in C1. Ch1 and turn your work.
ROW 2 :
6 scs in C1, change colour, 5 scs in C2, change colour, 4 scs in C1, change colour, 6 scs in C2, change colour, 4 scs in C1, change colour, 5 scs in C2, change colour, 6 scs in C1. Ch1 and turn your work.
ROW 3 :
5 scs in C1, change colour, 5 scs in C2, change colour, 4 scs in C1, change colour, 8 scs in C2, change colour, 4 scs in C1, change colour, 5 scs in C2, change colour, 5 scs in C1. Ch1 and turn your work.
ROW 4 :
4 scs in C1, change colour, 5 scs in C2, change colour, 4 scs in C1, change colour, 4 scs in C2, change colour, 2 scs in C1, change colour, 4 scs in C2, change colour, 4 scs in C1, change colour, 5 scs in C2, change colour, 4 scs in C1. Ch1 and turn your work.
ROW 5 :
3 scs in C1, change colour, 5 scs in C2, change colour, 4 scs in C1, change colour, 4 scs in C2, change colour, 4 scs in C1, change colour, 4 scs in C2, change colour, 4 scs in C1, change colour, 5 scs in C2, change colour, 3 scs in C1. Ch1 and turn your work.
ROW 6 :
3 scs in C1, change colour, 4 scs in C2, change colour, 4 scs in C1, change colour, 3 scs in C2, change colour, 8 scs in C1, change colour, 3 scs in C2, change colour, 4 scs in C1, change colour, 4 scs in C2, change colour, 3 scs in C1. Ch1 and turn your work.
ROW 7 :
2 scs in C1, change colour, 4 scs in C2, change colour, 4 scs in C1, change colour, 3 scs in C2, change colour, 4 scs in C1, change colour, 2 scs in C2, change colour, 4 scs in C1, change colour, 3 scs in C2, change colour, 4 scs in C1, change colour, 4 scs in C2, change colour, 2 scs in C1. Ch1 and turn your work.
ROW 8 :
1 sc in C1, change colour, 4 scs in C2, change colour, 4 scs in C1, change colour, 3 scs in C2, change colour, 3 scs in C1, change colour, 6 scs in C2, change colour, 3 scs in C1, change colour, 3 scs in C2, change colour, 4 scs in C1, change colour, 4 scs in C2, change colour, 1 sc in C1. Change colour, ch1 and turn your work.
ROW 9 :
4 scs in C2, change colour, 4 scs in C1, change colour, 3 scs in C2, change colour, 3 scs in C1, change colour, 3 scs in C2, change colour, 2 scs in C1, change colour, 3 scs in C2, change colour, 3 scs in C1, change colour, 3 scs in C2, change colour, 4 scs in C1, change colour, 4 scs in C2. Ch1 and turn your work.
ROW 10 :
3 scs in C2, change colour, 4 scs in C1, change colour, 4 scs in C2, change colour, 2 scs in C1, change colour, 3 scs in C2, change colour, 4 scs in C1, change colour, 3 scs in C2, change colour, 2 scs in C1, change colour, 4 scs in C2, change colour, 4 scs in C1, change colour, 3 scs in C2. Ch1 and turn your work.
ROW 11 :
3 scs in C2, change colour, 3 scs in C1, change colour, 4 scs in C2, change colour, 3 scs in C1, change colour, 2 scs in C2, change colour, 6 scs in C1, change colour, 2 scs in C2, change colour, 3 scs in C1, change colour, 4 scs in C2, change colour, 3 scs in C1, change colour, 3 scs in C2. Ch1 and turn your work.
ROW 12 :
2 scs in C2, change colour, 4 scs in C1, change colour, 3 scs in C2, change colour, 3 scs in C1, change colour, 2 scs in C2, change colour, 8 scs in C1, change colour, 2 scs in C2, change colour, 3 scs in C1, change colour, 3 scs in C2, change colour, 4 scs in C1, change colour, 2 scs in C2. Ch1 and turn your work.
ROW 13 :
2 scs in C2, change colour, 3 scs in C1, change colour, 4 scs in C2, change colour, 2 scs in C1, change colour, 3 scs in C2, change colour, 8 scs in C1, change colour, 3 scs in C2, change colour, 2 scs in C1, change colour, 4 scs in C2, change colour, 3 scs in C1, change colour, 2 scs in C2. Ch1 and turn your work.
ROW 14 :
1 sc in C2, change colour, 4 scs in C1, change colour, 3 scs in C2, change colour, 3 scs in C1, change colour, 3 scs in C2, change colour, 8 scs in C1, change colour, 3 scs in C2, change colour, 3 scs in C1, change colour, 3 scs in C2, change colour, 4 scs in C1, change colour, 1 sc in C2. Ch1 and turn your work.
ROW 15 :
1 sc in C2, change colour, 3 scs in C1, change colour, 4 scs in C2, change colour, 3 scs in C1, change colour, 4 scs in C2, change colour, 2 scs in C1, change colour, 2 scs in C2, change colour, 2 scs in C1, change colour, 4 scs in C2, change colour, 3 scs in C1, change colour, 4 scs in C2, change colour, 3 scs in C1, change colour, 1 sc in C2. Change colour, ch1 and turn your work.
ROW 16 :
4 scs in C1, change colour, 4 scs in C2, change colour, 3 scs in C1, change colour, 14 scs in C2, change colour, 3 scs in C1, change colour, 4 scs in C2, change colour, 4 scs in C1. Ch1 and turn your work.
ROW 17 :
4 scs in C1, change colour, 4 scs in C2, change colour, 4 scs in C1, change colour, 5 scs in C2, change colour, 2 scs in C1, change colour, 5 scs in C2, change colour, 4 scs in C1, change colour, 4 scs in C2, change colour, 4 scs in C1. Ch1 and turn your work.
ROW 18 :
4 scs in C1, change colour, 5 scs in C2, change colour, 5 scs in C1, change colour, 2 scs in C2, change colour, 5 scs in C1, change colour, 2 scs in C2, change colour, 4 scs in C1, change colour, 5 scs in C2, change colour, 4 scs in C1. Ch1 and turn your work.
ROW 19 :
4 scs in C1, change colour, 5 scs in C2, change colour, 8 scs in C1, change colour, 2 scs in C2, change colour, 8 scs in C1, change colour, 5 scs in C2, change colour, 4 scs in C1. Ch1 and turn your work.
ROW 20 :
5 scs in C1, change colour, 5 scs in C2, change colour, 6 scs in C1, change colour, 4 scs in C2, change colour, 6 scs in C1, change colour, 5 scs in C2, change colour, 5 scs in C1. Ch1 and turn your work.
ROW 21 :
6 scs in C1, change colour, 24 scs in C2, change colour, 6 scs in C1. Ch1 and turn your work - move onto part 1B.
— Part 1B: Making decreasing top section on first side
ROW 22 :
6 scs in C1, change colour, 6 scs in C2. Ch1 and turn your work.
ROW 23 :
Sk 1 st, 3 scs in C2, change colour, 7 scs in C1, change colour, 1 sc in C2. Ch1 and turn your work.
ROW 24 :
1 sc in C2, change colour, 7 scs in C1, sk 2 sts, 1 sc in C1. Ch1 and turn your work.
ROW 25 :
Sk 1 st, 6 scs in C1, change colour, 2 scs in C2. Ch1 and turn your work.
ROW 26 :
3 scs in C2, change colour, 2 scs in C1, sk 2 sts, 1 sc in C1. Change colour, ch1 and turn your work.
ROW 27 :
Sk 1 st, 5 scs in C2. Ch1 and fasten off.
— Part 1C: Making decreasing top section on other side
Info :
Attach your yarn in C1 to the other corner of your main body, ch1 and repeat ROW 22 - ROW 27 from part 1B. One side of the main body of your bag is now complete. Repeat all the steps above one more time to create the other side of your bag.
— Part 2: Creating the base/bottom of the bag
Setup :
Begin by chaining 37 in C2
ROW 1 :
1 sc in C2, change colour, 7 sc in C1, change colour, 5 sc in C2, change colour, 4 sc in C1, change colour, 2 sc in C2, change colour, 4 sc in C1, change colour, 5 sc in C2, change colour, 7 sc in C1, change colour, 1 sc in C2. Ch1 and turn your work.
ROW 2 :
2 sc in C2, change colour, 8 sc in C1, change colour, 5 sc in C2, change colour, 6 sc in C1, change colour, 5 sc in C2, change colour, 8 sc in C1, change colour, 2 sc in C2. Ch1 and turn your work.
ROW 3 :
3 sc in C2, change colour, 8 sc in C1, change colour, 5 sc in C2, change colour, 4 sc in C1, change colour, 5 sc in C2, change colour, 8 sc in C1, change colour, 3 sc in C2. Ch1 and turn your work.
ROW 4 :
3 sc in C2, change colour, 8 sc in C1, change colour, 5 sc in C2, change colour, 4 sc in C1, change colour, 5 sc in C2, change colour, 8 sc in C1, change colour, 3 sc in C2. Ch1 and turn your work.
ROW 5 :
2 sc in C2, change colour, 8 sc in C1, change colour, 5 sc in C2, change colour, 6 sc in C1, change colour, 5 sc in C2, change colour, 8 sc in C1, change colour, 2 sc in C2. Ch1 and turn your work.
ROW 6 :
1 sc in C2, change colour, 7 sc in C1, change colour, 5 sc in C2, change colour, 4 sc in C1, change colour, 2 sc in C2, change colour, 4 sc in C1, change colour, 5 sc in C2, change colour, 7 sc in C1, change colour, 1 sc in C2. Ch1 and fasten off - the base of your bag is now complete.
— Part 3A: The first 27 rows of the strap
Setup :
Begin by chaining 9 in C1
ROW 1 - ROW 2 :
1 sc in C1, change colour, 6 scs in C2, change colour, 1 sc in C1. Ch1 and turn your work.
ROW 3 - ROW 4 :
2 scs in C1, change colour, 4 scs in C2, change colour, 2 scs in C1. Ch1 and turn your work.
ROW 5 - ROW 7 :
3 scs in C1, change colour, 2 scs in C2, change colour, 3 scs in C1. Ch1 and turn your work.
ROW 8 :
3 scs in C1, change colour, 2 scs in C2, change colour, 3 scs in C1. Change colour, ch1 and turn your work.
ROW 9 :
1 sc in C2, change colour, 6 scs in C1, change colour, 1 sc in C2. Ch1 and turn your work.
ROW 10 :
2 scs in C2, change colour, 4 scs in C1, change colour, 2 scs in C2. Ch1 and turn your work.
ROW 11 - 25 :
3 scs in C2, change colour, 2 scs in C1, change colour, 3 scs in C2. Ch1 and turn your work.
ROW 26 :
2 scs in C2, change colour, 4 scs in C1, change colour, 2 scs in C2. Ch1 and turn your work.
ROW 27 :
1 sc in C2, change colour, 6 scs in C1, change colour, 1 sc in C2. Change colour, ch1 and turn your work (do NOT fasten off - move onto part 3B). If you'd like, add a stitch marker to mark this row.
— Part 3B: The middle 57 (or more) rows of the strap
ROW 1 :
2 scs in C1, change colour, 4 scs in C2, change colour, 2 scs in C1. Ch1 and turn your work.
ROW 2 :
3 scs in C1, change colour, 4 scs in C2, change colour, 1 sc in C1. Change colour, ch1 and turn your work.
ROW 3 :
4 scs in C2, change colour, 4 scs in C1. Change colour, ch1 and turn your work.
ROW 4 :
1 sc in C2, change colour, 4 scs in C1, change colour, 3 scs in C2. Ch1 and turn your work.
ROW 5 :
2 scs in C2, change colour, 4 scs in C1, change colour, 2 scs in C2. Ch1 and turn your work.
ROW 6 :
3 scs in C2, change colour, 4 scs in C1, change colour, 1 sc in C2. Change colour, ch1 and turn your work.
ROW 7 :
4 scs in C1, change colour, 4 scs in C2. Change colour, ch1 and turn your work.
ROW 8 :
1 sc in C1, change colour, 4 scs in C2, change colour, 3 scs in C1. Ch1 and turn your work.
ROW 9 - ROW 56 :
Repeat ROW 1 - ROW 8 six more times, for a total of 7 sets. If you'd like a longer strap, feel free to repeat these rows as many times as you'd like.
ROW 57 :
2 scs in C1, change colour, 4 scs in C2, change colour, 2 scs in C1. Change colour, ch1 and turn your work.
— Part 3C: The last 27 rows of the strap
ROW 1 :
1 sc in C2, change colour, 6 scs in C1, change colour, 1 sc in C2. Ch1 and turn your work. If you'd like, add a stitch marker to mark this row.
ROW 2 :
2 scs in C2, change colour, 4 scs in C1, change colour, 2 scs in C2. Ch1 and turn your work.
ROW 3 - ROW 17 :
3 scs in C2, change colour, 2 scs in C1, change colour, 3 scs in C2. Ch1 and turn your work.
ROW 18 :
2 scs in C2, change colour, 4 scs in C1, change colour, 2 scs in C2. Ch1 and turn your work.
ROW 19 :
1 sc in C2, change colour, 6 scs in C1, change colour, 1 sc in C2. Change colour, ch1 and turn your work.
ROW 20 - ROW 23 :
3 scs in C1, change colour, 2 scs in C2, change colour, 3 scs in C1. Ch1 and turn your work.
ROW 24 - ROW 25 :
2 scs in C1, change colour, 4 scs in C2, change colour, 2 scs in C1. Ch1 and turn your work.
ROW 26 - ROW 27 :
1 sc in C1, change colour, 6 scs in C2, change colour, 1 sc in C1. Ch1 and fasten off - your strap is now complete.
— Part 4: Attaching the pieces of the bag together
Step 1 :
Align the base of the bag and one side of the main body. Attach yarn in C1 through the corner of both pieces, and ch1. Place scs through both layers to attach the two pieces. You can change colours in line with the base pattern or use C1 throughout. Ch1 and fasten off when complete.
Step 2 :
Repeat the previous step to attach the other side of the bag to the base.
Step 3 :
Attach the base of the strap to the base of the bag. Attach yarn in C2 through both corners and ch1. Place scs in C2 through both layers, keeping it straight and aligned. Ch1 and fasten off.
Step 4 :
Attach one side of the strap to one side of the main body by attaching yarn in C1 through the bottom corner. Place scs through both layers, aligning the top of the bag to the 27th row of the strap (stitch marker location). Ch1 and fasten off.
Step 5 :
Repeat the previous step to attach the strap to the other side of the main body, ensuring the strap is not twisted.
Step 6 :
Repeat all attachment steps to secure the strap to the other side of the bag completely.
Step 7 :
Turn the bag inside out to hide all seams where pieces were attached together.
— Part 5: Adding the final edging
Step 1 :
Attach yarn in C1 at the top corner of one side of the bag and ch1. Place scs in C1 all along the top of the bag and along one side of the strap. When you reach the first sc again, ss into it, ch1 and fasten off.
Step 2 :
Repeat the previous step to add trim to the other side of your bag. Your powerpuff heart shoulder bag is now complete!
This Powerpuff Heart Shoulder Bag pattern brings nostalgic cartoon vibes into a functional everyday accessory! Combining tapestry crochet techniques with thoughtful construction, you'll create a bag that's both adorable and practical. The detailed instructions guide you through color changes, assembly, and finishing touches to achieve professional-looking results. Whether you're treating yourself or making a special gift, this pattern delivers a unique piece that celebrates your crochet skills and love for playful design. 🧶💕 Happy crocheting! ✨