🧢 Beautiful ✨ Detailed πŸ’ Adorable

Santa Christmas Cat Amigurumi Pattern

Santa Christmas Cat Amigurumi Pattern
4.0β˜… Rating
6-8 Hours Time Needed
1.3K Made This
βœ‚οΈ

Intermediate Level

Ideal for those with basic knitting experience, featuring slightly more advanced stitches and techniques to expand your skills.

⏱️

Weekend Treat

Takes 5-7 hours, making it an enjoyable project to finish over a couple of days.

πŸŽ„

Holiday Cheer

Festive fun for the season, bringing handmade magic to celebrations and creating new family traditions.

About This Santa Christmas Cat Amigurumi Pattern

Santa Christmas Cat Amigurumi Pattern crochet pattern - detailed view of completed project

With color changes between red, white, beige, and brown yarns, this pattern teaches valuable techniques while creating a stunning holiday decoration. The detailed instructions guide you through creating realistic cat ears, expressive safety eyes placement, and perfectly proportioned limbs.

Why You'll Love This Santa Christmas Cat Amigurumi Pattern

I'm absolutely enchanted by how this pattern combines two of my favorite things - cats and Christmas! The genius of dressing a sweet little cat in a full Santa outfit is just too adorable for words. What I really appreciate is how the pattern breaks down that gorgeous beard into manageable rows - those scalloped edges look incredibly complex but the instructions make them totally achievable. The color blocking with the red Santa suit and brown paws creates such a polished, professional look that people won't believe you made it yourself. I love the attention to detail with the black belt accent and the fact that the pattern includes that darling gift sack - it's not just a cat in a hat, it's a complete Santa character! The sport weight yarn creates a nice sturdy fabric that holds its shape beautifully, perfect for a decoration that will be brought out year after year. The seamless leg joining technique is so clever and creates such a clean look. Plus, working the tail separately and sewing it on gives you total control over the positioning for that perfect cat posture!

Santa Christmas Cat Amigurumi Pattern step 1 - construction progress Santa Christmas Cat Amigurumi Pattern step 2 - assembly progress Santa Christmas Cat Amigurumi Pattern step 3 - details and accessories Santa Christmas Cat Amigurumi Pattern step 4 - final assembly and finishing

Switch Things Up

I love creating different holiday character variations of this adorable cat pattern! Instead of the traditional Santa outfit, I've made an elf version by keeping the red and white theme but adding pointed ears and swapping the Santa hat for an elf hat with a curled tip. For a Mrs. Claus version, I work the body in red like Santa but add a white apron overlay and replace the beard with a little granny bun on top of the head.

The color possibilities are endless - I've created a gingerbread cat using brown yarn for the body with white icing-style decorative stitches, and even a snowman cat that's all white with a carrot nose and coal button eyes. For Hanukkah celebrations, blue and white color blocking with a tiny crocheted menorah accessory makes this pattern perfectly adaptable.

I sometimes skip the full Santa suit and just add holiday accessories - a simple red and green striped scarf, a tiny wreath collar, or jingle bell earrings sewn to the ears. The gift sack can be modified too: I've made it in different colors, added embroidered snowflakes or stars, or even created multiple mini sacks in various sizes. For a more elegant look, I've worked the entire pattern in metallic gold or silver yarn with the Santa hat in deep burgundy.

The beard is another element I love experimenting with - making it shorter and rounder for a different Santa style, or adding tiny seed beads throughout for a frosty, icy effect. You could even work the beard in a different stitch pattern entirely, like a simple ruffle edge or looped fringe for a shaggier look!

Common Mistakes & How to Fix Them

βœ— Forgetting to make the seamless leg joint with the two chains between legs, resulting in an awkward gap in the body construction βœ— Not changing colors at the correct rounds, especially the black belt detail, which throws off the entire Santa suit appearance completely βœ— Rushing through the beard pattern rows without carefully counting the skip stitches and slip stitches, creating an uneven scalloped edge βœ— Attaching the ears at the wrong rounds on the head, making them appear too high or too low for proper cat proportions

Santa Christmas Cat Amigurumi Pattern

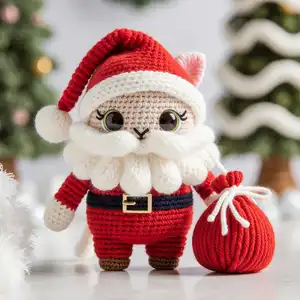
Create the most adorable Santa Cat amigurumi perfect for your holiday decorations! This festive feline comes dressed in a classic red Santa suit with black belt details, complete with a fluffy white beard and jolly Santa hat topped with a pompom. The pattern includes a charming gift sack accessory that adds extra holiday magic to this cheerful Christmas companion. With sport weight yarn and a 2.5mm hook, you'll craft a detailed and delightful cat character that captures the spirit of the season. Perfect for gifting to cat lovers or displaying as part of your handmade holiday dΓ©cor collection!

Intermediate 6-8 Hours

Materials Needed for Santa Christmas Cat Amigurumi Pattern

β€” Main Fabric

  • 01
    Sport weight (Fine 2) yarn in white color
  • 02
    Sport weight (Fine 2) yarn in brown color
  • 03
    Sport weight (Fine 2) yarn in red color
  • 04
    Sport weight (Fine 2) yarn in beige color
  • 05
    Sport weight (Fine 2) yarn in pink color
  • 06
    Sport weight (Fine 2) yarn in black color

β€” Tools Required

  • 01
    Crochet hook 2.5mm (C)
  • 02
    Safety eyes 12-15mm
  • 03
    Stitch markers
  • 04
    Sewing needle
  • 05
    Scissors
  • 06
    Hot glue gun
  • 07
    Fiberfill stuffing
  • 08
    White pompom ball 10-15mm for hat

Progress Tracker

0% Complete

β€” Legs (Make 2) :

Info :

Begin with brown yarn. Join rounds with slip stitch

Row 1 :

6SC in MR (6)

Row 2 :

6INC (12)

Row 3 :

(2SC, INC) 4 times (16)

Row 4 :

16SC (16)

Row 5-6 :

Change to red yarn, 16SC (16)

Info :

Cut yarn. Make one more leg until row 6 but DO NOT cut yarn

β€” Body :

Info :

Begin with red yarn. Make chain 2 for seamless leg joint

Row 1 :

16SC of first leg, 2SC of chain, 16SC of second leg, 2SC on back bump of chains between 2 legs (36)

Row 2 :

(5SC, INC) 6 times (42)

Row 3 :

(6SC, INC) 6 times (48)

Row 4-5 :

48SC (48)

Row 6-7 :

Change to black yarn, 48SC (48)

Row 8-9 :

Change to red yarn, 48SC (48)

Row 10 :

(4SC, DEC) 8 times (40)

Row 11-12 :

40SC (40)

Row 13 :

(3SC, DEC) 8 times (32)

Row 14 :

32SC (32)

Row 15 :

(2SC, DEC) 8 times (24)

Row 16 :

24SC (24)

Info :

Stuff body. Fasten off and cut yarn

β€” Arms (Make 2) :

Info :

Begin with white yarn. Join rounds with slip stitch

Row 1 :

6SC in MR (6)

Row 2 :

(SC, INC) 3 times (9)

Row 3-4 :

9SC (9)

Row 5-9 :

Change to red yarn, 9SC (9)

Info :

Fasten off and cut yarn leaving long tail for sewing. Sew two edges together

β€” Tail :

Info :

Use beige yarn

Row 1 :

6SC in MR (6)

Row 2-15 :

6SC (6)

Info :

Fasten off and cut yarn. Sew tail to body at R6-7

β€” Head :

Info :

Use beige yarn

Row 1 :

8SC in MR (8)

Row 2 :

8INC (16)

Row 3 :

(SC, INC) 8 times (24)

Row 4 :

(2SC, INC) 8 times (32)

Row 5 :

32SC (32)

Row 6 :

(7SC, INC) 4 times (36)

Row 7 :

(5SC, INC) 6 times (42)

Row 8 :

(6SC, INC) 6 times (48)

Row 9-17 :

48SC (48)

Row 18 :

(4SC, DEC) 8 times (40)

Row 19 :

(3SC, DEC) 8 times (32)

Row 20 :

(2SC, DEC) 8 times (24)

Info :

Stuff head. Fasten off and cut yarn leaving long tail for sewing

β€” Ears (Make 2) :

Info :

Begin with beige yarn

Row 1 :

6SC in MR (6)

Row 2 :

(SC, INC) 3 times (9)

Row 3 :

2SC, INC, 2SC, INC, 2SC, INC (12)

Row 4 :

3SC, INC, 3SC, INC, 3SC, INC (15)

Row 5 :

4SC, INC, 4SC, INC, 4SC, INC (18)

Info :

Fasten off and cut yarn. Sew two edges together and attach ears to head at R4-9

β€” Beard :

Info :

Use white yarn

Row 1 :

Make 23 chains. Start in 3rd stitch from hook: 21DC

Row 2 :

2CH and turn, 21DC

Row 3 :

2CH and turn, skip 1 stitch, SLST, (2CH, skip 1 stitch, SLST) 9 times

Row 4 :

(CH and turn SC, 3DC, SC) in one st, (SC, 3DC, SC) 9 times, 2CH, SLST in row 2

Row 5 :

2CH and turn, skip 1 stitch, SLST, (2CH, skip 1 stitch, SLST) 8 times

Row 6 :

(CH and turn SC, 3DC, SC) in one st, (SC, 3DC, SC) 9 times, 2CH, SLST in row 1

Row 7 :

2CH and turn, skip 1 stitch, SLST, (2CH, skip 1 stitch, SLST) 9 times

Row 8 :

(CH and turn SC, 3DC, SC) in one st, (SC, 3DC, SC) 9 times, SLST

Info :

Fasten off leaving long tail for sewing at R11

β€” Santa's Sack :

Info :

Use red yarn. Join rounds with slip stitch

Row 1 :

6SC in MR (6)

Row 2 :

6INC (12)

Row 3 :

(SC, INC) 6 times (18)

Row 4 :

(2SC, INC) 6 times (24)

Row 5 :

(3SC, INC) 6 times (30)

Row 6 :

30SC (30)

Row 7 :

(4SC, INC) 6 times (36)

Row 8 :

(5SC, INC) 6 times (42)

Row 9-11 :

42SC (42)

Row 12 :

(5SC, DEC) 6 times (36)

Row 13-14 :

36SC (36)

Row 15 :

(4SC, DEC) 6 times (30)

Row 16-17 :

30SC (30)

Row 18 :

15DEC (15)

Row 19 :

(SC, CH, Skip 1 stitch) Repeat to end (15)

Row 20 :

2CH, (15HDC-INC) 6 times (30)

Row 21 :

2CH, 30HDC (30)

Info :

Stuff sack. Fasten off and cut yarn. Make 20 chains with white yarn and sew chains to pocket in CH of R19

β€” Santa's Hat :

Info :

Begin with red yarn. Join rounds with slip stitch

Row 1 :

6DC in MR (6)

Row 2 :

2CH, 6DC (6)

Row 3 :

2CH, (2DC, INC) 2 times (8)

Row 4 :

2CH, (DC, INC) 4 times (12)

Row 5 :

2CH, (2DC, INC) 4 times (16)

Row 6 :

2CH, (DC, INC) 8 times (24)

Row 7 :

2CH, (2DC, INC) 8 times (32)

Row 8 :

2CH, (7DC, INC) 4 times (36)

Row 9-12 :

Cut red yarn and change to white yarn. CH, 36SC (36)

Info :

Fasten off leaving long tail for sewing. Attach pompom ball 10-15mm white to hat. Sew hat to head at R16-19

Assembly Instructions

  • Sew the head to the body using the long tail, ensuring proper alignment and secure attachment for stability.
  • Attach the arms to the body at round 19 of the head, positioning them slightly forward for natural cat posture.
  • Place and secure safety eyes at rounds 11-12 of the head with 7 stitches apart for proper facial proportions.
  • Sew the beard to the front of the head at round 11, centering it below where the eyes will be placed.
  • Attach the Santa hat to the top of the head at rounds 16-19, slightly tilted for character and charm.
  • Position and sew the tail to the back of the body at rounds 6-7 for proper cat tail placement.
  • Sew or embroider facial features following the pattern photo guide for authentic cat expression and personality.

Important Notes

  • πŸ’‘Use stitch markers to track rounds especially during color changes between red, black, and white sections
  • πŸ’‘Join all leg and body rounds with slip stitches as indicated to maintain proper shape and structure
  • πŸ’‘Make the seamless leg joint carefully with the chain 2 connection to prevent gaps in the body construction
  • πŸ’‘Stuff body and head firmly but not too tightly to maintain the cat's soft, cuddly appearance and proportions
  • πŸ’‘Work the beard pattern rows carefully, counting skip stitches precisely to achieve even scalloped edges throughout
  • πŸ’‘Attach white pompom securely to hat tip using hot glue gun or strong thread for durability

This Santa Christmas Cat amigurumi is pure holiday magic wrapped in yarn! Combining adorable feline features with classic Santa Claus styling, this pattern creates a festive decoration that cat lovers will treasure for years. The detailed white beard with its beautiful scalloped edges, the perfectly proportioned Santa suit with black belt accent, and the charming gift sack accessory make this more than just an amigurumi - it's a complete Christmas character that brings joy to any holiday display. Whether you're decorating your own home or creating special gifts, this Santa Cat captures the whimsy and warmth of the season. Happy crocheting and happy holidays! πŸŽ…πŸ±βœ¨

You ask,

we answer.

FAQs

What size will the finished Santa Cat be?

Using sport weight yarn and a 2.5mm hook as specified, your Santa Cat will be approximately 6-8 inches tall depending on your tension and how firmly you stuff it. The proportions are designed to create a balanced, sitting cat pose.

Can I use different yarn weights for this pattern?

While the pattern is designed for sport weight yarn, you can use DK or worsted weight with a larger hook (3.5-4mm) for a bigger cat. Just maintain the same gauge ratio and your finished piece will be proportionally larger but equally adorable.

How do I make the seamless leg joint?

After completing both legs, chain 2 from the second leg, then work single crochet around the first leg, continue across the chain, work around the second leg, and work back along the other side of the chain. This creates a smooth connection without visible gaps.

Is the beard pattern difficult?

The beard uses a scalloped shell pattern that looks complex but is quite manageable once you understand the rhythm. It's worked in rows with strategic slip stitches and shell stitches (SC, 3DC, SC groupings). Take it slowly and count carefully for best results.

Do I need to make the gift sack?

The gift sack is optional but adds wonderful character to your Santa Cat! It's a fun extra detail that makes the project more complete. If you're short on time, the cat looks great without it, and you can always add it later.

How do I attach the safety eyes securely?

Insert the eyes between rounds 11-12 with 7 stitches between them before you finish decreasing and closing the head. Push the eye post through from the right side, then secure the washer from the inside, pushing it on firmly until you hear it click.

Can I make this pattern without color changes?

While the color changes create the Santa suit effect, you could make a solid-colored cat and add the Santa hat and beard separately. However, the red suit with black belt detail is what makes this distinctly a Santa Cat, so the color work is recommended.