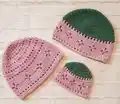
Create an adorable vintage-inspired baby beanie featuring beautiful diamond flower motifs with this comprehensive crochet pattern. Perfect for gifting or creating a treasured keepsake for your little one, this beanie combines classic elegance with modern technique. The pattern includes three stunning variations - Sweet and Simple, Twice as Nice, and Matchy Mummy - plus bonus Itty Bitty and Titchy preemie sizes. With detailed instructions and special stitch guidance, you'll craft a timeless piece that showcases intricate diamond patterns while remaining wonderfully soft and comfortable for baby's delicate skin.
Progress Tracker
0% Complete
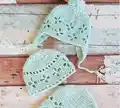
— Vintage Vibes Sweet & Simple Baby Beanie:
Round 1 - Make a circle:
With first color yarn make a closed circle using either magic circle or 3-4 Ch and then SlSt into first Ch. Ch 2, then DC 11 times into circle. (If using magic circle, now pull taut.) SlSt into first DC (skip 2 Ch) to close circle. (Stitch Count: 11 DC excluding beginning 2 Ch)
Round 2 - Double the stitch count:
To commence the round, StndSt in first DC from previous round. DC in the same stitch that the StndSt was made. 2 DC in each of the remaining stitches around. SlSt into the StndSt from Step 1. (Stitch Count: 22 DC)
Round 3 - Increase in every second stitch:
To commence the round, StndSt in StndSt from previous round. 2 DC in the next stitch. DC in the next stitch. 2 DC in the next stitch. Repeat last two steps nine times. SlSt into the StndSt from Step 1. (Stitch Count: 33 DC)
Round 4 - Increase in every third stitch:
To commence the round, StndSt in StndSt from previous round. DC in the next stitch. 2 DC in the next stitch. DC in each of the next two stitches. 2 DC in the next stitch. Repeat last two steps nine times. SlSt into the StndSt from Step 1. (Stitch Count: 44 DC)
Round 5 - Increase in every fourth stitch and the second to last stitch:
To commence the round, StndSt in StndSt from previous round. DC in each of the next two stitches. 2 DC in the next stitch. DC in each of the next three stitches. 2 DC in the next stitch. Repeat last two steps eight times. DC in each of the next two stitches. 2 DC in each of the next two stitches. SlSt into the StndSt from Step 1. (Stitch Count: 56 DC)
Round 6 - DC in all stitches around:
To commence the round, StndSt in StndSt from previous round. DC in next and each of the remaining stitches around. SlSt into the StndSt from Step 1. (Stitch Count: 56 DC)
Round 7 - DC in all stitches around:
Repeat Round 6. (Stitch Count: 56 DC)
Round 8 - HDC in all stitches around:
To commence the round, HDCStndSt in StndSt from previous round. HDC in next and each of the remaining stitches around. SlSt into the HDCStndSt from Step 1. (Stitch Count: 56 HDC)
Round 9A - First Round Diamond Flower (3 DC spacing):
To commence the round, StndSt in HDCStndSt from previous round. DC in each of the next three stitches. Ch 3 and skip the next stitch. DC in each of the next seven stitches. Ch 3 and skip next stitch. Repeat last two steps five times. DC in each of the next three stitches. SlSt into the StndSt from Step 1. (Stitch Count: 49 DC and 7 Ch 3 Sp)
Round 9B - First Round Diamond Flower (2 DC spacing):
To commence the round, StndSt in HDCStndSt from previous round. DC in each of the next three stitches. Ch 3 and skip the next stitch. DC in each of the next six stitches. Ch 3 and skip next stitch. Repeat last two steps six times. DC in each of the next two stitches. SlSt into the StndSt from Step 1. (Stitch Count: 48 DC and 8 Ch 3 Sp)
Round 10A - Second Round Diamond Flower (3 DC spacing):
To commence the round, StndSt in StndSt from previous round. DC in next stitch. Ch 3 and skip the next 2 DC stitches and the first Ch (of the next previous round 3 Ch). SlSt in the second (middle) Ch of the previous round 3 Ch. Ch 3 and skip the third Ch of the previous round 3 Ch and the next 2 DC stitches. DC in each of the next three stitches. Ch 3 and skip the next 2 DC stitches and the first Ch (of the next previous round 3 Ch). SlSt in the second (middle) Ch of the next previous round 3 Ch. Ch 3 and skip the third Ch of the previous round 3 Ch and the next 2 DC stitches. Repeat last steps five times. DC in next (last) stitch. SlSt into the StndSt from Step 1. (Stitch Count: 21 DC and 7 [Ch 3 Sp, SlSt, Ch 3 Sp])
Round 10B - Second Round Diamond Flower (2 DC spacing):
To commence the round, StndSt in StndSt from previous round. DC in next stitch. Ch 3 and skip the next 2 DC stitches and the first Ch (of the next previous round 3 Ch). SlSt in the second (middle) Ch of the previous round 3 Ch. Ch 3 and skip the third Ch of the previous round 3 Ch and the next 2 DC stitches. DC in each of the next two stitches. Ch 3 and skip the next 2 DC stitches and the first Ch (of the next previous round 3 Ch). SlSt in the second (middle) Ch of the next previous round 3 Ch. Ch 3 and skip the third Ch of the previous round 3 Ch and the next 2 DC stitches. Repeat last steps six times. SlSt into the StndSt from Step 1. (Stitch Count: 16 DC and 8 [Ch 3 Sp, SlSt, Ch 3 Sp])
Round 11A - Third Round Diamond Flower (3 DC spacing):
To commence the round, StndSt in StndSt from previous round. DC in next DC. DC in each of next two Ch stitches. Ch 1 and skip all of: Ch, SlSt and Ch. DC in each of next two Ch stitches. DC in each of the next three DC stitches. DC in each of next two Ch stitches. Ch 1 and skip all of: Ch, SlSt and Ch. DC in each of next two Ch stitches. Repeat last steps five times. DC in next (last) stitch. SlSt into the StndSt from Step 1. (Stitch Count: 49 DC and 7 Ch 1 Sp)
Round 11B - Third Round Diamond Flower (2 DC spacing):
To commence the round, StndSt in StndSt from previous round. DC in next DC. DC in each of next two Ch stitches. Ch 1 and skip all of: Ch, SlSt and Ch. DC in each of next two Ch stitches. DC in each of the next two DC stitches. DC in each of next two Ch stitches. Ch 1 and skip all of: Ch, SlSt and Ch. DC in each of next two Ch stitches. Repeat last steps six times. SlSt into the StndSt from Step 1. (Stitch Count: 48 DC and 8 Ch 1 Sp)
Round 12A - HDC in all stitches around (3 DC spacing):
To commence the round, HDCStndSt in StndSt from previous round. HDC in each of the next 3 DCs. HDC over Ch Sp. HDC in each of next 7 DCs. HDC over Ch Sp. Repeat last two steps five times. HDC in each of the last 3 DCs. SlSt into the HDCStndSt from Step 1. (Stitch Count: 56 HDC)
Round 12B - HDC in all stitches around (2 DC spacing):
To commence the round, HDCStndSt in StndSt from previous round. HDC in each of the next 3 DCs. HDC over Ch Sp. HDC in each of next 6 DCs. HDC over Ch Sp. Repeat last two steps six times. HDC in each of the last 2 DCs. SlSt into the HDCStndSt from Step 1. (Stitch Count: 56 HDC)
Optional Finishing Round:
SlSt in every stitch around. (Careful to maintain same tension as previous HDC round.) Or, if you prefer, work a round of Crab Stitch or Spin Stitch.
— Adding Earflaps (Optional):
Smaller Solid Earflap:
Place stitch markers 11 stitches apart in desired position. Row 1: Commence earflap with an HDCStndSt in the first stitch, and then work a HDC in each of the following 10 stitches. (11 stitches) Row 2: Ch 1, turn work, 2HDCTog over the first two HDCs (reduction stitch), HDC in each subsequent stitch until reaching the last two stitches, and then 2HDCTog over the last two HDCs (reduction stitch). (9 stitches) Rows 3-5: Repeat Row 2, three times. (3 stitches should remain at the end of Row 5) Row 6: Ch 1, turn work, and then 3HDCTog over the 3 DCs from the previous row. Row 7: Ch1, turn work, and then SC in 3HDCTog from the previous row. Earflap Chain: Turn work, and then work multiple HDCStndSt, to make a chunky chain that is the length of your preference. Chunky knot the chain, or if you prefer, first make a tassel before knotting the chain.
Larger Motif Earflap:
Place stitch markers 11 stitches apart in desired position. Row 1: Commence earflap with a StndSt in the first stitch, work a DC in each of the following 4 stitches, Ch 3 and skip a stitch, and then work a DC in each of the following 5 stitches. (10 DC and a Ch 3 Sp) Row 2: Ch 2, turn work, 2DCTog over the first two DCs (reduction stitch), DC in next stitch, Ch 3 and SlSt into middle Ch stitch of the previous round Ch 3, Ch 3 and then DC into third to last stitch, 2DCTog over the last two stitches (reduction stitch). (4 DC and a Ch 3 Sp – SlSt – Ch 3 Sp sequence) Row 3: Ch 2, turn work, 2DCTog over the first two DCs (reduction stitch), DC in each of the first two Ch stitches, Ch 1 and (skipping Ch, SlSt, Ch) DC in the last two Ch stitches, and then 2DCTog over the last two DCs (reduction stitch). (6 DC and a Ch 1 Sp) Row 4: Ch 2, turn work, 2DCTog over the first two DCs (reduction stitch), DC in each subsequent stitch until reaching the two last stitches, and then 2DCTog over the last two stitches (reduction stitch). (5 DC) Row 5: Ch 1, turn work, 2HDCTog over the first two stitches (reduction stitch), HDC in next stitch, and then 2HDCTog over the last two stitches (reduction stitch). (3 HDC) Row 6: Ch 1, turn work, and then 3HDCTog over the 3 DCs from the previous row. Row 7: Ch1, turn work, and then SC in 3HDCTog from the previous row. Earflap Chain: as per Smaller Solid Earflap.
This charming Vintage Vibes Baby Beanie pattern brings timeless elegance to modern crochet with its beautiful diamond flower motifs and versatile design options. Whether you're crafting for your own little one or creating a heartfelt gift, this pattern offers three stunning variations plus bonus preemie sizes to suit any need. The combination of simple stitches arranged in sophisticated patterns makes this an achievable yet impressive project that showcases your skills beautifully. With comprehensive instructions, special stitch tutorials, and helpful resizing tips, you'll create an heirloom-quality piece that will be treasured for years to come. 🧶 Happy crocheting! 🧵✨