🧢 Beautiful ✨ Detailed πŸ’ Adorable

Turtle Memory Game Amigurumi Pattern

Turtle Memory Game Amigurumi Pattern
4.2β˜… Rating
6-8 Hours Time Needed
2.0K Made This
βœ‚οΈ

Intermediate Level

Ideal for those with basic knitting experience, featuring slightly more advanced stitches and techniques to expand your skills.

⏱️

Weekend Treat

Takes 5-7 hours, making it an enjoyable project to finish over a couple of days.

🧸

Cute Companion

An adorable friend to cherish, handcrafted with love to bring comfort and joy for years to come.

About This Turtle Memory Game Amigurumi Pattern

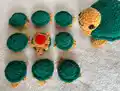
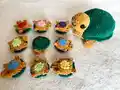
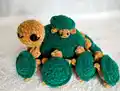
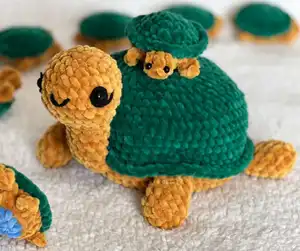
This charming turtle memory game pattern is a creative twist on traditional amigurumi! The mama turtle features an innovative elastic band shell design that securely holds multiple baby turtles, each crafted with different colored bellies for memory matching fun. Using soft HIMALAYA DOLPHIN BABY yarn in beige and green, this pattern creates a plush, huggable toy that's perfect for children and collectors alike. The construction technique cleverly incorporates the elastic band into the shell structure, allowing the babies to nestle safely inside mama turtle's back.

Turtle Memory Game Amigurumi Pattern crochet pattern - detailed view of completed project

Each baby turtle is quick to make and features an adorable shell-and-body construction that showcases your choice of vibrant tummy colors. The pattern includes detailed photo references and step-by-step instructions to guide you through creating both the large turtle and her miniature offspring.

Why You'll Love This Turtle Memory Game Amigurumi Pattern

I absolutely love how this pattern combines functionality with cuteness! It's not just a toyβ€”it's an interactive learning experience that helps children develop memory skills while playing. I'm amazed by the clever elastic band technique that transforms the mama turtle into a cozy carrying case for all the babies. The variety of colorful tummies you can create makes each baby turtle unique, and watching little ones match them during playtime is incredibly rewarding. Plus, working with the chunky HIMALAYA DOLPHIN BABY yarn makes this project stitch up quickly, so you can see results fast without sacrificing that soft, premium feel.

Turtle Memory Game Amigurumi Pattern step 1 - construction progress Turtle Memory Game Amigurumi Pattern step 2 - assembly progress Turtle Memory Game Amigurumi Pattern step 3 - details and accessories Turtle Memory Game Amigurumi Pattern step 4 - final assembly and finishing

Switch Things Up

I love experimenting with this turtle pattern to make each one truly unique! Instead of the traditional beige and green combo, I've tried ocean-inspired blues and teals for a sea turtle vibe, or even pastel rainbow colors for a whimsical fantasy turtle. You could easily add texture by using different yarn types - a fuzzy yarn for the shell would create an adorable fluffy effect!

For the baby turtles, I sometimes embroider tiny patterns on their tummies instead of just using solid colors - little hearts, stars, or flowers make them extra special. You could also experiment with the shell texture by working different stitch patterns in rounds 11-15, like alternating front post and back post stitches for extra dimension.

I've personalized these turtles by adding small accessories - tiny crocheted flowers on mama turtle's head, or little bow ties on the baby turtles. Some crafters even add small bells inside the babies (securely sewn in) to make them rattle gently. If you're making this as a learning toy, you could embroider numbers or letters on each baby turtle's tummy instead of using colors for the memory game. The possibilities are endless, and each variation makes the turtle family more special and tailored to the child who'll love them!

Common Mistakes & How to Fix Them

βœ— Forgetting to crochet for front loops only in round 10 of the shell, which creates the distinctive ridge texture βœ— Not securing the elastic band tightly enough before starting round 1, causing it to slip during crocheting βœ— Overstuffing the head and legs, which makes it difficult to fold and crochet them closed properly βœ— Missing the color change from beige to green after completing the body attachments in round 8 of the shell βœ— Crocheting baby turtle legs too tightly, preventing them from laying flat between the decrease stitches as instructed

Turtle Memory Game Amigurumi Pattern

Create an enchanting turtle family with this delightful crochet pattern! This unique design features a large mama turtle with a special elastic band shell that holds 9-12 adorable baby turtles, each with colorful tummies. Perfect as both a cuddly toy and an educational memory game, this pattern combines playful fun with learning. The finished mama turtle measures approximately 12 x 5 inches, while each baby turtle is a sweet 4 x 2.5 inches, making them perfect for little hands to grasp and play with during memory matching games.

Intermediate 6-8 Hours

Materials Needed for Turtle Memory Game Amigurumi Pattern

β€” Main Fabric

  • 01
    HIMALAYA DOLPHIN BABY yarn 131 yards / 3.5oz (120 m/100 g) in beige color
  • 02
    HIMALAYA DOLPHIN BABY yarn 131 yards / 3.5oz (120 m/100 g) in green color
  • 03
    Small amounts of colored yarn for baby turtle tummies (blue or various colors)
  • 04
    Black yarn for embroidering features

β€” Tools Required

  • 01
    Crochet hook size 7 (4.5 mm)
  • 02
    Stuffing (polyester fiberfill)
  • 03
    Black beads for eyes 1/3 inch (8-10 mm) - 2 pieces
  • 04
    Transparent glue
  • 05
    Sewing needle
  • 06
    Stitch markers
  • 07
    Elastic band for hair - diameter 2 inches (5 cm)
  • 08
    Scissors

Progress Tracker

0% Complete

β€” LEGS :

Round 1 :

5 sc in MR (5)

Round 2 :

5 inc (10)

Round 3-5 :

10 sc (10)

Round 6 :

(3 sc, dec) x 2 (8)

Info :

Stuff the detail. Fold the detail in half and crochet 3sc, grasping the stitches of the both edges. Fasten off and cut the yarn, hide the end. Crochet the rest of the legs in the same way.

β€” HEAD :

Round 1 :

6sc in MR (6)

Round 2 :

6 inc (12)

Round 3 :

(1 sc, inc) x 6 (18)

Round 4 :

(inc, 2 sc) x 6 (24)

Round 5-8 :

24 sc (24)

Round 9 :

12 dec (12)

Round 10 :

(4 sc, dec) x 2 (10)

Round 11-17 :

10 sc (10)

Info :

Stuff the detail. Fold the detail in half and crochet 4 sc, grasping the stitches of the both edges. Fasten off and cut the yarn, hide the end.

β€” SHELL / BODY :

Round 1 :

24 sc in elastic (24)

Round 2 :

(3 sc, inc) x 6 (30)

Round 3 :

(inc, 4 sc) x 6 (36)

Round 4 :

(5 sc, inc) x 6 (42)

Round 5 :

(inc, 6 sc) x 6 (48)

Round 6 :

(7 sc, inc) x 6 (54)

Round 7 :

(inc, 8 sc) x 6 (60)

Round 8 :

7 sc, 3 sc with leg, 10sc, 3 sc with leg, 5 sc, 4 sc with head, 5 sc, 3 sc with leg, 10 sc, 3 sc with leg, 7 sc, crochet the tail: 4 ch, sl st in 2nd ch from hook, 2 sc, sl st

Info :

Change the color to green

Round 9 :

60 sc (60)

Round 10 :

Crochet for the front loops only: (9 sc, inc) x 6 (66), crochet for the back loops only: 60sc (60)

Round 11-15 :

60 sc (60)

Round 16 :

(dec, 8 sc) x 6 (54)

Round 17 :

(7 sc, dec) x 6 (48)

Round 18 :

(dec, 6 sc) x 6 (42)

Round 19 :

(5 sc, dec) x 6 (36)

Round 20 :

(dec, 4 sc) x 6 (30)

Round 21 :

(3 sc, dec) x 6 (24)

Round 22 :

(dec, 2 sc) x 6 (18)

Round 23 :

(1 sc, dec) x 6 (12)

Round 24 :

6 dec (6)

Info :

Cut the yarn, tighten the hole. Fasten the yarn, hide the end inside. Sew the neck to the shell. Glue or sew eyes. You can add black felt circles. Embroider eyelashes and mouth.

β€” BABY TURTLE :

Round 1 :

6 sc in MR (6)

Round 2 :

6 inc (12)

Round 3 :

(1 sc, inc) x 6 (18)

Round 4 :

(inc, 2 sc) x 6 (24)

Round 5 :

24 sc for the front loops only (24)

Info :

Change the color to beige

Round 6 :

Crochet the body, legs and head for the back loops only of the 4th round: 2 sc, 1st leg: (1 sc, 4 ch, 1 sc) in one loop, 5 sc, 2nd leg: (1 sc, 4 ch, 1 sc) in one loop, 2sc, head: (1 sc, 2 ch, 2 tc) in one loop, (1 tc, 1 dc, sl st) in one loop, 2 sc, 3rd leg: (1 sc, 4 ch, 1 sc) in one loop, 5 sc, 4th leg: (1 sc, 4 ch, 1 sc) in one loop, 2sc

Round 7 :

(1 sc, dec) x 7, 1sc, sl st (16)

Info :

Do not crochet the legs and head, leave them between the stitches of the decrease. Change the color to blue (or any other).

Round 8 :

Crochet for the back loops only: 8 dec (8)

Info :

Stuff the body. Cut the yarn, leaving a long end enough for sewing the hole. Tighten the hole. You can glue on the eyes. Baby is ready! Crochet 9-12 of these babies with tummies of different colors.

Assembly Instructions

  • Make 4 legs following the pattern, stuffing each one before folding in half and closing with single crochets
  • Create the head, stuff it firmly, then fold and close with single crochets as instructed
  • Crochet round 1 of the shell body directly onto the elastic band, ensuring it's secure and evenly distributed
  • In round 8, carefully attach all four legs and the head by crocheting together with the body stitches
  • After completing the shell, sew the neck portion of the head to the front of the turtle shell for stability
  • Attach or glue the black bead eyes to the head, optionally adding black felt circles behind them
  • Embroider eyelashes and a mouth using black yarn to give mama turtle a sweet expression

Important Notes

  • πŸ’‘Make sure the elastic band is 2 inches (5 cm) in diameter for proper fit and shell structure
  • πŸ’‘When crocheting round 10 of the shell, work front loops first for increases, then back loops for the ridge effect
  • πŸ’‘Leave the legs and head limbs free when working round 8 - they should not be enclosed inside the shell
  • πŸ’‘For baby turtles, the legs and head are created directly in round 6 using chain stitches in single loops
  • πŸ’‘Use stitch markers to track where each leg and head attachment should occur in the mama turtle pattern
  • πŸ’‘Create 9-12 baby turtles with different colored tummies for the memory game aspect to work properly
  • πŸ’‘Don't overstuff the baby turtles - they need to nestle comfortably inside mama turtle's shell

This enchanting Turtle Memory Game pattern brings together creativity, play, and learning in one adorable package! The mama turtle's innovative elastic band shell design creates a cozy home for her colorful baby turtles, each one unique and perfect for memory matching games. Whether you're crafting for a child's educational toy collection or creating a charming gift for turtle lovers, this pattern offers both visual appeal and interactive fun. The chunky yarn works up quickly, making it satisfying for intermediate crocheters looking for a rewarding weekend project. πŸ’πŸ’š

You ask,

we answer.

FAQs

Can I use a different yarn weight for this pattern?

While the pattern specifically calls for HIMALAYA DOLPHIN BABY (bulky weight), you can substitute with similar weight 5 bulky yarn. However, you'll need to adjust your hook size accordingly and note that the finished size will vary. The elastic band size may also need adjustment.

How do I crochet into the elastic band for round 1?

Hold the elastic band and insert your hook through the center of the band (not around it). Work your single crochets by wrapping the yarn around the band itself, spacing them evenly around the entire circumference. The pattern photos 1-2 show this technique visually.

What does 'crochet for front loops only' and 'back loops only' mean?

Each stitch has a V-shape at the top with two loops. The front loop is the one closest to you, and the back loop is farther away. Working in only one loop creates a ridge effect and leaves the other loop free for later rounds, which is essential for the turtle shell texture.

How many baby turtles should I make for the memory game?

The pattern recommends making 9-12 baby turtles. For a proper memory matching game, create them in pairs (2 of each tummy color) - so 10 babies with 5 different colors, or 12 babies with 6 different colors works perfectly.

Can I make the mama turtle without the elastic band?

The elastic band is integral to the pattern's structure and allows the shell to hold the baby turtles. Without it, you'd need to significantly redesign the pattern. If you want a regular turtle, consider starting with a magic ring instead and adjusting subsequent rounds.