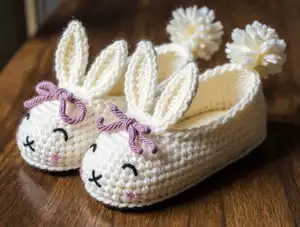
Wrap tiny toes in handmade love with these adorable Hoppy Baby Bunny Slippers! Perfect for infants aged 0-12 months, these charming booties feature sweet upright bunny ears, embroidered faces, decorative bows, and fluffy pom-pom tails. Available in two sizes with adjustable hook options, the pattern guides you through creating soft, comfortable slippers that stay snug on little feet. The detailed sole construction ensures proper fit and durability, while the playful bunny details bring smiles to everyone who sees them. These slippers make wonderful baby shower gifts, first Easter presents, or just-because treasures for the little bunny in your life. Create a keepsake that parents will photograph again and again!
Progress Tracker
0% Complete
— Sole
Round 1:
With color A ch 13 (15), 2 sc in 2nd ch from hook, 7(8) sc, 3 (4) hdc, 4 hdc in last ch, 3 (4) hdc down the other side of foundation ch, 7 (8) sc, 2 sc in last ch that already has 2 sc in it. Join with sl st. 28 (32) total stitches
Round 2:
Ch 1, 2 sc in each of the first two stitches, 6 (7) sc, 4 (5) hdc, 2 hdc in each of the next 4 stitches, 4 (5) hdc, 6 (7) sc, 2 sc in each of the last two stitches. Join with sl st. 36 (40) total stitches
Round 3:
Ch 2, 1 hdc, 2 hdc in next stitch, 10 hdc, 2 (4) dc, 2 dc in each of the next 8 stitches, 2 (4) dc, 10 hdc, 2 hdc in next stitch, 1 hdc. Join with sl st. 46 (50) total stitches
Round 4:
Sl st all the way around sole through back loops only. Join with sl st. 46 (50) total stitches
— Upper Shoe
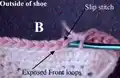
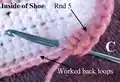
Round 5:
Working through both the slip stitch and back loops of previous round, Ch 2, 6 hdc, 6 (8) sc, 3 hdc, 16 dc, 3 hdc, 6 (8) sc, 6 hdc, Join with sl st. 46 (50) total stitches
Info:
In this round you will basically be working back over what you just did. You will need to work through both the slip stitches and the back loops that you just worked. This makes for a thick round and gives body to the bottom of the shoe
Round 6:
Ch 2, 6hdc, 6 (8) sc, 3 hdc, 16 dc, 3 hdc, 6 (8) sc, 6 hdc. Join with sl st. 46 (50) total stitches
Round 7:
Ch 2, 2hdc, hdc2tog, 2 hdc, 6 (8) sc, sc2tog, [hdc2tog] 2 times, [dc2tog] 5 times, [hdc2tog] 2 times, sc2tog, 6 (8) sc, 2 hdc, hdc2tog, 2 hdc, Join with sl st. 33 (37) total stitches
Round 8:
Ch 2, 5 hdc, 6 (8) sc, [sc2tog] 2 times, 3 dc, [sc2tog] 2 times, 6 (8) sc, 5 hdc. Join with sl st. 29 (33) total stitches
Round 9:
Sl st all the way around shoe. 29 (33) total stitches
— Ears
Instructions:
With E size crochet hook chain 9 (10), 1 htr in 4th ch from hook, 1 (2) htr, 2 dc, 1 hdc, 4 hdc in last chain, (working back down foundation chain) 1 hdc, 2 dc, 2 (3) htr, ch 3, sl st to first ch 3 space. Now sl stitch along the side of foundation ch, up and back down turning at end of foundation chain. This gives the ears a little body so that they stand up
Info:
Directions for how to do a half treble crochet: Yarn over two times, insert hook in stitch, yarn over, draw loop through stitch, yarn over, draw through two loops on hook, yarn over, then draw through all three loops on hook
— Finishing
Attach Ears:
Thread Yarn needle with yarn and attach ears. Stitch ears to slipper several times at center bottom of each ear. Then pull needle and yarn through both sides of ear and pull together. Stitch ears the rest of the way to body of shoe
Bunny Face:
Find center front. With pink yarn make one stitch over center double crochet post almost at bottom of shoe. Count over to 3rd crochet from center and make one stitch with black yarn for each eye. Place eyes right under the top of the first row of double crochets
Bows:
Thread pink yarn through base of ears and tie a bow on both. These are great because they cover up the stitching
Pom Poms:
Make 2. Wrap yarn around two fingers 20 times. Remove from fingers and tie yarn around center. Cut the loops on the ends. Fluff it up to make it pretty and attach to center-back of bunny so she is pretty from front to back
Final:
Weave in ends and you're done
These Hoppy Baby Bunny Slippers are pure joy to create and even more delightful to see on precious little feet! The combination of practical construction and whimsical details makes these booties special keepsakes that parents will treasure in photos for years to come. With two size options, detailed instructions, and adorable finishing touches including embroidered faces, decorative bows, and fluffy pom-pom tails, this pattern delivers both cuteness and functionality. Whether you're crafting for your own little one, preparing for a baby shower, or creating gifts for your favorite tiny humans, these bunny slippers are guaranteed to bring smiles and capture hearts. 🧶 Happy crocheting! 🐰✨