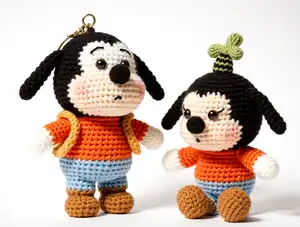
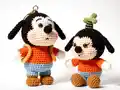
Bring Disney magic to life with this charming Goofy amigurumi pattern that includes instructions for both standing and sitting poses. This detailed pattern guides you through creating the lovable, clumsy Disney character complete with his signature floppy ears, iconic green hat, and adorable outfit in classic colors. Using 4-ply cotton yarn and a small hook, you'll craft a perfectly proportioned Goofy with expressive features and poseable elements. Whether you choose the standing version for display or the sitting version for a cuddly companion, this pattern offers clear instructions with color-coded guidance to help you create every detail from his brown jacket to his charming personality.
Progress Tracker
0% Complete
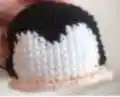
— Head :
Infos :
BLACK YARN for main, WHITE YARN for muzzle sections, BLUE YARN for details, SKIN COLOUR YARN for certain areas. On R24, Begin to stuff
Round 1 :
Magic Ring 6X (6) BLACK
Round 4 :
6 (X, V, X) (24)
Round 6 :
6 (2X, V, 2X) (36)
Round 8 :
6 (3X, V, 3X) (48)
Round 10 :
18X, 4X, 4X, 4X, 18X (48)
Round 11 :
17X, 6X, 2X, 6X, 17X (48)
Round 12-15 :
16X, 16X, 16X (48)
Round 16 :
17X, 14X, 17X (48)
Round 17 :
12X, A, 20X, A, 12X (46)
Round 18 :
12X, FLO X, FLO 3V, FLO 7 (X, V), FLO 3V, FLO X, 12X (59)
Round 19 :
12X, 35X, 12X (59)
Round 20 :
12X, X, 33T, X, 12X (59)
Round 21-22 :
12X, 35X, 12X (59)
Round 23 :
12X, X, 3A, 7 (X, A), 3A, X, 12X (46)
Round 24 :
X, 3 (X, A, X), 5 (X, A, X), X, A, X, 2 (X, A, X), X (35)
Round 25 :
X, 3 (X, A), 5 (X, A), X, A, 2 (X, A), X (24)
Round 26 :
6 (X, A, X) (18)
— Ear (Make 2) :
Infos :
BLACK YARN. You don't have to stuff the ears. You may insert soft wire for poseable ears
Round 1 :
Magic Ring 5X (5)
Round 6 :
A, 3X, A, 3X (8)
Round 11 :
A, 2X, A, 2X (6)
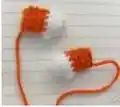
— Arms (Make 2) :
Infos :
WHITE YARN for hand, ORANGE YARN for glove section. For the arms, you don't have to stuff too full. HDC= Half Double Crochet
Round 1 :
Magic Ring 6X (6) BLACK
Round 4 :
4X, In one stitch: 3HDC, 4X (9)
— Leg + Body (Standing Version) :
Infos :
BROWN YARN for shoes, BLUE YARN for pants, ORANGE YARN for details
Round 1 :
5CH, working on 2nd stitch: 3X, W, 2X, V (10)
Round 2 :
V, 2X, 3V, 2X, 2V (16)
Round 6 :
A, 2X, 2A, 2X, A (8)
Round 7-8 :
8X. Fasten Off first leg, Repeat R1-8 to make second leg, you don't have to fasten off second leg (8)
Round 9 :
4CH, connect both legs, On Legs 8X+ On CH 4X+ On Legs 8X+ On CH 4X (24)
Round 10 :
6X, 4 (X, V), 6X, 2 (X, V) (30)
Round 12 :
6 (2X, V, 2X) (36)
Round 15 :
6 (2X, A, 2X) (30)
Round 16 :
6X, 4 (X, A), 6X, 2(X, A) (24)
Round 18 :
6 (X, A, X) (18)
— Leg (Sitting Version) :
Infos :
BROWN YARN for shoes, BLUE YARN for pants
Round 1 :
5CH, working on 2nd stitch: 3X, W, 2X, V (10)
Round 2 :
V, 2X, 3V, 2X, 2V (16)
Round 6 :
A, 2X, 2A, 2X, A (8)
— Body (Sitting Version) :
Infos :
BLUE YARN for main body, ORANGE YARN for details. On R11, Begin to stuff. Once done, leave long tail for sewing
Round 1 :
Magic Ring 8X (8)
Round 5 :
X, V, 6X, 4 (X, V), 7X, V (30)
Round 7 :
6 (2X, V, 2X) (36)
Round 9 :
6 (2X, A, 2X) (30)
Round 10 :
X, A, 6X, 4 (X, A), 7X, A (24)
Round 12 :
6(X, A, X) (18)
— Jacket (Work in Lines) :
Row 1 :
25CH, working on 2nd stitch: 24X (24)
Row 2 :
1CH Flip over, 6 (3X, V) (30)
Row 3 :
1CH Flip over, 3X, 6CH, Empty 6 stitches, X, 10T, X, 6CH, Empty 6 stitches, 3X (30)
Row 4 :
1CH Flip over, 9X, TV, 10T, TV, 9X (32)
— Nose :
Info :
You may replace with 1.4cm plastic eyes or nose. BLACK YARN
Round 1 :
Magic Ring 6X (6)
— Hat :
Infos :
GREEN YARN for main, BLACK YARN for base
Round 1 :
Magic Ring 6X (6)
Round 2 :
6X. Fasten off the first one. Repeat R1-R2 to make a second one (6)
Round 3 :
Insert hook into the first one to connect both pieces: 6X+6X (12)
Round 4 :
2 (2X, A, 2X) (10)
This delightful Standing and Sitting Goofy pattern brings Disney's most lovable goofball to life in adorable amigurumi form. With detailed color-coded instructions and options for both poses, you can create the perfect Goofy for display or cuddles. The pattern's thoughtful construction includes all of Goofy's signature features - those iconic floppy ears, his charming outfit complete with brown jacket and green hat, and that endearing expression that captures his personality perfectly. Whether you're making him for a Disney collector, a child's toy box, or your own craft collection, this Goofy is sure to bring smiles and warm memories. Happy crocheting, and remember - it's all about having fun, just like Goofy himself! 🐕✨🎩