🧢 Beautiful ✨ Detailed πŸ’ Adorable

Tulip Shell Crochet Pattern

Tulip Shell Crochet Pattern
4.2β˜… Rating
3-4 Hours Time Needed
3.2K Made This
βœ‚οΈ

Intermediate Level

Ideal for those with basic knitting experience, featuring slightly more advanced stitches and techniques to expand your skills.

⏱️

Weekend Treat

Takes 5-7 hours, making it an enjoyable project to finish over a couple of days.

🏑

Cozy Accent

A warm touch for your space that transforms ordinary corners into inviting nooks filled with handmade charm.

About This Tulip Shell Crochet Pattern

Tulip Shell Crochet Pattern crochet pattern - detailed view of completed project

What makes this pattern special is the innovative shaping technique using a water and glue mixture that allows you to mold your crocheted piece into a realistic three-dimensional shell. The combination of tight stitches worked with a smaller hook and the stiffening process creates a sturdy, displayable piece that will last for years.

Why You'll Love This Tulip Shell Crochet Pattern

I absolutely love this pattern because it pushes the boundaries of what crochet can create. There's something magical about watching a flat piece of fabric transform into a sculptural shell that looks like it washed up from the ocean. I love how the pattern teaches you to think three-dimensionally and how the shaping process gives you complete creative control over the final form. The attention to detail with the trim and border adds such an elegant finishing touch, and I adore how you can customize it with watercolors or embellishments to make each shell truly unique. It's incredibly satisfying to create something so realistic and beautiful from simple yarn and a hook.

Tulip Shell Crochet Pattern step 1 - construction progress Tulip Shell Crochet Pattern step 2 - assembly progress Tulip Shell Crochet Pattern step 3 - details and accessories Tulip Shell Crochet Pattern step 4 - final assembly and finishing

Switch Things Up

I love experimenting with different yarn weights and colors to create unique shell variations. For a miniature version, I sometimes use embroidery floss or very fine crochet thread with a 0.6mm hook – the results are incredibly delicate and perfect for jewelry making or dollhouse accessories. I've also tried working this pattern in larger yarn weights with corresponding hook sizes to create decorative shells that work as catch-all bowls or wall art.

Color experimentation is where this pattern really shines for me. I've created stunning ombre effects by gradually changing colors every few rows, mimicking the natural color transitions found in real shells. Metallic threads mixed with regular cotton create a subtle shimmer that catches the light beautifully. I've even made galaxy-themed shells using deep purples and blues with splattered white paint for stars.

For the border, I sometimes add multiple rounds in contrasting colors or create a ruffled edge by working (sc, hdc, dc, hdc, sc) in each stitch for a more ornate, Victorian-inspired look. Adding tiny seed beads to the trim before stiffening creates gorgeous texture – just hand-stitch them on and be sure to do this before the glue-shaping process.

I've experimented with different stiffening methods too. For shells I want to be completely rigid, I use a 1:1 glue-to-water ratio. For slightly flexible shells that still hold shape, I go with 3 parts water to 1 part glue. Mod Podge also works wonderfully and gives a slightly glossy finish that enhances painted details.

Common Mistakes & How to Fix Them

βœ— Working with a hook that's too large resulting in loose stitches and gaps that won't hold shape well during the stiffening process βœ— Forgetting to work in back loops only during the initial rounds which creates the wrong texture and prevents proper spiral formation βœ— Not stuffing the shell adequately with plastic bags during drying causing it to collapse or lose its dimensional shape βœ— Using too much glue mixture or not squeezing out excess properly making the shell stiff and heavy with a crusty appearance

Tulip Shell Crochet Pattern

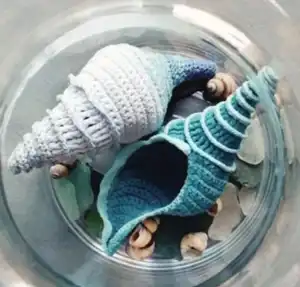
Create a stunning realistic tulip shell with this detailed crochet pattern that combines delicate stitchwork with creative shaping techniques. Perfect for home dΓ©cor, beach-themed displays, or as a unique handmade gift, this pattern guides you through crocheting a beautiful shell from tip to opening. Using cotton yarn in two weights and a special glue-shaping method, you'll craft a dimensional piece that captures the elegant spiral and flowing curves of a natural tulip shell. The pattern includes instructions for the shell body, decorative trim, border details, and professional finishing techniques to achieve a museum-quality result.

Intermediate 3-4 Hours

Materials Needed for Tulip Shell Crochet Pattern

β€” Main Fabric

  • 01
    100% cotton yarn for shell body, approximately 50g=125m weight (such as Madame Tricote Camilla)
  • 02
    100% cotton yarn for trim and border in thinner weight, approximately 100g=565m (such as Madame Tricote Maxi)

β€” Tools Required

  • 01
    Crochet hook 1.5mm for shell body
  • 02
    Crochet hook 1.0mm for trim and border
  • 03
    Scissors
  • 04
    Needle to weave in ends
  • 05
    White glue for shaping
  • 06
    Water for glue mixture
  • 07
    Small plastic bags for stuffing during drying
  • 08
    Rubber gloves (optional)
  • 09
    Stitch markers (optional)

Progress Tracker

0% Complete

β€” Shell Body :

Round 1 :

6 sc in a magic ring (6)

Round 2 :

* 1 sc in each of next 2 sts, 2 sc in next; rep from * 1 more time (8)

Round 3 :

* 1 hdc in each of next 3 sts, 2 hdc in next; rep from * 1 more time (10)

Round 4 :

* 1 dc in each of next 4 sts, 2 dc in next; rep from * 1 more time (12)

Round 5 :

* 1 dc in each of next 2 sts, 2 dc in next; rep from * 3 more time (16)

Round 6 :

* 1 dc in each of next 3 sts, 2 dc in next; rep from * 3 more time (20)

Round 7 :

* 1 tr in each of next 3 sts, 2 tr in next; rep from * 4 more time (25)

Round 8 :

* 1 tr in each of next 4 sts, 2 tr in next; rep from * 4 more time (30)

Info :

Turn and continue working in rows from now on

Row 1 :

working through front loops only: ch 1 (=1 sc), 2 sc in next st, 1 sc in each st; turn (31)

Row 2 :

working through both loops from now on: ch 1 (=1 sc), sc2tog, * 1 sc in each of next 2 sts, 2 sc in next; rep from * 7 more times; 1 sc in each of last 4 sts; turn (38)

Row 3 :

ch 1 (=1 sc), 2 sc in next st, 1 sc in each st; turn (39)

Row 4 :

ch 1 (=1 sc), sc2tog, 1 sc in each st; turn (38)

Rows 5, 7, 9, 11 :

same as Row 3

Rows 6, 8, 10 :

same as Row 4

Row 12 :

ch 1 (=1 sc), * sc2tog, 1 sc in next 2 sts, rep from * 8 more times; 1 sc in last 2 sts; turn (30)

Row 13 :

ch 1 (=1 sc), 2 sc in next st, 1 sc in each st; turn (31)

Row 14 :

ch 1 (=1 sc), * sc2tog, 1 sc in next 2 sts, rep from * 6 more times, 1 sc in last 2 sts; turn (24)

Row 15 :

ch 1 (=1 sc), 2 sc in next st, 1 sc in each st; turn (25)

Row 16 :

ch 1 (=1 sc), * sc2tog, 1 sc in next 2 sts, rep from * 5 more times; turn (19)

Row 17 :

ch 1 (=1 sc), 2 sc in next st, 1 sc in each st; turn (20)

Row 18 :

ch 1 (=1 sc), * sc2tog, 1 sc in next 2 sts, rep from * 3 more times, 1 sc in last 3 sts; turn (16)

Row 19 :

ch 1 (=1 sc), sc in next st, 1 sc in each st; turn (16)

Row 20 :

ch 1 (=1 sc), * sc2tog, 1 sc in next st, rep from * 3 more times, 1 sc in last 3 sts; turn (12)

Row 21 :

ch 1 (=1 sc), 1 sc in each st; turn (12)

Row 22 :

ch 1 (=1 sc), * sc2tog, 1 sc in next st, rep from * 2 more times, 1 sc in last 2 sts; turn (9)

Row 23 :

ch 1 (=1 sc), 1 sc in each st; turn (9)

Row 24 :

ch 1 (=1 sc), * sc2tog, 1 sc in next st, rep from * 1 more time, 1 sc in last 2 sts; turn (7)

Rows 25, 26, 27, 28 :

ch 1 (=1 sc), 1 sc in each st; turn (7)

Info :

Fasten off and weave in the ends

β€” Trim :

Info :

Using 1.00mm hook and thin thread, attach yarn to the front loop of last stitch of last round

Step :

Working into those front loops: 2 sc in one stitch all the way to the center of the shell

Info :

Fasten off and weave in the ends

β€” Border :

Info :

Using 1.00mm hook and thin thread, attach yarn to the top of the shell opening

Row 1 :

Ch 1 and then sc all the way around the shell opening inserting hook into the stitches

Row 2 :

Work only down the opening of the shell by working 2 dc in one stitch and 1 dc in next. Few stitches before the tip of the shell make 2 hdc and 4-5 sc instead of dc

Info :

Fasten off and weave in the ends

Assembly Instructions

  • Mix 2 parts water with 1 part white glue in a cup to create the shaping mixture
  • Immerse the completed crocheted shell into the glue and water mixture until fully saturated, wearing rubber gloves if desired
  • Carefully squeeze out excess glue-water mixture without distorting the shell shape
  • Begin shaping by gently pulling and stretching the crochet fabric to create the desired shell curves and spiral form
  • Use a chopstick or similar tool to straighten and shape the long thin top portion of the shell
  • Stuff the shell interior with small plastic bags to help maintain the three-dimensional shape while drying
  • Pinch the bottom opening together and shape it into the characteristic shell opening, pulling at the trim to enhance details

Important Notes

  • πŸ’‘Use a crochet hook several sizes smaller than recommended on yarn label for tight, secure stitches that hold shape better
  • πŸ’‘Work in continuous rounds without joining or turning unless specifically instructed in the pattern
  • πŸ’‘Consider using a stitch marker in the first stitch of each round to track your progress accurately
  • πŸ’‘For variegated effects, try using batik or ombre yarns which create beautiful natural shell coloring
  • πŸ’‘If uncomfortable with very thin yarn for border, you can use the same weight as the shell body
  • πŸ’‘Allow shell to dry completely on a towel, which may take 24-48 hours depending on humidity
  • πŸ’‘After drying, embellish with watercolors, diluted acrylic paint, or glitter sealed with varnish for added realism

This enchanting Tulip Shell pattern brings the beauty of the ocean into your home through the art of crochet. Combining traditional techniques with innovative three-dimensional shaping methods, this pattern creates a stunning decorative piece that captures the delicate spirals and graceful curves of a real seashell. Whether displayed alone or as part of a beach-themed collection, your handcrafted shell will be a conversation starter and a testament to your crochet skills. The optional embellishment techniques allow you to customize each shell with unique colors and finishes, making every piece one-of-a-kind. Perfect for gifting or adding coastal charm to your décor! 🐚✨

You ask,

we answer.

FAQs

What type of yarn works best for this shell pattern?

100% cotton yarn is highly recommended as it holds shape well when stiffened. For the shell body, use a medium weight cotton (50g=125m) like Madame Tricote Camilla, Kartopu Organica, or Schachenmayr Catania. For the delicate trim and border, use a finer cotton thread (100g=565m) like Madame Tricote Maxi or Alize Miss for the most realistic detail.

Can I skip the glue shaping step?

Yes, you can wet the shell with plain water and shape it without glue if you prefer a softer, more flexible finish. However, the glue mixture (2 parts water to 1 part white glue) creates a much stiffer, more durable shell that maintains its three-dimensional shape permanently and is better for display purposes.

Why do I need to use such a small crochet hook?

Using a hook smaller than the yarn label recommends (1.5mm instead of 3.0mm) creates very tight, dense stitches with no gaps. This is essential for the shell to hold its sculptural shape during and after the stiffening process. Loose stitches will result in a floppy shell that won't maintain its form.

What does working in back loops only mean and why is it important?

Working in back loops only (BLO) means inserting your hook under only the back loop of each stitch instead of both loops. This technique creates a ridge effect and the distinctive spiral texture that makes the shell look realistic. It's used in the initial rounds to establish the shell's characteristic grooves.

How can I customize the color of my shell?

You can use variegated or batik cotton yarns for natural color variations, or crochet with solid colors and paint after shaping. Watercolors or diluted acrylic paints work beautifully on cotton. Apply color while the shell is still slightly damp for better absorption, or after it's completely dry for more controlled application. You can also add glitter sealed with craft varnish for a pearlescent effect.