🧢 Beautiful ✨ Detailed πŸ’ Adorable

Hanging Monstera Plant Crochet Pattern

Hanging Monstera Plant Crochet Pattern
4.7β˜… Rating
3-4 Hours Time Needed
4.0K Made This
βœ‚οΈ

Beginner Friendly Level

Perfect for those just starting their sewing journey, with clear instructions and simple techniques

⏱️

Bite-Sized Project

Complete in under 2 hoursβ€”quick, fun, and perfect for a little creative escape.

🏑

Cozy Accent

A warm touch for your space that transforms ordinary corners into inviting nooks filled with handmade charm.

About This Hanging Monstera Plant Crochet Pattern

Hanging Monstera Plant Crochet Pattern crochet pattern - detailed view of completed project

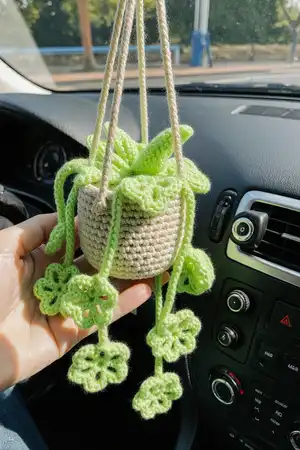
The pattern includes three main components: a decorative hanging pot with rope details, realistic soil insert, and multiple drooping leaves that give the plant its characteristic cascading appearance.

Why You'll Love This Hanging Monstera Plant Crochet Pattern

I absolutely love this pattern because it brings the beauty of nature indoors without any of the maintenance. There's something incredibly satisfying about crocheting each leaf and watching them come together to form a realistic plant. I enjoy how this project lets me practice basic stitches while creating something both decorative and practical. The hanging element adds such a lovely bohemian touch to any room, and I find it makes a wonderful gift for plant lovers or anyone who struggles to keep real plants alive. It's quick enough to finish in an afternoon but impressive enough that everyone will ask where you bought it.

Hanging Monstera Plant Crochet Pattern step 1 - construction progress Hanging Monstera Plant Crochet Pattern step 2 - assembly progress Hanging Monstera Plant Crochet Pattern step 3 - details and accessories Hanging Monstera Plant Crochet Pattern step 4 - final assembly and finishing

Switch Things Up

I love experimenting with this pattern to create my own unique variations. Try using variegated yarn in earthy tones for the pot to create a marbled ceramic effect, or add metallic thread to give it a modern shimmer. You could also make the leaves in different shades of green - from deep forest to bright lime - to mimic the natural color variations found in real Monstera plants.

For a fun twist, consider making mini versions using thinner yarn and smaller hooks to create a collection of tiny hanging plants. I've also added small embroidered details on the leaves using darker green thread to create the characteristic Monstera fenestrations (those beautiful splits and holes). You could stuff the pot more firmly and skip the hanging ropes to create a sturdy tabletop version instead.

Another idea I enjoy is embellishing the pot with surface crochet designs, slip stitch patterns, or even small crocheted flowers around the rim. Try mixing different textures by alternating between matte cotton and glossy mercerized cotton for visual interest. The possibilities are endless, and each variation makes your plant uniquely yours!

Common Mistakes & How to Fix Them

βœ— Forgetting to slip stitch at the end of each row and chain at the beginning which can cause uneven pot shape and misaligned stitches throughout the project βœ— Not stuffing the soil piece firmly enough before closing which results in a flat or saggy appearance that doesn't sit properly inside the pot βœ— Skipping the back loop only instruction in Row 6 of the pot which eliminates the decorative ridge that defines the pot rim and hanging rope attachment point βœ— Crocheting leaves too tightly or loosely causing them to curl unnaturally or look floppy instead of having the characteristic drooping Monstera leaf appearance

Hanging Monstera Plant Crochet Pattern

Create your own stunning hanging Monstera plant with this delightful crochet pattern. Perfect for adding a touch of greenery to your home without the worry of watering, this charming piece features realistic drooping leaves and a decorative hanging pot. Whether you're looking to brighten up your living space or create a thoughtful handmade gift, this pattern will guide you through crafting a beautiful botanical decoration that brings nature indoors with style and personality.

Beginner Friendly 3-4 Hours

Materials Needed for Hanging Monstera Plant Crochet Pattern

β€” Main Fabric

  • 01
    Super fine weight yarn (1.8 oz/50g) in green color for leaves
  • 02
    Super fine weight yarn (1.8 oz/50g) in beige color for pot
  • 03
    Super fine weight yarn (1.8 oz/50g) in brown color for soil

β€” Tools Required

  • 01
    Crochet hook size 2.5-3.0 mm
  • 02
    Stitch markers
  • 03
    Sewing needle
  • 04
    Scissors
  • 05
    Cotton filling for stuffing

Progress Tracker

0% Complete

β€” Pots :

Info :

For newbie: Slip stitch in the first stitch every time a row ends and begin a chain every time a new row starts. Example: single crochet begin chain 1, double crochet begin chain 2

Row 1 :

MR, chain 1, 8SC (8 sts)

Row 2 :

chain 1, 8SC inc (16 sts)

Row 3 :

chain 1, (1SC, 1 inc) 8 time (24 sts)

Row 4 :

chain 1, (2SC, 1inc) 8 time (32 sts)

Row 5 :

(3 SC, 1 inc) 8 time (40 sts)

Row 6 :

(BLO) 40 SC (40 sts)

Row 7 :

40 DC (40 sts)

Row 8 :

40 SC (40 sts)

Row 9 :

40 DC (40 sts)

Row 10 :

40 SC (40 sts)

Row 11 :

40 SC (40 sts)

Info :

For the hanging pot, continue crocheting chain 30 (make 3) and tie it to the rim of the pot plant. The distance of each hanging rope is 12-13 sts

β€” The Soil :

Row 1 :

mr 8SC (8sts)

Row 2 :

8 SC inc (16sts)

Row 3 :

(1 SC + 1 inc) 8 times (24sts)

Row 4 :

(2SC + 1inc) 8 times (32sts)

Row 5-8 :

SC in each st to end

Row 9 :

(2 SC + 1 dec) 8 times (24sts)

Row 10 :

(1 SC + 1 dec) 8 times (16sts)

Info :

stuffing

Row 11 :

8 dec (8sts) cut yarn and leave a long tail for sew, close off the hole

β€” Leaves (1) :

Info :

Chain 4, slip stitch in the first chain from the hook to make an MR

Row 1 :

Chain 3, 1DC + 3 Chain, 1HDC + 3 Chain, 1DC + 3 Chain, 1DC + 3 Chain, 1HDC + 3 Chain, 1DC + 3 Chain. All st crochet of row 1 into the MR

Row 2 :

Now we have total 7 spaces. 1st - 3rd space: 3SC, 1 slip st. 4th space: 1SC, 1picot, 1SC, 1 slip st. 5-7th space: 3SC, 1 slip st

β€” Leaves (2) :

Info :

When you're done with the leaf, chain 10 and again slip st in the 4th chain from the hook to make an MR, and begin making the next leaf

Assembly Instructions

  • Create three chain-30 hanging ropes and attach them to the rim of the pot at Row 11, spacing them 12-13 stitches apart for even hanging
  • Sew all the drooping leaves securely into the top of the soil piece using the yarn tails
  • Stuff the soil piece firmly with cotton filling before closing to maintain its rounded shape
  • Insert the completed soil piece with attached leaves into the pot, ensuring it sits snugly inside
  • Tie the three hanging ropes together at the top to create the hanging mechanism for display

Important Notes

  • πŸ’‘Remember to slip stitch at the end of each row and chain at the beginning of new rows for even shaping
  • πŸ’‘Work the BLO (back loop only) row carefully in Row 6 of the pot to create the decorative ridge
  • πŸ’‘Make multiple leaves to create a fuller, more realistic Monstera plant appearance
  • πŸ’‘Stuff the soil piece firmly but not overly tight to maintain the proper rounded shape
  • πŸ’‘Keep consistent tension throughout to ensure the pot and leaves have a professional finished look

This charming Hanging Monstera Plant pattern brings the trendy botanical style to your home with zero maintenance required. The combination of textured stitches creates a realistic pot and leaves that capture the beloved drooping Monstera aesthetic. Perfect for plant lovers or anyone wanting to add a cozy handmade touch to their space, this quick project creates a statement piece that's sure to impress. Hang it in a sunny corner and enjoy your forever-green creation! 🌿 Happy crocheting! 🧢✨

You ask,

we answer.

FAQs

How many leaves should I make for a full-looking plant?

The pattern shows how to create connected leaves. For a fuller Monstera appearance, I recommend making at least 5-7 leaves. You can chain between leaves as shown in the pattern to create a cascading effect with multiple leaves connected together.

Can I use different yarn weights for this pattern?

Yes, you can use different yarn weights, but you'll need to adjust your hook size accordingly. Using a heavier yarn will create a larger plant, while lighter yarn will make it more delicate. Just ensure your stitches are tight enough that the stuffing doesn't show through the pot.

How do I attach the hanging ropes securely?

The pattern instructs you to attach three chain-30 ropes to the rim of the pot (Row 11) with 12-13 stitches spacing between each rope. Weave the ends through multiple stitches and secure with knots to ensure they can support the weight of the filled pot.

What does BLO mean and why is it important in this pattern?

BLO stands for 'back loop only' which means you only crochet through the back loop of each stitch instead of both loops. In Row 6 of the pot, this creates a decorative ridge that defines the pot rim and provides a clear attachment point for the hanging ropes.

Can I make this pattern without the hanging feature?

Absolutely! You can skip the hanging rope chains and simply display your potted Monstera on a shelf or table. Just complete the pot and soil as instructed, omit the chain-30 ropes, and you'll have a lovely tabletop decoration.