🧢 Beautiful ✨ Detailed πŸ’ Adorable

Nemo the Clown Fish Amigurumi Pattern

Nemo the Clown Fish Amigurumi Pattern
4.3β˜… Rating
2-3 Hours Time Needed
2.2K Made This
βœ‚οΈ

Beginner Friendly Level

Perfect for those just starting their sewing journey, with clear instructions and simple techniques

⏱️

Bite-Sized Project

Complete in under 2 hoursβ€”quick, fun, and perfect for a little creative escape.

🐠

Charming Critter

Delightful animal designs with sweet details that capture the essence of your favorite woodland and farmyard friends.

About This Nemo the Clown Fish Amigurumi Pattern

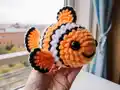
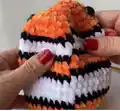
This delightful Nemo the Clown Fish amigurumi pattern captures the playful spirit of everyone's favorite animated fish character. Worked in continuous spiral rounds using the crossed stitch technique, this pattern creates a beautifully textured clownfish with bold orange, white, and black stripes. The pattern includes detailed instructions for the body, two side fins, two upper fins, and a gorgeous striped tail, all assembled to create a dimensional plush toy that stands approximately 20-24 cm tall. With 16mm safety eyes and a sweet embroidered smile, this little fish friend is ready to swim into your heart and home.

Nemo the Clown Fish Amigurumi Pattern crochet pattern - detailed view of completed project

Using Himalaya Velvet Yarn and a 4mm crochet hook, this pattern works up quickly with straightforward color changes that create Nemo's signature striped appearance. The comprehensive instructions include helpful notes about stuffing, shaping, and assembly, plus links to video tutorials for visual learners.

Why You'll Love This Nemo the Clown Fish Amigurumi Pattern

I absolutely love this Nemo pattern because it brings such joy and nostalgia to every stitch! The color changes create those iconic clownfish stripes that are instantly recognizable, and watching the little fish take shape round by round is incredibly satisfying. I appreciate how beginner-friendly this pattern is while still producing a professional-looking result that kids and adults alike will adore. The velvet yarn gives Nemo such a soft, huggable texture that makes him perfect for cuddling or displaying. Plus, with video tutorials included, you'll never feel lost during the process. Creating this cheerful underwater friend is like bringing a piece of the ocean into your home, and seeing that embroidered smile at the end makes all the effort worthwhile.

Nemo the Clown Fish Amigurumi Pattern step 1 - construction progress Nemo the Clown Fish Amigurumi Pattern step 2 - assembly progress Nemo the Clown Fish Amigurumi Pattern step 3 - details and accessories Nemo the Clown Fish Amigurumi Pattern step 4 - final assembly and finishing

Switch Things Up

I love experimenting with different color combinations for this Nemo pattern! While the classic orange, white, and black create the iconic clownfish look, you could try making different clownfish species by using pink and white stripes, or even create a fantasy version with blue and purple. The velvet yarn gives such a luxurious feel, but switching to cotton yarn creates a firmer, more structured fish that's perfect for playtime.

Consider adding embellishments like tiny bubbles around Nemo using clear beads or embroidered details, or create an entire Finding Nemo family by making multiple fish in slightly different sizes. You could even attach a small loop to the top fin to turn your clownfish into an adorable bag charm or car decoration.

For an extra special touch, try using variegated yarn for the orange sections to create a more dimensional, realistic appearance. You might also experiment with the positioning of the stripes by adding more or fewer black bands to create your own unique clownfish design. The possibilities are endless when you let your creativity swim free!

Common Mistakes & How to Fix Them

βœ— Forgetting to use a stitch marker can cause you to lose track of rounds, especially during color changes between orange, white, and black sections βœ— Stuffing too firmly or too loosely affects the shape, so add filling gradually while sculpting the body to maintain Nemo's rounded fish silhouette βœ— Not leaving yarn tails long enough for sewing fins and tail makes assembly frustrating, always leave at least 15-20 cm for secure attachment βœ— Crocheting fins too tightly makes them stiff and unnatural looking, maintain consistent tension to create flexible, realistic-looking fins that flow naturally

Nemo the Clown Fish Amigurumi Pattern

Dive into the magical underwater world with this adorable Nemo the Clown Fish amigurumi pattern! This charming crochet project brings the beloved clownfish character to life with vibrant orange, white, and black stripes that capture his iconic look. Perfect for beginners and intermediate crocheters, this pattern uses simple techniques like single crochet, increases, and decreases worked in continuous spiral rounds. The finished Nemo measures approximately 20-24 cm and features safety eyes, adorable side fins, upper fins, and a beautiful striped tail. Whether you're creating a special gift for a Finding Nemo fan or adding to your amigurumi collection, this cuddly clownfish will bring smiles and ocean adventures to any home.

Beginner Friendly 2-3 Hours

Materials Needed for Nemo the Clown Fish Amigurumi Pattern

β€” Main Fabric

  • 01
    Himalaya Velvet Yarn in Orange (90016), White (90001), and Black (90011)
  • 02
    Any velvet or soft worsted weight yarn in orange, white, and black colors can be substituted

β€” Tools Required

  • 01
    4mm crochet hook
  • 02
    Safety eyes 16mm
  • 03
    Tapestry needle
  • 04
    Black amigurumi thread for embroidery
  • 05
    Fiberfill stuffing
  • 06
    Scissors
  • 07
    Stitch markers (recommended)

Progress Tracker

0% Complete

β€” BODY :

Info :

Start with orange

Round 1 :

6 sc into the magic ring (6)

Round 2 :

(inc) * 6 (12)

Round 3 :

(sc, inc) * 6 (18)

Round 4 :

sc, inc, (2 sc, inc)* 5, sc (24)

Round 5 :

(3 sc, inc)* 6 (30)

Round 6 :

2 sc, inc, (4 sc, inc) * 5, 2 sc (36)

Round 7 :

sc, inc, (3 sc, inc) * 8, 2 sc (45)

Round 8 :

45 sc (B) (45)

Round 9-10 :

45 sc (W) 2 rows (45)

Round 11 :

45 sc (B) (45)

Round 12-13 :

45 sc (O) 2 rows (45)

Round 14 :

45 sc (B) (45)

Round 15-17 :

45 sc (W) 3 rows (45)

Round 18 :

45 sc (B) (45)

Round 19-20 :

45 sc (O) 2 rows (45)

Round 21 :

sc, dec, (3 sc, dec)* 8, 2 sc (O) (36)

Round 22 :

2 sc, dec, (4 sc, dec)* 5, 2 sc (B) (30)

Round 23 :

(3 sc, dec)* 6 (W) (24)

Round 24 :

(2 sc, dec)* 6 (B) (18)

Round 25 :

(sc, dec)* 6 (O) (12)

Round 26 :

(dec)* 6 (O) (6)

Info :

1 Slst to next empty stitch, pull 1 chain, FO. Stuff. Cut the yarn short and hide

Info :

Safety eyes will be attached between the 5th and 6th row

β€” SIDE FIN (x2) :

Info :

With orange thread

Round 1 :

6 sc into the magic ring (6)

Round 2 :

(inc)* 6 (12)

Round 3 :

(3 sc, inc)* 3 (15)

Round 4 :

(4 sc, inc)* 3 (18)

Round 5 :

(5 sc, inc)* 3 (21)

Round 6 :

(6 sc, inc)* 3 (24)

Info :

Leave the orange thread long for sewing and cut

Info :

With black thread, take opposite stitches and crochet 12 sc as shown in pictures, 1 Slst to next empty stitch, pull 1 chain, FO. Cut the yarn short and hide

β€” UPPER FIN (x2) :

Info :

With orange thread, pull 4 chains, start to crochet in second chain. All rows will be HDC

Row 1 :

3 HDC, turn and Ch1 (3)

Row 2 :

2 HDC, inc HDC, turn and Ch1 (4)

Row 3 :

4 HDC, turn and Ch1 (4)

Row 4 :

4 HDC, turn and Ch1 (4)

Row 5 :

Dec HDC, 2 HDC, turn and Ch1 (3)

Row 6 :

HDC, Dec HDC (2)

Info :

1 Slst to next empty stitch. Leave the thread long for sewing

Info :

Place the second piece you knit on top of the first piece. The edges will be crocheted 1 row: 9 sc with orange thread, 11 sc with black thread

β€” TAIL :

Info :

With orange thread

Round 1 :

6 sc into the magic ring (6)

Round 2 :

(inc)* 6 (12)

Round 3 :

(3 sc, inc)* 3 (15)

Round 4 :

(4 sc, inc)* 3 (18)

Round 5 :

(5 sc, inc)* 3 (21)

Round 6 :

(6 sc, inc)* 3 (24)

Round 7 :

(7 sc, inc)* 3 (27)

Round 8 :

(8 sc, inc)* 3 (30)

Info :

Leave the orange thread long for sewing and cut

Info :

With black thread, take opposite stitches and crochet 15 sc as shown in pictures

Assembly Instructions

  • Attach safety eyes between the 5th and 6th rows of the body, spacing them appropriately to create Nemo's friendly expression
  • Sew the tail to the last 2 rows of the body, ensuring the black striped edge aligns properly with the body's stripes
  • Attach the side fins between the 12th and 15th rows of the body on both sides, positioning them symmetrically for balanced appearance
  • Sew the upper fins between the 11th and 20th rows of the body, placing them on the top center to create the dorsal fin
  • Embroider the smiling face using black amigurumi thread below the eyes, creating a gentle curved smile that brings Nemo to life
  • Check all attachments are secure and adjust stuffing if needed to maintain the rounded clownfish shape throughout

Important Notes

  • πŸ’‘All rounds are worked in a continuous spiral, use a stitch marker to track your rounds and color changes
  • πŸ’‘Knit using the crossed stitch technique for better texture and durability throughout the entire project
  • πŸ’‘Take care while stuffing to give each part a nice rounded shape, especially the body and tail sections
  • πŸ’‘Leave yarn tails long enough for sewing when finishing side fins, upper fins, and tail pieces before cutting
  • πŸ’‘Video tutorials are available (Part 1 and Part 2 linked in pattern) for visual guidance through challenging steps
  • πŸ’‘Safety eyes should be positioned and secured before completing the body to ensure they're properly placed and safe

This enchanting Nemo the Clown Fish amigurumi pattern brings the magic of the ocean right into your hands! With its vibrant striped design and adorable features, this friendly fish makes the perfect companion for children and adults who love Finding Nemo or marine life. The straightforward construction using continuous spiral rounds means you'll see your clownfish taking shape quickly, while the velvet yarn creates an irresistibly soft, cuddly texture. Whether you're making him as a gift, room decoration, or starting an underwater amigurumi collection, Nemo is sure to make waves of happiness wherever he goes! 🐠🧢✨

You ask,

we answer.

FAQs

What size will my finished Nemo be?

Using the recommended Himalaya Velvet Yarn and 4mm hook, your finished Nemo will measure approximately 20-24 cm (7.87-9.44 inches) in length. The size can vary slightly depending on your tension and how firmly you stuff the body.

Can I use different yarn instead of Himalaya Velvet?

Yes! You can substitute any worsted weight or velvet-style yarn in orange, white, and black. Just keep in mind that different yarn weights will affect the final size of your clownfish, and you may need to adjust your hook size accordingly.

What does 'crossed stitch' mean in the pattern?

The crossed stitch refers to crocheting through both loops of the stitch but inserting your hook in a slightly different way to create a twisted, more textured appearance. The video tutorials linked in the pattern demonstrate this technique clearly for visual learners.

When should I attach the safety eyes?

The pattern specifies that safety eyes should be attached between the 5th and 6th rows of the body. It's important to position and secure them before you complete and close the body, as they cannot be added afterward.

How do I keep track of color changes?

Use stitch markers to mark the beginning of each round, especially when changing colors between orange, white, and black sections. The pattern clearly indicates when to switch colors with (B), (W), or (O) notations throughout the instructions.

Do I need to stuff the fins and tail?

No, only the main body needs stuffing. The side fins, upper fins, and tail remain flat and are sewn onto the stuffed body to create dimension and the characteristic clownfish appearance.