🧢 Beautiful ✨ Detailed πŸ’ Adorable

Forget-Me-Not Fairy Amigurumi Pattern

Forget-Me-Not Fairy Amigurumi Pattern
4.3β˜… Rating
6-8 Hours Time Needed
2.3K Made This
βœ‚οΈ

Intermediate Level

Ideal for those with basic knitting experience, featuring slightly more advanced stitches and techniques to expand your skills.

⏱️

Weekend Treat

Takes 5-7 hours, making it an enjoyable project to finish over a couple of days.

🧸

Tiny Treasure

Small, sweet, and gift-worthy creations that fit perfectly in the palm of your hand with detailed charm.

About This Forget-Me-Not Fairy Amigurumi Pattern

This Forget-Me-Not Fairy pattern is a miniature masterpiece that combines delicate crochet work with intricate assembly techniques. The pattern guides you through creating a tiny 6cm fairy doll complete with a cone-shaped body, sweet facial features, and flowing golden hair styled to perfection. The highlight is the beautiful bell-shaped hat adorned with hand-crocheted forget-me-not flowers, each one carefully attached to create a whimsical crown.

Forget-Me-Not Fairy Amigurumi Pattern crochet pattern - detailed view of completed project

What makes this pattern special is the attention to detail in every element, from the wire-wrapped flower stems to the carefully sewn arms. The finished fairy holds a small bouquet of three forget-me-not flowers, making her a perfect gift or decorative piece.

Why You'll Love This Forget-Me-Not Fairy Amigurumi Pattern

I absolutely love how this pattern transforms simple materials into something truly magical. The process of creating each tiny forget-me-not flower and watching the fairy come to life is incredibly rewarding. I find the wire-wrapping technique for the flower stems particularly satisfying, and the way the finished fairy stands proudly with her little bouquet never fails to make me smile. What I cherish most is how this pattern teaches you patience and precision while creating something so enchanting and personal.

Forget-Me-Not Fairy Amigurumi Pattern step 1 - construction progress Forget-Me-Not Fairy Amigurumi Pattern step 2 - assembly progress Forget-Me-Not Fairy Amigurumi Pattern step 3 - details and accessories Forget-Me-Not Fairy Amigurumi Pattern step 4 - final assembly and finishing

Switch Things Up

I love experimenting with color variations for this sweet fairy pattern! Instead of the classic light blue hat and dress, I've created autumn versions with burnt orange and deep burgundy that look absolutely stunning. You could even make a whole garden of fairies in different colors - imagine a lavender fairy with purple forget-me-nots, or a spring green fairy with white flowers!

I've also played around with the hairstyle options. While the pattern suggests golden yellow hair, I've made fairies with brown, auburn, and even silvery white hair for a winter fairy effect. You can style the hair differently too - try braiding it, creating an updo, or leaving it long and flowing for variety.

For the flowers, I sometimes add tiny beads to the centers instead of just crocheted yarn, which gives them extra sparkle and dimension. You could also experiment with different flower types entirely - tiny roses, daisies, or even cherry blossoms would be adorable!

I've found that making the arms slightly longer (adding 0.5cm) gives the fairy a more graceful proportion, especially if you want her to hold the bouquet in a different position. Some crafters add tiny embroidered details like freckles, rosy cheeks with blush, or even eyelashes for extra personality.

Common Mistakes & How to Fix Them

βœ— Not stuffing the head and body firmly enough, which can cause the fairy to lose shape over time βœ— Skipping the cardboard circle insert in the body base, resulting in an unstable fairy that won't stand properly βœ— Cutting hair pieces too short or unevenly, making it difficult to create a neat hairstyle later βœ— Not wetting and smoothing the hair after attaching, leaving it sticking out in all directions βœ— Wrapping the wire stems too loosely for arms and flowers, causing them to unravel or look messy βœ— Forgetting to mark rounds while crocheting in spiral, leading to confusion about stitch count βœ— Sewing flowers to the hat without securing all petals properly, causing them to flip or fall off

Forget-Me-Not Fairy Amigurumi Pattern

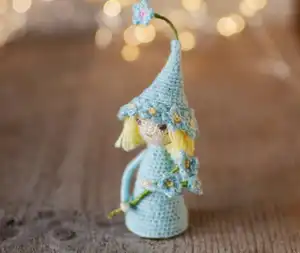
Create your own enchanting Forget-Me-Not Fairy with this delightful crochet pattern! This whimsical design features a petite fairy doll adorned with a charming bell-shaped hat decorated with delicate forget-me-not flowers. Standing at just 6cm tall, she comes complete with golden hair, a sweet embroidered face, and a tiny bouquet of flowers to hold. Perfect for fairy lovers and collectors of miniature treasures, this pattern combines basic crochet techniques with detailed assembly work to bring magical charm to life.

Intermediate 6-8 Hours

Materials Needed for Forget-Me-Not Fairy Amigurumi Pattern

β€” Main Fabric

  • 01
    Cotton crochet thread (10 gr/87m ~ 1 oz/ 267 yd) in Beige
  • 02
    Cotton crochet thread in Light blue
  • 03
    Cotton crochet thread in Light yellow
  • 04
    Cotton crochet thread in Light pink (small amount)
  • 05
    Cotton crochet thread in Green
  • 06
    Embroidery floss in Brown for eyes
  • 07
    Embroidery floss in Reddish brown for mouth
  • 08
    Embroidery floss for stitching in Beige, Light yellow, and Light blue

β€” Tools Required

  • 01
    Crochet hook 0.9mm or 1mm (US 12 – UK 6)
  • 02
    Sewing needle and pins
  • 03
    Tapestry needle
  • 04
    Scissors
  • 05
    Thin wire 0.2-0.3mm (~ 0.01 in)
  • 06
    Glue stick
  • 07
    Old bank card or cardboard
  • 08
    Synthetic or organic filler for stuffing
  • 09
    Stitch markers (recommended)

Progress Tracker

0% Complete

β€” Head :

Round 1 :

2 ch and 6 sc into first ch (6 sts)

Round 2 :

(inc) X 6 (12 sts)

Round 3 :

(1sc,inc) X 6 (18 sts)

Round 4 :

(2sc,inc) X 6 (24 sts)

Round 5-11 :

sc around (24 sts) - 7 rounds

Round 12 :

(2sc, dec) X 6 (18 sts)

Round 13 :

(1sc, dec) X 6 (12 sts)

Info :

Stuff the head tightly with filler after round 13

Round 14 :

(dec) X 6 (6 sts)

Round 15 :

decrease and close the hole with a slip stitch
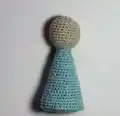
β€” Body :

Round 1 :

2 ch and 6 sc into first ch (6 sts)

Round 2 :

(inc) X 6 (12 sts)

Round 3 :

(1sc,inc) X 6 (18 sts)

Round 4 :

(2sc,inc) X 6 (24 sts)

Round 5 :

(3sc,inc) X 6 (30 sts)

Round 6 :

(4sc,inc) X 6 (36 sts)

Round 7 :

(5sc,inc) X 6 (42 sts)

Info :

Make a circular bottom from an old plastic card – outline the hexagon with a pencil and cut it out with a slightly smaller diameter

Round 8 :

Make single crochets perpendicular to the previous round – work not in the top of the stitch but around the post (42 sts)

Round 9-10 :

sc around (42 sts) - 2 rounds

Round 11 :

(5sc,dec) X 6 (36 sts)

Round 12-14 :

sc around (36 sts) - 3 rounds

Round 15 :

(4sc,dec) X 6 (30 sts)

Round 16-18 :

sc around (30 sts) - 3 rounds

Round 19 :

(3sc,dec) X 6 (24 sts)

Info :

After round 19 place the cardboard circle inside

Round 20-22 :

sc around (24 sts) - 3 rounds

Round 23 :

(2sc,dec) X 6 (18 sts)

Round 24-26 :

sc around (18 sts) - 3 rounds

Round 27 :

(1sc,dec) X 6 (12 sts)

Round 28-29 :

sc around (12 sts) - 2 rounds

Info :

Stuff the finished cone with filler rather tightly using the ends of scissors

β€” Hair and Hairstail :

Info :

You'll need about 64 pieces of light yellow thread 8cm (3.2 in) long. Use 4cm (1.6 in) wide cardboard for making hair pieces

Infos :

Mark the place on the head for the face with pins. Attach yellow threads in macramΓ© knots, one by one in each round. Insert hook through 2 holes of nearby rounds, pull loop and pull ends through loop and tighten. Start from bottom round and move upwards covering about 6 rounds from the top of head

Hair pieces per round :

R9: 11, R10: 12, R11: 13, R12: 11, R13: 8, R14-15: 9 (approximate numbers)

Info :

Wet the hair, smooth and leave to dry. When dry, cut hair little by little to create desired hairstyle. Sew the finished hairstyle to the head partially in small stitches

β€” Hat :

Round 1 :

2 ch and 5 sc into first ch (5 sts)

Round 2-3 :

sc around (5 sts) - 2 rounds

Round 4 :

(inc) X 5 (10 sts)

Round 5-6 :

sc around (10 sts) - 2 rounds

Round 7 :

(1sc,inc) X 5 (15 sts)

Round 8-9 :

sc around (15 sts) - 2 rounds

Round 10 :

(2sc,inc) X 5 (20 sts)

Round 11-12 :

sc around (20 sts) - 2 rounds

Round 13 :

(3sc,inc) X 5 (25 sts)

Round 14 :

sc around (25 sts)

Round 15 :

(4sc,inc) X 5 (30 sts)

Round 16 :

sc around (30 sts)

Round 17 :

(5sc,inc) X 5 (35 sts)

Round 18 :

(6sc,inc) X 5 (40 sts)

Round 19 :

(7sc,inc) X 5 (45 sts)

Round 20 :

Lace edging: (1sl st, 1ch, 5dc, 1ch, 1sl st) X 9

β€” Forget-Me-Not Flowers (make 10) :

Center :

Yellow thread: 2 ch and 5 sc into first ch (5 sts), join in a ring with sl st

Petals :

Light blue thread: (sl st, ch, 2 double crochet cluster, ch, sl st) X 5, finish by joining the round with sl st

Info :

Make 9 flowers with yellow center and 1 flower with pink center for the hat top. Thread end through center to wrong side. Tie all 4 thread tails tightly together and cut off leaving 4-5mm tail

Assembly :

Sew 9 flowers on edges of hat edging one by one with thin thread in very small imperceptible stitches. For the pink center flower: prepare 10cm wire piece, pass wire through center loops, fold in half and twist to form stem. Wrap green thread around stem tightly for 4.5cm, tie ends tightly. Cut wire 2-3mm from knot, bend upward and press to stem. Insert flower in center hole of hat with 1.7cm stem outside, press stem inside to back of hat and sew with light blue thread

Finishing :

Put a little filler inside the bell-flower hat, place on doll's head, fix with pins and sew thoroughly with imperceptible stitches

β€” Arms (make 2) :

Info :

Prepare 2 pieces of wire 10cm long. Make both arms at the same time doing one step for each arm

Step 1 :

Wrap beige thread around 2 fingers 10 times and tie tightly in the middle. Cut at other side

Step 2 :

Fold in half with knot at fold, put wire around bunch 3-4mm from knot for hand and wrist, twist wire ends together very tightly at wrist

Step 3 :

Cut the bunch diagonally (not straight) at 3cm distance from wired wrist

Step 4 :

Take light blue thread, leave long tail, place along bunch up to wrist, wrap thread around arm above wire very tightly and neatly placing wraps side by side. When reaching end of beige threads, tie blue thread tightly leaving long tails

Step 5 :

Repeat wrapping with blue thread again so sleeve is wrapped twice. Tie ends very tightly. Cut off wire leaving 1cm long tails. Arms should be approximately 3.5cm long

Attaching :

Find spots 3 rounds down from neckline on both sides, mark with pins. Widen hole with crochet hook, insert arm's wire in hole. Thread long blue threads in tapestry needle, pull through same hole to other side. Pull to deepen arm in body. Sew arm to body around shoulder carefully with sewing needle and embroidery floss in very small imperceptible stitches. Pull tail and cut off

β€” Eyes and Mouth :

Eyes :

Embroider with brown thread between rounds 8 and 9. Distance between eyes is 4 crochet stitches. Length of eyes is 1 or 1.5 single crochet. Height of eyes is 4 sew stitches

Mouth :

Embroider with reddish brown embroidery floss in round 6 by 2 sew stitches
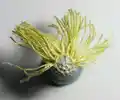
β€” Small Flower Bouquet :

Flowers :

Make 3 forget-me-not flowers with yellow center as for hat

Stems :

Make wired stems for all 3 flowers. Twist wire of two flowers only at beginning, twist wire till end for third one

Wrapping First 2 Flowers :

Wrap stems with green thread: wrap around 7mm of stem, cut loose end. When wrapping around 1cm of stem, place end of green thread between wire's ends and cut leaving 3cm tail

Assembling Bouquet :

Start 3rd flower wrapping as before. Add second flower after 1.2cm of wrapping and wrap around both stems. Add one more flower after 5mm more wrapping and work around 3 stems. After 1 more cm, cut 2 loose ends, leave 1, continue wrapping. After 1 more cm cut 1 wired stem off, after 5mm more cut second stem off. When wrapping 4.5cm total, tie green thread ends very tightly

Finishing :

Cut wire 2-3mm from knot, bend wire upward and press hard to stem. Cut threads at 5mm distance from knot and apply glue stick to ends

Final Assembly :

Sew head to body neatly between rounds 2 and 3 of head using beige thin thread. Give the flower bouquet to the fairy

Assembly Instructions

  • Sew the head to the body using beige embroidery floss, attaching between rounds 2 and 3 of the head with imperceptible stitches
  • Attach hair pieces using macramΓ© knots in rounds 9-15, then wet, smooth, dry, trim to desired style, and partially sew in place
  • Sew 9 blue forget-me-not flowers to the hat edging, then attach the pink center flower with wire stem to the hat top
  • Place small amount of filler inside hat, position on head, secure with pins, and sew thoroughly with invisible stitches
  • Attach both arms 3 rounds down from neckline by widening holes, inserting wire, and sewing around shoulders with tiny stitches
  • Embroider eyes with brown thread between rounds 8-9 (4 stitches apart) and mouth with reddish brown in round 6
  • Assemble the three-flower bouquet with wrapped wire stems and place in the fairy's hand

Important Notes

  • πŸ’‘This project requires excellent sewing skills and patience during assembly for best results
  • πŸ’‘Pull the initial thread end out between rounds 2 and 3 to use as a marker for counting rounds
  • πŸ’‘When pieces become voluminous, fold them in half while working to make crocheting easier
  • πŸ’‘Wet the bottom of the body cone and let it dry on an even surface to ensure it stands straight
  • πŸ’‘Always make both arms simultaneously doing one step at a time to ensure they match perfectly
  • πŸ’‘Use thin embroidery floss for sewing instead of thick yarn as it slides better and creates invisible stitches
  • πŸ’‘If using thicker yarn than recommended, you'll need to make longer arms and more hair pieces to maintain proportions

This enchanting Forget-Me-Not Fairy pattern brings a touch of woodland magic to your crochet collection! With her delicate bell-shaped hat adorned with tiny blue flowers and a sweet bouquet in hand, this miniature fairy is perfect for display or as a heartfelt gift. The pattern challenges you to master wire-wrapping techniques and precise assembly while creating something truly special. Every stitch brings her closer to life, from her flowing golden hair to her tiny embroidered smile. 🧚✨ Happy crocheting! 🌸🧡

You ask,

we answer.

FAQs

What size will my finished fairy be?

Using the recommended cotton crochet thread and 0.9-1mm hook, your fairy will be approximately 6cm (2.4 inches) tall. If you use thicker yarn, the fairy will be larger and will require longer arms and more hair pieces to maintain proper proportions.

How do I keep track of rounds when crocheting in spiral?

Pull the initial thread end out between rounds 2 and 3 to use as a marker. This will help you count rounds throughout the project. You can also use stitch markers at the beginning of each round for easier tracking.

What's the best way to attach the hair so it looks neat?

Attach hair pieces using macramΓ© knots, inserting your hook from top downwards starting from the bottom round and moving upwards. After attaching all pieces, wet the hair, smooth it down, and let it dry completely before trimming to your desired style. Partially sew the finished hairstyle to the head in small stitches.

Why won't my fairy stand straight?

Make sure you've inserted the cardboard circle into the body base after round 19 and stuffed the body firmly. The bottom of the cone may not be flat initially, so wet it slightly and let it dry standing on an even surface to flatten the base.

How do I make the arms look professional and not messy?

The key is wrapping the wire very tightly at the wrist and wrapping the blue thread sleeve neatly with wraps placed side by side. Make both arms simultaneously, doing each step one at a time for both arms to ensure they match. Don't hesitate to practice on 1-2 test arms before making the final pieces.

Can I make the fairy without wire in the arms and flowers?

While the wire is recommended for structure and posability, you could potentially crochet simple arms without wire. However, the flower stems require wire to stand upright and maintain their shape, especially for the bouquet and the central hat flower.