🧢 Beautiful ✨ Detailed πŸ’ Adorable

Tuk Tuk Armadillo Amigurumi Pattern

Tuk Tuk Armadillo Amigurumi Pattern
3.9β˜… Rating
8-10 Hours Time Needed
3.3K Made This
βœ‚οΈ

Advanced Level

Designed for experienced knitters, these patterns involve intricate designs and complex techniques to challenge and inspire.

⏱️

All-Day Adventure

Requires 8-10 hours, ideal for a full day of immersive knitting.

🧸

Cute Companion

An adorable friend to cherish, handcrafted with love to bring comfort and joy for years to come.

About This Tuk Tuk Armadillo Amigurumi Pattern

This enchanting Tuk Tuk pattern captures the essence of Disney's beloved armadillo character with remarkable attention to detail. The pattern features a removable armor shell constructed from eight interlocking pieces that genuinely fold and unfold around the sweet armadillo body. With embroidered facial features, delicate antennas, and four adorable spotted legs attached using threaded bracing technique, this project showcases advanced amigurumi construction methods that result in a truly special handmade treasure.

Tuk Tuk Armadillo Amigurumi Pattern crochet pattern - detailed view of completed project

The innovative design allows you to crochet both the inner soft body and the articulated outer armor separately, creating an interactive toy that's both cuddly and display-worthy. This pattern combines multiple yarn colors and specialized techniques including color changes, working in rows and rounds, and detailed assembly instructions.

Why You'll Love This Tuk Tuk Armadillo Amigurumi Pattern

I absolutely love this pattern because it goes beyond typical amigurumi with its engineering marvel of detachable, folding armor pieces. The satisfaction of watching those eight armor segments come together to create a functional shell is incredibly rewarding. I appreciate how the pattern challenges you with thread bracing for limb attachment and color-change techniques that create beautiful transitions. The embroidery details for the face and leg spots add such personality and charm. Most importantly, I love that this creates an interactive toy where Tuk Tuk can actually roll up in his armor, making it a conversation piece that showcases your advanced crochet skills while capturing Disney magic in every stitch.

Tuk Tuk Armadillo Amigurumi Pattern step 1 - construction progress Tuk Tuk Armadillo Amigurumi Pattern step 2 - assembly progress Tuk Tuk Armadillo Amigurumi Pattern step 3 - details and accessories Tuk Tuk Armadillo Amigurumi Pattern step 4 - final assembly and finishing

Switch Things Up

I absolutely love how versatile this Tuk Tuk pattern can be with just a few creative modifications! For a more vibrant look, I sometimes swap the neutral beige and pink tones for brighter colors like turquoise and coral, giving Tuk Tuk a tropical fantasy vibe that really pops.

I've also experimented with adding small decorative elements to the armor piecesβ€”tiny embroidered flowers or geometric patterns using surface crochet can transform the armor into something truly unique and personalized. Some makers I know have even added small beads between the armor segments for a slight rattle effect, making it extra engaging for children.

If you want to make Tuk Tuk more poseable, consider inserting thin wire into the legs before stuffing them completely. This allows you to bend and position the legs in different poses, though I recommend wrapping the wire in yarn first to prevent it from poking through.

For a larger version, I've successfully scaled up the pattern by using DK weight yarn with a 2.5mm hook, which creates an approximately 12cm tall Tuk Tukβ€”perfect for those who want more presence on a shelf. Just remember to use proportionally larger safety eyes (around 15mm) for the scaled version.

I also love adding a tiny crocheted flower crown or a small backpack accessory, which doesn't interfere with the armor mechanism but adds so much personality. The beauty of this pattern is that once you master the armor construction technique, you can apply it to create other armored creatures using your imagination!

Common Mistakes & How to Fix Them

βœ— Forgetting to mark the beginning of rounds with pins or markers, leading to miscounts and misaligned pieces throughout construction βœ— Overstuffing the body which makes it difficult to attach the armor pieces properly and prevents the shell from closing smoothly βœ— Skipping the color-change technique instructions for clean transitions, resulting in messy lines between the inner armor and outer sections βœ— Not using threaded bracing for leg attachment and instead sewing directly, which creates weak joints that won't support the toy's weight βœ— Rushing through the eight outer armor pieces without ensuring consistent tension, causing segments that don't align or connect properly βœ— Neglecting to check stitch counts after each round, particularly in the head shaping where precise decreases are critical for facial proportions

Tuk Tuk Armadillo Amigurumi Pattern

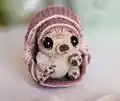
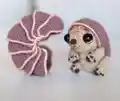
Create your own adorable Tuk Tuk, the charming armadillo companion from Disney! This delightful crochet pattern brings to life the lovable pet with a unique detachable armor feature that can fold and unfold, just like in the movie. Standing at approximately 9 cm tall, this sweet amigurumi combines intricate detailing with clever construction techniques. Perfect for Disney fans and amigurumi enthusiasts who love a creative challenge with rewarding results!

Advanced 8-10 Hours

Materials Needed for Tuk Tuk Armadillo Amigurumi Pattern

β€” Main Fabric

  • 01
    Alize Cotton Gold Batik yarn (330m/100gr, Sport weight) in beige/tan color
  • 02
    Gazzal Baby Cotton yarn (165m/50gr, Sport weight) in pink color
  • 03
    Gazzal Jeans yarn (170m/50gr, Sport weight) in brown color

β€” Tools Required

  • 01
    Crochet hook 1.75mm (for main body and armor)
  • 02
    Crochet hook 1.5mm (for spots and antennas)
  • 03
    12mm safety eyes
  • 04
    Black embroidery floss
  • 05
    White embroidery floss
  • 06
    Brown embroidery floss
  • 07
    Yarn needle (tapestry needle with blunt end)
  • 08
    Needles for cutting with beads on the end (for pinning parts)
  • 09
    2 pins or stitch markers
  • 10
    Polyester fiberfill stuffing (synthepus)
  • 11
    Scissors
  • 12
    Sewing needle
  • 13
    Brown felt (optional, for closing hole)
  • 14
    Round-nosed pliers (for threaded bracing)

Progress Tracker

0% Complete

β€” TUMMY (Yarn A) :

Round 1 :

2 loops, 6sc in 2nd loop from hook (amigurumi ring) (6l)

Round 2 :

[inc]Ρ…6 (12l)

Round 3 :

[sc, inc]Ρ…6 (18l)

Round 4 :

[2sc, inc]Ρ…6 (24l)

Round 5 :

[3sc, inc]Ρ…6 (30l)

Round 6 :

[4sc, inc]Ρ…6 (36l)

Round 7 :

[5sc, inc]Ρ…6 (42l)

Round 8 :

[6sc, inc]Ρ…6 (48l)

Info :

Cut and fix the thread. The pin marking the beginning of the round will be the place where the tummy connects to the head.

β€” MUZZLE (Yarn A) :

Round 1 :

6 loops, turning, 5sc (starting from the 2nd loop from the hook), 5sc (from the back of the chain) (10l)

Round 2 :

[4sc, inc]Ρ…2 (12l)

Round 3 :

12sc, sl st in the 1st sc (12l)

Info :

Cut and fix the thread, leaving a long end for sewing. Using yarn needle to embroider the nose with brown threads floss. Divide the floss in half, embroider the mouth.

β€” HEAD (Yarn A) :

Round 1 :

10 loops, turning, 9sc (starting from the 2nd loop from the hook), 9sc (from the back of the chain) (18l)

Round 2 :

3sc in the next loop, 7sc, 3sc in the next loop, 3sc, inc, sc, inc, 3sc (24l)

Round 3 :

sc, 3sc in the next loop, 9sc, 3sc in the next loop, 5sc, inc, 2sc, inc, 3sc (30l)

Round 4 :

2sc, 3sc in the next loop, 11sc, 3sc in the next loop, 7sc, inc, 3sc, inc, 3sc (36l)

Round 5 :

3sc, 3sc in the next loop, 13sc, 3sc in the next loop, 9sc, inc, 4sc, inc, 3sc (42l)

Round 6 :

4sc, 3sc in the next loop, 15sc, 3sc in the next loop, 11sc, inc, 5sc, inc, 3sc (48l)

Round 7 :

48sc (48l)

Infos :

Insert safety eyes between rounds 3 and 4, distance between them approximately 15 stitches, don't fix yet. Using yarn needle to do from inner corner to top of eye 'loose stitch' of white thread floss in two folds. Separate one thread and fasten with needle 'loose stitch'. Using yarn needle to do from above of eye 'loose stitch' of black thread floss in two folds. Separate one thread and fasten with needle 'loose stitch'. Make from below of eye 'loose stitch' of black thread floss in one fold. Separate one thread and fasten with needle 'loose stitch'. Press eye to embroidered line and fasten it. Sew muzzle to face. Divide brown threads floss in half, embroider eyebrows. Continue crocheting.

Round 8-9 :

48sc (48l)

Round 10 :

4sc, {sc3tog}, 15sc, {sc3tog}, 11sc, dec, 5sc, dec, 3sc (42l)

Info :

Connect the head with the tummy in the next round. To connect the details insert the hook initially into the tummy (from the inside to the outside), and then into the head (from the outside to the inside).

Round 11 (incomplete round) :

Crochet 8sc along the head, crochet 12sc of the head together with 12sc of the tummy, crochet 22sc along the head

Round 12 :

Crochet 8sc on the head, crochet 36sc on the tummy, crochet 22sc on the head (66l)

Round 13 :

8sc - don't crochet this round to the end. Don't trim the thread. Move the pin marking the beginning of the round to the 9th loop to the left. Count 30 loops counter-clockwise from the beginning of the round and hang up the extra pin - this pin will be the place where the head connect to the inner armor

β€” INNER ARMOR (Yarn B) :

Info :

Crochet inner armor along rows.

Row 1 :

2 loops, turning, inc (starting from the 2nd loop from the hook) (2l)

Row 2 :

1 loop, turning, inc, sc (3l)

Row 3 :

1 loop, turning, sc, inc, sc (4l)

Row 4 :

1 loop, turning, sc, inc, 2sc (5l)

Row 5 :

1 loop, turning, 2sc, inc, 2sc (6l)

Row 6-11 :

1 loop, turning, 6sc (6l)

Row 12 :

1 loop, turning, 2sc, inc, 3sc (7l)

Row 13 :

1 loop, turning, 7sc (7l)

Row 14 :

1 loop, turning, 3sc, inc, 3sc (8l)

Row 15-16 :

1 loop, turning, 8sc (8l)

Row 17 :

1 loop, turning, 3sc, dec, 3sc (7l)

Row 18 :

1 loop, turning, 7sc (7l)

Row 19 :

1 loop, turning, 2sc, dec, 3sc (6l)

Row 20-25 :

1 loop, turning, 6sc (6l)

Row 26 :

1 loop, turning, 2sc, dec, 2sc (5l)

Row 27 :

1 loop, turning, sc, dec, 2sc (4l)

Row 28 :

1 loop, turning, sc, dec, sc (3l)

Row 29 :

1 loop, turning, dec, sc (2l)

Row 30 :

1 loop, turning, dec (1l)

Info :

To get a beautiful line when changing color in the next round crochet part of the sc in this way - half of the sc with brown thread, and the other half with pink (Yarn B + Yarn C).

Round 31 :

Crochet 30sc down the side (Yarn Π’ + Yarn Π‘). Next attach the armor to the head and crochet 30 sc of the armor together with 30 sc of the head with Yarn B only

Info :

In the next round crochet part of the sc in this way - half of the sc with beige thread, and the other half with brown (Yarn A + Yarn B).

Round 32 :

Crochet 36sc on the tummy (Yarn A + Yarn B), 30sc on the armor (Yarn B) (66l). Next crocheting along continuous rounds.

Round 33-35 :

66sc (66l)

Round 36 :

[9sc, dec]Ρ…6 (60l)

Round 37 :

[8sc, dec]Ρ…6 (54l)

Round 38 :

[7sc, dec]Ρ…6 (48l)

Round 39 :

[6sc, dec]Ρ…6 (42l)

Round 40 :

[5sc, dec]Ρ…6 (36l)

Round 41 :

[4sc, dec]Ρ…6 (30l)

Info :

Start stuffing the body with synthepus.

Round 42 :

[3sc, dec]Ρ…6 (24l)

Round 43 :

[2sc, dec]Ρ…6 (18l)

Round 44 :

[sc, dec]Ρ…6 (12l)

Infos :

Sew the holes between the head and the tummy using extra thread. Completely fill the body. Tip: Cut out a circle of brown felt it should be a little larger than the resulting hole. Insert it into the hole in order to synthepus does not cling to the hook during closing the detail.

Round 45 :

[dec]Ρ…6 (6l)

Info :

Trim the thread. Pass the thread through all the loops using a yarn needle. Tighten and secure.

β€” LEGS, 4 pieces (Yarn A) :

Round 1 :

4 loops, turning, 3sс (starting from the 2nd loop from the hook), 3sс (from the back of the chain) (6l)

Round 2 :

[inc]Ρ…6 (12l)

Round 3 :

12sc (12l)

Round 4 :

3 sl st, 6sc, 3 sl st (12l)

Round 5 :

[dec]Ρ…2, sc, [inc]Ρ…2, sc, [dec]Ρ…2 (10l)

Round 6-7 :

10sc (10l)

Info :

Start stuffing the hand with synthepus.

Round 8 :

inc, 8sc, inc (12l)

Round 9 :

12sc (12l)

Info :

Completely fill the hand.

Round 10 :

[dec]Ρ…6 (6l)

Info :

Trim the thread. Pass the thread through all the loops using a yarn needle. Tighten and secure.

β€” SPOT (Brown threads floss) :

Round 1 :

4 loops, turning, 3sc (starting from the 2nd loop from the hook), 3sс (from the back of the chain) (6l)

Infos :

Cut and fix the thread, leaving a very long end for sewing. Sew the spot to the foot. Don't cut the thread, but move upward diagonally from the spot. Make 3 French knots. Divide the threads floss in half, embroider 4 stripes.

β€” ANTENNAS, 2 pieces (Yarn A) :

Info :

Divide the thread of Yarn A in half. Antennas are crocheted the form of a cord of two threads at once with 1.5 mm hook. At the beginning leave the long end of the thread. Make 2 loops. Put the end of the thread on the hook, then grab the working thread and pull it through two loops on the hook. Crochet 4 more loops in the same way. Sew antennas to the head.
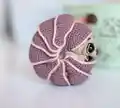
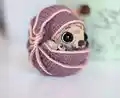
β€” OUTER ARMOR (Yarn B) :

Info :

The outer armor consists of 8 parts and is crocheted along rows.

Detail 1, Row 1 :

6 loops, turning, 5sc (starting from the 2nd loop from the hook) (5l)

Row 2 :

1 loop, turning, 5sc (5l)

Row 3 :

1 loop, turning, sc, {sc3tog}, sc (3l)

Row 4-6 :

1 loop, turning, 3sc (3l)

Row 7 :

1 loop, turning, inc, sc, inc (5l)

Row 8 :

1 loop, turning, 5sc (5l)

Row 9 :

1 loop, turning, inc, 3sc, inc (7l)

Row 10-27 :

1 loop, turning, 7sc (7l)

Row 28 :

1 loop, turning, dec, 3sc, dec (5l)

Row 29 :

1 loop, turning, 5sc (5l)

Row 30 :

1 loop, turning, dec, sc, dec (3l)

Row 31-33 :

1 loop, turning, 3sc (3l)

Row 34 :

1 loop, turning, sc, 3sc in the next loop, sc (5l)

Row 35-36 :

1 loop, turning, 5sc (5l)

Info :

To get a beautiful line when changing color in the next round crochet part of the sc in this way - half of the sc with brown thread, and the other half with pink (Yarn B + Yarn C). Crochet the detail around the perimeter in a counter-clockwise direction from the point Start.

Round 37 :

36sc down, 5sc straight, [4sc, dec]x3, [dec, 4sc]x3 up, 5sc straight, sl st in 1st sc (Yarn Π’ + Yarn Π‘) (76l)

Details 2-8, Row 1 :

8 loops, turning, 7sc (starting from the 2nd loop from the hook) (7l)

Row 2 :

1 loop, turning, 7sc (7l)

Row 3 :

1 loop, turning, 2sc, {sc3tog}, 2sc (5l)

Row 4-6 :

1 loop, turning, 5sc (5l)

Row 7 :

1 loop, turning, inc, 3sc, inc (7l)

Row 8 :

1 loop, turning, 7sc (7l)

Row 9 :

1 loop, turning, inc, 5sc, inc (9l)

Row 10-27 :

1 loop, turning, 9sc (9l)

Row 28 :

1 loop, turning, dec, 5sc, dec (7l)

Row 29 :

1 loop, turning, 7sc (7l)

Row 30 :

1 loop, turning, dec, 3sc, dec (5l)

Row 31-33 :

1 loop, turning, 5sc (5l)

Row 34 :

1 loop, turning, 2sc, 3sc in the next loop, 2sc (7l)

Row 35-36 :

1 loop, turning, 7sc (7l)

Info :

To get a beautiful line when changing color in the next round crochet part of the sc in this way - half of the sc with brown thread, and the other half with pink (Yarn B + Yarn C). Crochet the detail around the perimeter in a counter-clockwise direction from the point Start.

Round 37 :

36sc down, 3sc straight, next attach detail 1 on top and crochet 1sc of detail 1 together with 1sc of detail 2, 3sc straight, [4sc, dec]x3, [dec, 4sc]x3 up, 3sc straight, next attach detail 1 on top and crochet 1sc of detail 1 together with 1sc of detail 2, 3sc straight, sl st in 1st sc (Yarn Π’ + Yarn Π‘) (80l)

Info :

Important! When connecting the details, it is necessary to ensure that the line with decreases on the previous detail is on the left side. Details 3-8 are crocheted and joined in the same way as detail 2.

Assembly Instructions

  • Attach the four legs to the body using threaded bracing technique with round-nosed pliers to pull the needle through easily.
  • Position front legs between rounds 9 and 10 of the body with approximately 15 stitches distance between them.
  • Place back legs 8 stitches lower than the front legs, maintaining proper spacing for balance.
  • Insert needles for cutting through attachment points first, then remove legs without removing needles to mark positions accurately.
  • Thread needle through two loops on inner surface of each leg with needle for cutting in the middle for secure attachment.
  • Sew body and legs together two more times in the same pattern for extra strength and durability.
  • Place completed Tuk Tuk inside the assembled outer armor shell and adjust the armor pieces so they fold and unfold properly around the body.

Important Notes

  • πŸ’‘Use stitch markers or pins to mark the beginning of each round, especially critical for the head and armor connection points
  • πŸ’‘Maintain consistent tension throughout all eight outer armor pieces to ensure they align and connect properly when assembled
  • πŸ’‘Follow the color-change technique instructions carefully for clean transitions between yarn colors, particularly where inner and outer armor meet
  • πŸ’‘Do not overstuff the body as this will prevent the outer armor from closing smoothly around Tuk Tuk
  • πŸ’‘When using threaded bracing for legs, make sure to sew through the body multiple times for strength and stability
  • πŸ’‘Keep the embroidery floss divided as instructed for delicate facial features and spot details on the legs
  • πŸ’‘Watch the referenced video tutorials for color changes and French knots to achieve the cleanest results

This enchanting Tuk Tuk armadillo pattern brings Disney magic to life with its innovative removable armor design that actually folds and unfolds! Perfect for advanced crocheters looking for a rewarding challenge, this pattern combines intricate construction techniques with adorable character details. The result is an interactive amigurumi that's both a cuddly companion and an impressive display piece. Whether you're a Disney fan or simply love unique amigurumi projects, creating this charming rolling friend will fill you with pride and joy. 🧢 Happy crocheting! 🎭✨

You ask,

we answer.

FAQs

Can I use different yarn brands than the ones specified in the pattern?

Absolutely! You can use any sport weight yarn, but make sure to adjust your hook size accordingly to achieve the right tension. The key is ensuring your stitches are tight enough that the stuffing doesn't show through. Test with a small swatch first to find the perfect hook size for your chosen yarn.

How do I make sure the outer armor pieces connect properly?

The most important tip is maintaining consistent tension across all eight armor segments. When joining pieces, ensure the decrease line on the previous detail is always on the left side as you attach the next piece. Pin the pieces together first before crocheting them to visualize the fit, and refer to the pattern photos frequently.

What is threaded bracing and why is it necessary for the legs?

Threaded bracing is a technique where you thread a needle completely through the body and both legs, creating a secure connection that distributes weight evenly. It's essential for this pattern because regular sewing wouldn't be strong enough to support the legs and allow Tuk Tuk to stand properly, especially with the armor adding extra weight.

My armor won't fold or close properly around the body. What am I doing wrong?

This usually happens when the body is overstuffed or the armor pieces aren't aligned correctly. Make sure you stuff the body firmly but not tightly, and double-check that all eight armor segments are the same size with consistent stitch counts. The armor should fit snugly but with enough flexibility to fold and unfold smoothly.

How difficult is the embroidery work for the face and leg spots?

The embroidery adds wonderful character details but requires patience and practice. The pattern includes detailed photo references for the loose stitch technique around the eyes and the French knots on the legs. If you're new to embroidery on amigurumi, practice on a test swatch first. You can also simplify by using safety eyes without embroidery and painting the leg spots with fabric paint instead.