🧶 Beautiful ✨ Detailed 💝 Adorable

Keychain Cow Amigurumi Pattern

Keychain Cow Amigurumi Pattern
4.6★ Rating
2-3 Hours Time Needed
4.0K Made This
✂️

Beginner Friendly Level

Perfect for those just starting their sewing journey, with clear instructions and simple techniques

⏱️

Bite-Sized Project

Complete in under 2 hours—quick, fun, and perfect for a little creative escape.

🐄

Pocket Pal

A mini friend to carry anywhere, providing comfort and companionship in a perfectly portable size.

About This Keychain Cow Amigurumi Pattern

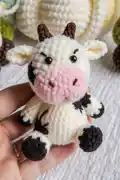
This keychain cow pattern is designed to be beginner-friendly while creating an absolutely adorable result. Using soft chenille yarn, you'll craft a miniature bovine friend with distinctive color-changing techniques that create realistic spotted markings. The pattern includes complete instructions for the head, body, ears, horns, limbs, and nose, with clear row-by-row guidance. The finished cow measures perfectly for keychain size, making it an ideal quick project for gift-giving or personal accessories.

Keychain Cow Amigurumi Pattern crochet pattern - detailed view of completed project

Working with safety eyes and simple decrease techniques, this pattern teaches fundamental amigurumi skills while creating something truly special. The color changes throughout give this cow character and personality, making each finished piece uniquely charming.

Why You'll Love This Keychain Cow Amigurumi Pattern

I absolutely love this pattern because it's incredibly satisfying to complete in just a few hours, yet the result looks so professional and adorable! The way the spotted pattern emerges as you work through the color changes feels magical, and there's something so rewarding about creating such a recognizable farm animal in miniature form. I find that working with chenille yarn adds an extra soft, huggable quality that makes these little cows irresistible. Plus, they make the most thoughtful gifts—everyone lights up when they receive a handmade keychain cow! The pattern is straightforward enough that I can work on it while watching TV, yet engaging enough to keep me interested throughout the entire process.

Keychain Cow Amigurumi Pattern step 1 - construction progress Keychain Cow Amigurumi Pattern step 2 - assembly progress Keychain Cow Amigurumi Pattern step 3 - details and accessories Keychain Cow Amigurumi Pattern step 4 - final assembly and finishing

Switch Things Up

I love experimenting with different color combinations for these adorable cow keychains! While the classic brown and white spotted pattern is timeless, I've discovered that creating cows in unexpected colors brings such delightful personality to each piece. Try making a pastel pink and cream cow for a kawaii aesthetic, or go bold with black and white Holstein-style markings for that traditional dairy farm look.

You could even create a whole rainbow herd by making cows in different color families—imagine lavender and white, mint green and cream, or even metallic gold and white for something truly special. I've also experimented with adding tiny accessories like miniature bells around their necks using embroidery thread, or creating little flower crowns with tiny crocheted blooms for a whimsical garden party vibe.

Another fun variation I enjoy is adjusting the size by using different yarn weights and hook sizes. A thinner yarn with a 2mm hook creates tiny micro-cows perfect for earrings, while bulkier chenille with a 5mm hook makes a larger plushie-style companion. The pattern is wonderfully adaptable, so don't be afraid to make it your own and create cows that reflect your personal style or match specific gift recipients' favorite colors!

Common Mistakes & How to Fix Them

✗ Not changing yarn colors at the correct rows can disrupt the cow's spotted pattern—always check which color to use before starting each row ✗ Stuffing too firmly can distort the cow's shape and make it difficult to close the final rounds properly—use moderate stuffing for best results ✗ Forgetting to position safety eyes before closing the head makes installation impossible later—place eyes at row 6 as instructed before stuffing ✗ Skipping the slip stitch to join rounds on the body creates an uneven seam—always join rounds with slip stitches as indicated in the pattern

Keychain Cow Amigurumi Pattern

Create your own adorable miniature cow keychain with this charming crochet pattern! This delightful project combines soft chenille yarn in classic cow colors to craft a sweet companion that's perfect for bags, keys, or as a thoughtful handmade gift. The pattern includes detailed instructions for crafting a complete cow with distinctive spotted markings, cute ears, tiny horns, and all the lovable features that make these farm friends so endearing. Whether you're looking to add personality to your everyday accessories or create heartfelt gifts for animal lovers, this pocket-sized cow will bring smiles wherever it goes.

Beginner Friendly 2-3 Hours

Materials Needed for Keychain Cow Amigurumi Pattern

— Main Fabric

  • 01
    100g Soft Chenille Yarn in Brown and Black colors
  • 02
    100g Soft Chenille Yarn in Pink and White colors

— Tools Required

  • 01
    Crochet hook size 3.5mm
  • 02
    Stitch markers
  • 03
    Sewing needle
  • 04
    Scissors
  • 05
    Plastic safety eyes 8mm
  • 06
    Hot glue gun
  • 07
    Fiberfill stuffing

Progress Tracker

0% Complete

— HEAD:

Info:

Begin with White Yarn and change the yarn color according to the font color

Row 1:

8 SC in an MR (8)

Row 2:

8 INC (16)

Row 3:

(SC, INC) 6 times, (SC, INC) 2 times (24)

Row 4:

18 SC, 6SC (24)

Row 5:

19 SC, 4 SC, SC (24)

Row 6:

24 SC (24)

Row 7:

8 SC, 3 SC, 13 SC (24)

Row 8:

(2 SC, DEC) 2 times, 2 SC, DEC, (2 SC, DEC) 3 times (18)

Row 9:

(SC, DEC) 6 times (12)

Info:

Stuffing - Cut the yarn, leaving a long tail for sewing

— BODY:

Row 1:

Make chain 4, start in second chain from the hook. Working on both sides of a chain (working on a foundation chain), 2 SC, 3SC in one st, SC, INC (8)

Row 2:

INC, SC, 3 INC, SC, 2 INC (14)

Row 3:

SC, INC, SC, (SC, INC) 3 times, 2 SC, INC, SC, INC (20)

Row 4:

16 SC, 4 SC (20)

Row 5-6:

20 SC (20)

Row 7:

8 SC, DEC, SC, 2 SC, 5 SC, DEC (18)

Row 8:

(SC, DEC) 3 times, SC, DEC, (SC, DEC) 2 times (12)

Info:

Stuffing - Cut the yarn - Join the rounds with a slip stitch

— EARS (Make 2):

Row 1:

6 SC into MR (6)

Row 2:

6 INC (12)

Info:

Cut the yarn, leaving a long tail for sewing

— HORNS (Make 2):

Row 1:

6 SC into MR, slst (6)

— HANDS (Make 2):

Info:

Begin with black yarn

Row 1:

6 SC into MR (6)

Info:

Change to white yarn

Row 2:

6 SC (6)

Row 3:

(SC, DEC) 2 times (4)

Info:

Cut the yarn, leaving a long tail for sewing

— LEGS (Make 2):

Info:

Begin with black yarn

Row 1:

8 SC into MR (8)

Info:

Change to white yarn

Row 2-3:

8 SC (8)

Row 4:

4 DEC (4)

Info:

Cut the yarn, leaving a long tail for sewing

— NOSE:

Row 1:

Make chain 4, start in the second chain from the hook, 3 SC, (3 SC), 2 SC, INC (10)

Row 2:

INC, 2 SC, 3 INC, 2 SC, 2 INC (16)

Row 3:

16 SC (16)

Info:

Cut the yarn, leaving a long tail for sewing

— EYE PLACEMENT:

Info:

Use eye size 8mm and attach to row 6

Assembly Instructions

  • Attach the head to the body by sewing them together securely, ensuring the spotted pattern aligns properly for a natural look
  • Position and sew the nose onto the front of the head at the appropriate location to create the cow's distinctive facial features
  • Attach the horns to the top of the head, spacing them evenly on either side for a balanced appearance
  • Sew the ears onto the sides of the head, positioning them slightly below the horns for authentic cow proportions
  • Attach the hands to the upper sides of the body where they naturally fall for the keychain design
  • Sew the legs to the bottom of the body, ensuring they're positioned to allow the keychain to hang properly
  • Add a keychain ring or attachment to the top of the head or body depending on your preferred hanging orientation

Important Notes

  • 💡Use stitch markers to track your position when working with color changes throughout the spotted pattern
  • 💡The font color mentioned in the pattern indicates which yarn color to use for each section
  • 💡Stuff the head and body moderately—overstuffing can distort the cow's shape and make assembly difficult
  • 💡Insert safety eyes at row 6 before closing and stuffing the head completely for easiest installation
  • 💡Leave long tails when finishing each piece to make sewing assembly much easier and more secure
  • 💡Chenille yarn can be delicate, so avoid pulling stitches too tightly to prevent yarn splitting

This charming keychain cow pattern brings farmyard sweetness to your everyday accessories! Designed with beginners in mind, it combines simple techniques with clever color changes to create those adorable spotted markings that make cows so recognizable and lovable. The soft chenille yarn gives these mini companions an irresistibly huggable texture, while the compact size makes them perfect for bags, keys, or gift-giving. Whether you're crafting for yourself or creating handmade presents for animal lovers, this quick and satisfying project delivers maximum cuteness in minimal time. 🐄🧶✨

You ask,

we answer.

FAQs

What does it mean when the pattern says to change yarn color according to the font color?

The pattern indicates color changes by showing instructions in different colored text. When you see text in a different color in the original pattern, that's your cue to switch to that corresponding yarn color for those specific stitches.

Can I use regular yarn instead of chenille yarn for this pattern?

Yes, you can substitute regular acrylic or cotton yarn, but your finished cow will have a different texture. Chenille yarn creates an extra soft, plush feel, while regular yarn will give you a more traditional amigurumi texture. Just maintain the same hook size for proper gauge.

How do I attach the keychain hardware to my finished cow?

You can attach a keychain ring or lobster clasp to the top of the head or body. The easiest method is to sew it on during assembly using the yarn tail, or you can use a small jump ring inserted through the stitches at the top of the piece.

What size will my finished cow keychain be?

Using the specified 3.5mm hook and chenille yarn, your finished cow will be approximately 2-3 inches tall, making it the perfect pocket-sized companion for keychains, bag charms, or zipper pulls.

Do I need to know how to do color changes before starting this pattern?

Basic color changing skills are helpful but not essential. The pattern involves switching colors at the end of rows, which is a beginner-friendly technique. Simply drop the old color and pick up the new color, carrying the unused yarn along the inside as you work.