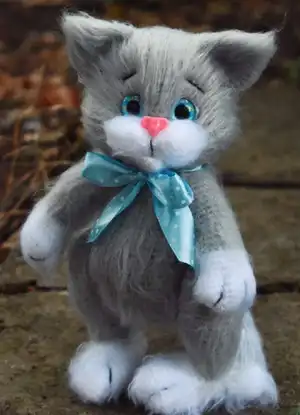
Create your very own adorable Tishka the Cat with this detailed amigurumi crochet pattern! This charming grey and white kitten features realistic proportions, movable limbs with plastic joints, and beautifully sculpted facial features including glass eyes and an embroidered muzzle. Perfect for intermediate crocheters looking to expand their amigurumi skills, this pattern includes comprehensive instructions for creating a fully articulated cat plushie complete with striped tail, detailed paws, and sweet little ears. Whether you're crafting a special gift for a cat lover or adding to your handmade toy collection, Tishka will steal hearts with her lifelike charm and cuddly personality.
Progress Tracker
0% Complete
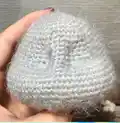
— Head :
Round 1 :
Start 6 sc in a mr (6)
Round 3 :
(1 sc, inc) x 6 (18)
Round 4 :
(2 sc, inc) x 6 (24)
Round 5 :
(3 sc, inc) x 6 (30)
Round 6 :
(4 sc, inc) x 6 (36)
Round 7 :
(5 sc, inc) x 6 (42)
Round 10 :
(6 sc, inc) x 6 (48)
Round 13 :
(7 sc, inc) x 6 (54)
Round 16 :
16 sc, 8 inc, 6 sc, 8 inc, 16 sc (70)
Round 22 :
16 sc, (1 sc, dec) x 6, 2 sc, (1 sc, dec) x 6, 16 sc (58)
Info :
Align marker by the middle of back side!
Round 25 :
2 sc, (7 sc, dec) x 6, 2 sc (52)
Round 26 :
2 sc, (6 sc, dec) x 6, 2 sc (46)
Round 27 :
2 sc, (5 sc, dec) x 6, 2 sc (40)
Round 28 :
(6 sc, dec) x 5 (35)
Round 29 :
(5 sc, dec) x 5 (30) - stuff tight
Round 30 :
(4 sc, dec) x 5 (25) - insert plastic joint
Round 31 :
(3 sc, dec) x 5 (20)
Round 32 :
(2 sc, dec) x 5 (15)
Round 33 :
(1 sc, dec) x 5 (10)
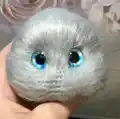
Info :
Video for muzzle sculpting: https://drive.google.com/file/d/1wWcWe4GofKsjePI-TIzR42hRDVhRj13W/view?usp=drivesdk
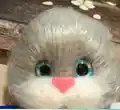
— Muzzle :
Info :
White color - Make 2 pieces
Round 1 :
Start 6 sc in a mr (6)
Round 3 :
(1 sc, inc) x 6 (18)
Info :
Connect 2 parts with sl st and crochet 36 sc (do not crochet sc into sl st)
— Lip :
Round 1 :
Start 5 sc in a mr
Info :
Do not join a circle, turn the item, ch
Round 2 :
1 sc, 3 inc, 1 sc
— Ears :
Round 1 :
Start 6 sc in a mr (6)
Round 5 :
(1 sc, inc) x 6 (18)
Round 8 :
(2 sc, inc) x 6 (24)
— Body :
Round 1 :
Start 6 sc in a mr (6)
Round 3 :
(1 sc, inc) x 6 (18)
Round 4 :
(2 sc, inc) x 6 (24)
Round 5 :
(3 sc, inc) x 6 (30)
Round 6 :
(4 sc, inc) x 6 (36)
Round 14 :
(5 sc, inc) x 6 (42)
Round 16 :
(6 sc, inc) x 6 (48)
Round 18 :
16 sc, (1 sc, inc) x 8, 16 sc (56) - inc are placed in front, it is belly
Round 26 :
(5 sc, dec) x 8 (48)
Round 31 :
(6 sc, dec) x 6 (42)
Round 32 :
(5 sc, dec) x 6 (36)
Round 33 :
(4 sc, dec) x 6 (30)
Round 34 :
(3 sc, dec) x 6 (24)
Round 35 :
(2 sc, dec) x 6 (18) - stuff
Round 36 :
(1 sc, dec) x 6 (12)
Infos :
Crochet body from top to bottom. Lock plastic joint in the 7th row. Marker is placed in the middle of back side!
— Tail :
Info :
Crochet tail alternating grey and white colors: 4 rows grey color, 2 rows white. Start with white color
Round 1 :
Start 7 sc in a mr (7)
Round 5 :
(6 sc, inc) x 2 (16)
Info :
Attach grey yarn and alternate colors now
Round 7-32 :
16 sc - stuff tail a little
Round 33 :
Put together and crochet 8 sc grabbing loops of both sides
— Front Paws :
Round 1 :
Start 6 sc in a mr (6)
Round 3 :
(1 sc, inc) x 6 (18)
Round 4 :
(2 sc, inc) x 6 (24)
Round 7 :
(dec, 1 sc) x 4, 12 sc (20)
Round 9 :
1 sc, 4 dec, 11 sc (16)
Round 10 :
16 sc - change color to grey
Round 26 :
(2 sc, dec) x 4 (12)
Info :
Embroider black stripes on paws to imitate fingers. Sew arms using thread jointing
— Back Paws :
Info :
White color - Make 2
Round 1 :
Start 7 sc in a mr (7)
Round 3 :
(1 sc, inc) x 7 (21)
Round 13 :
(5 sc, dec) x 3 (18)
Round 16 :
(4 sc, dec) x 3 (15) - stuff a little
Round 17 :
(1 sc, dec) x 5 (10)
Info :
Crochet on top of foot 14 sc, on the 16th row of white foot. Start working in back (right) if you look from back to front, crochet clock-wise. Crochet 5 sc horizontally, 2 sc vertically, 5 sc horizontally, 2 sc vertically again. You get 14 sc now
Round 6 :
7 sc, 5 inc, 2 sc (19) - inc are in front, this is a knee
Round 8 :
7 sc, (1 sc, inc) x 5, 2 sc (24) - inc are in front, this is a knee
Round 9-18 :
24 sc - stuff
Round 19 :
(6 sc, dec) x 3 (21)
Round 20 :
(1 sc, dec) x 7 (14) - stuff, do not stuff tight top part
Info :
Sew legs using thread jointing. Do not sew them too high
This charming Tishka the Cat pattern combines intermediate amigurumi techniques with professional toy-making methods to create a truly special handmade companion. The articulated limbs, realistic facial features, and careful attention to feline proportions make this pattern stand out from basic amigurumi designs. Whether you're creating a cherished gift or expanding your crochet skills, Tishka offers a rewarding challenge that results in a beautiful, poseable cat with personality and charm. The striped tail and embroidered details add those perfect finishing touches that transform yarn into a work of art! 🧶🐱✨