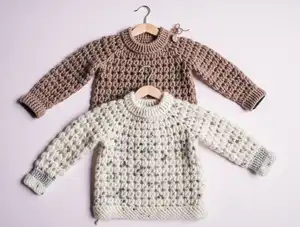
Create a stunning textured sweater with a knit-like appearance perfect for babies and children! This beautiful side-to-side construction pattern features alternating half double crochet and slip stitch ribbing that creates gorgeous vertical texture resembling fisherman-style knit ribbing. The sweater includes thoughtful details like button plackets on the shoulder for easy dressing, yarn over slip stitch ribbing at cuffs and neckline, and side slits at the hem for added style. With comprehensive video tutorials and eight sizes from newborn to tween, you'll craft a cozy, professional-looking sweater that grows with your little one. The pattern guides you through shaping techniques, short rows for sleeves, and seaming methods to achieve a polished, store-bought finish.
Progress Tracker
0% Complete
— Front Panel - Right Shoulder Shaping
Foundation Chain:
Ch (54, 60, 62, 66), (78, 86, 90, 96). Place marker in (6, 6, 8, 8), (8, 10, 10, 10)th ch from edge indicating beginning of ribbing.
Row 1:
Sl st in second ch from hook, [hdc in next ch, sl st in next ch] repeat to marker. Work yo sl st in ea of last (6, 6, 8, 8), (8, 10, 10, 10) ch. Turn.
Row 2:
Ch 1, yo sl st in blo of next (6, 6, 8, 8), (8, 10, 10, 10) sts, [sl st in blo of next st, hdc in blo of next st], repeat to last st, sl st in blo of last st. Turn.
Row 3:
Ch 1, [sl st in blo, hdc in blo of next st] repeat to one st before marker, sl st in blo of next st. Work yo sl st in blo of ea of last (6, 6, 8, 8), (8, 10, 10, 10) sts. Turn.
Row 5:
Ch 2, hdc in 2nd ch from hook, [sl st in blo of next st, hdc in blo of next st] repeat to one st before marker, sl st in blo of next st. Work yo sl st in blo of ea of last (6, 6, 8, 8), (8, 10, 10, 10) sts. Turn. 1 st increased.
Row 6:
Ch 1, yo sl st in blo of next (6, 6, 8, 8), (8, 10, 10, 10) sts, sl st in blo of next st, [hdc in blo of next st, sl st in blo of next st] repeat to last st, hdc in blo of last st. Turn.
Row 7:
Ch 1, hdc in 1st st, [sl st in blo, hdc in blo] repeat to one st before marker, sl st in blo of next st. Work yo sl st in blo of ea of last (6, 6, 8, 8), (8, 10, 10, 10) sts. Turn.
Row 9:
Ch 2, sl st in second ch from hook, [hdc in blo of next st, sl st in blo of next st] repeat to marker. Work yo sl st in blo of ea of last (6, 6, 8, 8), (8, 10, 10, 10) sts. Turn. 1 st increased.
Rows 10-27:
Continue pattern as written, repeating increase rows every 4 rows until (11, 17, 19, 21), (23, 25, 25, 27) rows total completed for shoulder.
— Front Panel - Neckline Shaping
Neckline Decreases Row 1:
Ch 1, yo sl st in blo of next (6, 6, 8, 8), (8, 10, 10, 10) sts, sl st in blo of next st, [hdc in blo of next st, sl st in blo of next st] repeat to last 8 sts. Leave these 8 sts unworked. Turn. 8 sts decreased.
Neckline Decreases Row 2:
Ch 1, [sl st in blo of next st, hdc in blo of next st] repeat to one st before marker, sl st in blo of next st. Work yo sl st in blo of ea of last (6, 6, 8, 8), (8, 10, 10, 10) sts. Turn.
Neckline Decreases Row 3:
Ch 1, yo sl st in blo of next (6, 6, 8, 8), (8, 10, 10, 10) sts, sl st in blo of next st, [hdc in blo of next st, sl st in blo of next st] repeat to last 2 sts. Leave these 2 sts unworked. Turn. 2 sts decreased.
Neckline Flat Section:
Work (10, 10, 12, 14), (14, 14, 16, 20) rows without increases or decreases, alternating between established pattern rows.
Neckline Increases Row 1:
Ch 3, sl st in second ch from hook, hdc in next ch, [sl st in blo of next st, hdc in blo of next st] repeat to one st before marker, sl st in blo of next st. Work yo sl st in blo of ea of last (6, 6, 8, 8), (8, 10, 10, 10) sts. Turn. 2 sts increased.
Neckline Increases Row 2:
Continue in pattern.
Neckline Increases Row 3 (without button opening):
Ch 9, starting with second ch from hook [sl st, hdc in next ch] repeat 4 times, {sl st in blo of next st, hdc in blo of next st} repeat to one st before marker, sl st in blo of next st. Work yo sl st in blo of ea of last (6, 6, 8, 8), (8, 10, 10, 10) sts. Turn. 8 sts increased.
Neckline Increases Row 3 (with button opening):
Ch 7, starting with second ch from hook [sl st, hdc in next ch] repeat 3 times, {sl st in blo of next st, hdc in blo of next st} repeat to one st before marker, sl st in blo of next st. Work yo sl st in blo of ea of last (6, 6, 8, 8), (8, 10, 10, 10) sts. Turn. 6 sts increased.
— Front Panel - Left Shoulder Shaping
Info:
Complete (10, 16, 18, 20), (22, 24, 24, 26) rows for left shoulder with decreases every 4 rows.
Row 1:
Ch 1, yo sl st in blo of next (6, 6, 8, 8), (8, 10, 10, 10) sts, sl st in blo of next st, [hdc in blo of next st, sl st in blo of next st] repeat to end. Turn.
Row 5:
Ch 1, yo sl st in blo of next (6, 6, 8, 8), (8, 10, 10, 10) sts, sl st in blo of next st, [hdc in blo of next st, sl st in blo of next st] repeat to last 2 sts, hdc in blo of next st. Leave last st unworked. Turn. 1 st decreased.
Remaining Rows:
Continue alternating between pattern rows and decrease rows until left shoulder is complete. Compare both shoulders for equal width. Fasten off leaving long tail for seaming.
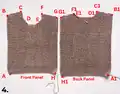
— Back Panel
Info:
Back panel is worked same as front with longer ribbing (additional 4 sts), less deep neckline, and if making button opening, left shoulder is worked first.
Foundation Chain (without button opening):
Ch (58, 64, 66, 70), (82, 90, 94, 100). Place marker in (10, 10, 12, 12), (12, 14, 14, 14)th ch.
Foundation Chain (with button opening):
Ch (56, 62, 64, 68), (80, 88, 92, 98). Place marker in (10, 10, 12, 12), (12, 14, 14, 14)th ch.
Left Shoulder:
Work same as Front Panel Right Shoulder for (11, 17, 19, 21), (23, 25, 25, 27) rows with (10, 10, 12, 12), (12, 14, 14, 14) sts ribbing.
Neckline Decreases Row 1 (without button opening):
Ch 1, yo sl st in blo of next (10, 10, 12, 12), (12, 14, 14, 14) sts, sl st in blo of next st, [hdc in blo of next st, sl st in blo of next st] repeat to last 2 sts. Leave unworked. Turn. 2 sts decreased.
Neckline Decreases Row 1 (with button opening):
Ch 1, yo sl st in blo of next (10, 10, 12, 12), (12, 14, 14, 14) sts, sl st in blo of next st, [hdc in blo of next st, sl st in blo of next st] repeat to end. Turn.
Neckline Decreases Row 3:
Ch 1, yo sl st in blo of next (10, 10, 12, 12), (12, 14, 14, 14) sts, sl st in blo of next st, [hdc in blo of next st, sl st in blo of next st] repeat to last 2 sts. Leave unworked. Turn. 2 sts decreased.
Neckline Flat Section:
Work (10, 10, 12, 14), (14, 14, 16, 20) rows without increases or decreases.
Neckline Increases:
Work 3 increase rows adding 2 sts, then 2 sts total 4 sts increased.
Right Shoulder:
Work (10, 16, 18, 20), (22, 24, 24, 26) rows with decreases same as Front Panel Left Shoulder. Fasten off leaving long tail.
— Sleeves (Make Two)
Info:
Leave yarn tail of (16, 17, 17, 18), (18, 19, 20, 21) inches / (39, 41, 41, 45), (45, 47, 51, 53) cm before starting for sewing sleeve to shoulder.
Foundation Chain:
Ch (32, 38, 44, 50), (52, 58, 66, 74).
Row 1:
Starting with second ch from hook, yo sl st in blo of next (6, 6, 8, 8), (8, 10, 10, 10) ch (place marker), [sl st in blo of next ch, hdc in blo of next ch] repeat to last ch, sl st in last ch. Turn.
Short Rows Section 1:
Work (7, 7, 9, 11), (11, 11, 13, 13) short rows gradually increasing stitches worked each row to shape sleeve cap.
Short Row 2:
Ch 1, [sl st in blo of next st, hdc in blo of next st] repeat (3, 3, 3, 3), (4, 4, 4, 4) times, sl st in blo of last st. Turn. (7, 7, 7, 7), (9, 9, 9, 9) sts worked.
Short Row 3:
Ch 1, [sl st in blo of first st, hdc in blo of next st] repeat (2, 2, 3, 3), (4, 4, 4, 4) times, sl st in blo of last st. Turn.
Short Row 4:
Ch 1, [sl st in blo of next st, hdc in blo of next st] repeat (3, 3, 3, 3), (4, 4, 4, 4) times, sl st in blo of last st of Row 3 and last worked st of Row 1. Start working into Row 1 base: [hdc in blo of next st, sl st in blo of next st] (3, 3, 3, 3), (3, 3, 3, 4) times. Turn. (6, 6, 6, 6), (6, 6, 6, 8) sts increased.
Continue Short Rows:
Work remaining short rows following pattern until all (7, 7, 9, 11), (11, 11, 13, 13) short rows completed.
Full Rows Section:
Work (26, 28, 28, 32), (32, 36, 38, 40) full rows alternating pattern rows.
Full Row 1:
Ch 1, [sl st in blo of next st, hdc in blo of next st] repeat to last st of previous short row, sl st in blo of last st and last worked st of Row 1. Work into foundation row: [hdc in blo of next st, sl st in blo of next st] to marker. Work yo sl st in blo of next (6, 6, 8, 8), (8, 10, 10, 10) sts. Turn.
Full Row 2:
Ch 1, yo sl st in blo of next (6, 6, 8, 8), (8, 10, 10, 10) sts, sl st in blo of next st, [hdc in blo of next st, sl st in blo of next st] repeat to end. Turn.
Full Row 3:
Ch 1, [sl st in blo of next st, hdc in blo of next st] repeat to one st before marker, sl st in blo of next st. Work yo sl st in blo of next (6, 6, 8, 8), (8, 10, 10, 10) sts. Turn.
Alternate Rows:
Continue alternating Rows 2 and 3 for total of (26, 28, 28, 32), (32, 36, 38, 40) rows in this section.
Short Rows Section 2:
Work (7, 7, 9, 11), (11, 11, 13, 13) short rows to shape opposite side of sleeve cap symmetrically.
Short Row 1:
Ch 1, [sl st in blo of next st, hdc in blo of next st] repeat (9, 12, 13, 17), (18, 19, 23, 26) times, sl st in blo of next st. (19, 25, 27, 35), (37, 39, 47, 53) sts worked, leave remaining sts unworked. Turn.
Continue Short Rows:
Work remaining short rows gradually decreasing stitches worked until all short rows completed.
Final Full Row:
Ch 1, [sl st in blo of next st, hdc in blo of next st] repeat to last st of short row, sl st in blo of this last st and blo of last worked st of base row. Continue working across connecting all short rows, then work pattern to marker. Work yo sl st in blo of ea of next (6, 6, 8, 8), (8, 10, 10, 10) sts. Fasten off leaving long tail.
— Assembly - Connecting Shoulders
Info:
Lay front and back panels flat with right side facing up and V stitches facing up. Flip front panel on top of back like closing a book.
Right Shoulder Seam:
Using tapestry needle and long yarn tail, sew right shoulders together using mattress stitch. Align vertical ribs of front and back panels.
Info:
If not making button opening, connect left shoulder same way. If making button opening, complete button bands first.
— Button Band (Left Shoulder)
Info:
With right side facing, attach yarn to top right outer edge of shoulder on Front Panel.
Row 1:
Ch 1, yo sl st in ea vertical rib of shoulder edge, plus one extra st at end. (12, 18, 20, 22), (24, 26, 26, 28) sts total. Turn.
Rows 2-6:
Ch 1, yo sl st in blo of every st. Turn. Fasten off after Row 6.
— Buttonhole Band
Rows 1-3:
Work same as button band Rows 1-3.
Row 4 (Make Buttonholes):
Ch 1, yo sl st in blo of next (3, 5, 5, 6), (6, 7, 7, 8) sts, ch (2, 2, 3, 3), (3, 3, 3, 3), sk (2, 2, 3, 3), (3, 3, 3, 3) sts, yo sl st in blo of next (3, 5, 5, 5), (6, 7, 7, 7) sts, ch (2, 2, 3, 3), (3, 3, 3, 3), sk (2, 2, 3, 3), (3, 3, 3, 3) sts, yo sl st in blo of next (2, 4, 4, 5), (6, 6, 6, 7) sts. Turn.
Rows 5-6:
Ch 1, yo sl st in blo of every st (count ch spaces as sts). Turn. Fasten off after Row 6. Do not break yarn.
— Neckline Ribbing (With Button Opening)
Foundation:
With working yarn from buttonhole band, ch (5, 5, 6, 6), (6, 7, 7, 7). Turn.
Row 1:
Starting with second ch from hook, yo sl st in next (3, 3, 4, 4), (4, 5, 5, 5) ch, yo sl st in blo of last st of ribbing and st of neckline, sl st into next st of neckline. Turn.
Row 2:
Ch 1, yo sl st in blo of 3rd st from hook, yo sl st in blo of next (3, 3, 4, 4), (4, 5, 5, 5) sts. Turn.
Row 3 (Buttonhole):
Ch 1, yo sl st in next (1, 1, 1, 1), (1, 2, 2, 2) st(s), ch (2, 2, 3, 3), (3, 3, 3, 3), sk (2, 2, 3, 3), (3, 3, 3, 3), yo sl st in blo of last st of ribbing and st of neckline, sl st into next st of neckline. Turn.
Rows 4 & 5:
Alternate between Row 2 and Row 5 pattern until neckline circumference covered. Fasten off.
— Neckline Ribbing (Without Button Opening)
Info:
Join yarn at mid back or side with wrong side facing.
Foundation:
Ch (5, 5, 6, 6), (6, 7, 7, 7). Turn.
Continue:
Work Rows 1, 2, and 5 alternating until neckline circumference covered. Connect both ends with row of yo sl st. Fasten off.
— Attaching Sleeves
Info:
Lay front and back flat. Align sleeves with V-stitches of ribbing directed upwards for all pieces. Right side facing up.
Alignment:
Align middle of top edge of each sleeve with shoulder seam. If button opening, ensure buttonhole band is on top of button band on right side. Distance between armhole edges should measure approximately (8¾, 9½, 10¼, 11¾), (11¾, 12½, 14¼, 15) inches / (22, 24, 26, 30), (30, 32, 36, 38) cm.
Sewing:
With long yarn tail threaded in tapestry needle, connect sleeves to body using mattress stitch. Pick up back loops only or base chains to keep integrity of rib columns. Stretch top edge of sleeve slightly when attaching.
— Connecting Sides and Sleeve Seams
Info:
Fold sweater with wrong side facing. Sides will be connected with crochet hook working same stitches as sweater body. Bottom ribbing sides are NOT connected for side slits.
Side Seam:
Join yarn at beginning of bottom ribbing. Work row alternating between sl st and hdc. Insert hook into both loops of last st of front panel ribbing edge, then into both loops of last st on back panel ribbing edge. Work sl st. Continue alternating sl st and hdc using edges of both panels as base stitches from bottom to underarm. Fasten off.
Sleeve Seam:
Join yarn at cuff. Connect cuff ribbing sides with yo sl st using back loop of yo sl st on one edge and base chain on other edge. Then connect both edges of sleeve following same alternating sl st/hdc pattern from cuff to armpit. Work additional sl sts if needed to close any holes at armpit. Fasten off.
Repeat:
Connect second side and sleeve same way.
— Finishing
Weaving Ends:
Weave in all ends on wrong side of garment.
Buttons:
For sweater with button opening, attach 3 buttons to shoulder button band.
Blocking:
Wet-block finished garment for best results and professional finish.
This beautiful Textured Ribbed Sweater pattern brings together the best of crochet and knitting aesthetics! The side-to-side construction creates mesmerizing vertical ribbing that resembles high-end hand-knitted fisherman sweaters, while the thoughtful design details like shoulder button plackets and yarn over slip stitch ribbing add professional polish. With eight sizes covering newborns through tweens and comprehensive video tutorials guiding every technique, you'll master advanced shaping methods including short rows and strategic increases that elevate your crochet skills. The reversible stitch pattern means no wrong side to hide, and the finished sweater becomes a treasured handmade heirloom that combines vintage charm with modern wearability. 🧶 Happy crocheting! 🧵✨