🧢 Beautiful ✨ Detailed πŸ’ Adorable

Spiral Raccoon Hat Crochet Pattern

Spiral Raccoon Hat Crochet Pattern
3.9β˜… Rating
2-3 Hours Time Needed
1.4K Made This
βœ‚οΈ

Beginner Friendly Level

Perfect for those just starting their sewing journey, with clear instructions and simple techniques

⏱️

Bite-Sized Project

Complete in under 2 hoursβ€”quick, fun, and perfect for a little creative escape.

🧣

Snug Essential

Everyday comfort with practical charm, designed for both functionality and style through changing seasons.

About This Spiral Raccoon Hat Crochet Pattern

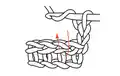
The Spiral Raccoon Hat is a delightful project that introduces you to the art of spiral crochet construction. Working in continuous rounds without joining creates a seamless, smooth finish that's both visually appealing and comfortable to wear. The pattern uses the unique technique of working into the horizontal bar below each stitch, creating beautiful texture and structure. With sizing options from toddler to adult, this versatile design makes it easy to create matching hats for the whole family using soft, chunky yarn that works up quickly.

Spiral Raccoon Hat Crochet Pattern crochet pattern - detailed view of completed project

Perfect for beginner crocheters ready to expand their skills, this pattern teaches spiral construction while creating a practical, wearable accessory. The chunky yarn and simple stitches mean you'll have a finished hat in just a few hours of enjoyable crafting time.

Why You'll Love This Spiral Raccoon Hat Crochet Pattern

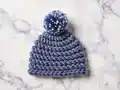
I absolutely love this spiral hat pattern because it's one of those rare projects that looks impressive but is surprisingly simple to make! The continuous spiral technique means no fiddly seaming or joining, just smooth, meditative rounds that grow into a cozy hat before your eyes. I find the repetitive nature incredibly relaxing, and there's something magical about watching the spiral shape emerge as you work. Plus, the pompom on top adds that perfect playful touch that makes everyone smile. It's become my go-to gift pattern because I can whip one up in an evening while watching TV, and recipients always think I spent days on it. The fact that it works for all ages means I can make matching sets for families, which creates such sweet photo opportunities!

Spiral Raccoon Hat Crochet Pattern step 1 - construction progress Spiral Raccoon Hat Crochet Pattern step 2 - assembly progress Spiral Raccoon Hat Crochet Pattern step 3 - details and accessories Spiral Raccoon Hat Crochet Pattern step 4 - final assembly and finishing

Switch Things Up

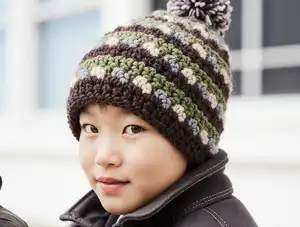
I love customizing this spiral hat pattern to match different styles and personalities! For a woodland theme, try working the hat in earthy browns and grays, then add not just one pompom but multiple smaller ones around the brim for a playful, berry-like effect.

You can easily transform this into a character hat by choosing bold colors - imagine it in bright red with a white pompom for a holiday gnome look, or in pastel rainbow stripes for a unicorn-inspired design. I've also experimented with adding simple embroidered details like small flowers or stars once the hat is complete.

For texture variation, consider working some rounds in a contrasting color to create stripes, or switch to single crochet for a few rounds to add subtle pattern interest. The spiral construction actually makes color changes incredibly easy since there's no seam to hide them behind.

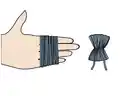
If you want to skip the pompom, try adding other embellishments like a crocheted flower, a fabric bow, or even small animal ears sewn to the sides. I've made versions with bear ears that kids absolutely adore!

For a more grown-up version, work the entire hat in a sophisticated single color and add a faux fur pompom for that luxe boutique look. The possibilities are truly endless with this versatile base pattern!

Common Mistakes & How to Fix Them

βœ— Working too tightly in the beginning rounds can make the crown of the hat pointy instead of nicely roundedβ€”keep your tension relaxed for better shaping βœ— Forgetting to move the stitch marker at the end of each round leads to confusion and misshapen spirals, so make this marker-moving a habit with every round βœ— Not understanding the horizontal bar technique correctly results in working into the wrong loops, which affects the textureβ€”study the diagram carefully before starting βœ— Stopping too early or working too many rounds creates hats that don't fit properly, so measure frequently against the head circumference you're working for

Spiral Raccoon Hat Crochet Pattern

Create this adorable spiral raccoon hat that's perfect for keeping little heads warm in style! This easy-to-follow pattern guides you through making a cozy hat featuring a unique spiral construction technique and topped with a fluffy pompom. Suitable for children and adults alike, this charming design works up quickly using chunky yarn and creates a playful accessory that brings woodland charm to any cold-weather outfit. Whether you're crafting for your own family or making heartfelt gifts, this spiral hat pattern delivers both comfort and cuteness in every stitch.

Beginner Friendly 2-3 Hours

Materials Needed for Spiral Raccoon Hat Crochet Pattern

β€” Main Fabric

  • 01
    Bernat Softee Chunky yarn in Dad's Scarf Ombre (29044) - 1-2 balls depending on size
  • 02
    Alternative: Bernat Softee Chunky in Grey Heather (28046) or Faded Denim (28114) - 1-2 balls depending on size
  • 03
    Any chunky weight yarn that achieves the correct gauge can be substituted

β€” Tools Required

  • 01
    Size U.S. L/11 (8mm) crochet hook
  • 02
    Stitch marker
  • 03
    Yarn needle for weaving in ends
  • 04
    Scissors
  • 05
    Measuring tape

Progress Tracker

0% Complete

β€” Notes :

Note 1 :

When working in rounds, the RS of work will be facing you, however you will be working into stitches on the WS

Note 2 :

Rounds are worked in a spiral. Do not join at end of rounds

Note 3 :

Place marker on first stitch at end of each round and move marker each round

β€” Starting Chain :

Foundation :

Ch 3

β€” Hat Construction :

Round 1 (RS) :

6 hdc in 3rd ch from hook

Round 2 :

Work 2 hdc in horizontal bar created below stitch in previous row (bar is below loops normally worked on WS). Rep from * around. 12 hdc

Round 3 :

Work 2 hdc in horizontal bar in next st. Rep from * around. 24 hdc

Round 4 :

Work 2 hdc in horizontal bar in next st. Work 1 hdc in horizontal bar in next st. Rep from * around. 36 hdc

Round 5 :

Work 2 hdc in horizontal bar in next st. Work 1 hdc in horizontal bar in each next 5 sts. Rep from * around. 42 hdc

β€” Sizes 6/8, 10/12 and Adult only :

Round 6 :

Work 2 hdc in horizontal bar in next st. Work 1 hdc in horizontal bar in each of next 6 sts. Rep from * around. 48 hdc

β€” Sizes 10/12 and Adult only :

Round 7 :

Work 2 hdc in horizontal bar in next st. Work 1 hdc in horizontal bar in each of next 23 sts. Rep from * once more. 50 sts

β€” All Sizes :

Next Round :

Work 1 hdc in horizontal bar in each st around. 42 (48-50-50) hdc

Info :

Rep last round until work from beg measures 6Β½ (7Β½-8Β½-9) inches or 16.5 (19-21.5-23) cm

Final Round :

Work 1 hdc in horizontal bar in each of next 3 sts. Sl st in horizontal bar in each of next 2 sts. Fasten off

Assembly Instructions

  • Weave in all yarn ends securely using a yarn needle, hiding them on the inside of the hat.
  • To make the pompom, wind yarn around 4 fingers approximately 80 times for a full, fluffy pompom.
  • Remove the wound yarn carefully from your fingers and tie it very tightly in the center with a separate strand of yarn.
  • Cut through each side of the loops to create the pompom strands.
  • Trim the pompom to create a smooth, round shape, cutting gradually to achieve the desired size.
  • Attach the pompom securely to the top center of the hat using the tie strands, weaving them through the top stitches and knotting firmly on the inside.

Important Notes

  • πŸ’‘The horizontal bar technique is crucial for this pattern - refer to the diagram showing where to insert your hook
  • πŸ’‘Gauge is important for proper fit: 8 sc and 9 rows should equal 4 inches in your yarn
  • πŸ’‘The spiral construction means you won't have a visible seam, but you must move your marker consistently
  • πŸ’‘Size adjustments are built into the pattern - follow only the instructions for your chosen size after the initial rounds
  • πŸ’‘Chunky yarn works up quickly but also shows tension inconsistencies, so maintain even stitches throughout
  • πŸ’‘The pompom can be made larger or smaller by adjusting how many times you wrap the yarn around your fingers

This charming Spiral Raccoon Hat pattern combines clever construction techniques with cozy style to create a hat that's both fun to make and wonderful to wear. The spiral method eliminates seaming while creating beautiful texture, and the playful pompom adds personality to every stitch. Perfect for gift-giving or keeping your own family warm, this pattern proves that simple stitches and thoughtful design create truly special results. 🧢 Happy crocheting! 🦝✨

You ask,

we answer.

FAQs

What does it mean to work into the horizontal bar?

The horizontal bar is a loop that appears below each stitch on the wrong side of your work. Instead of working into the typical top two loops, you insert your hook under this horizontal bar. The pattern includes a diagram to help you identify exactly where to place your hook for this unique technique.

How do I keep track of rounds when working in a spiral?

Use a stitch marker placed in the first stitch of each round. As you complete each round and reach the marker, move it to the new first stitch. This helps you track your progress without the confusion that can come from working continuously without joining.

Can I use a different yarn weight for this pattern?

While the pattern is designed for chunky weight yarn, you can substitute other weights by adjusting your hook size to match the gauge. However, you'll need to recalculate the number of rounds and increases to achieve the correct measurements. It's best to stick with chunky yarn if you're new to pattern modifications.

How do I know which size to make?

Measure the head circumference of the person who will wear the hat. Size 2/4 fits approximately 18-19 inches, 6/8 fits 19-20 inches, 10/12 fits 20-21 inches, and Adult fits 21-23 inches. Choose the size closest to your measurement, and remember the hat will have some stretch.

My hat is coming out pointy instead of rounded. What am I doing wrong?

This usually happens when working too tightly in the early increase rounds. Try using a slightly larger hook for the first few rounds, or consciously relax your tension. The increases should create a gently curved dome shape, not a steep cone.